How to Use a RAM Disk as a Scratch Disk for Video Editing
Video and photo editing programs rely heavily on a scratch disk — a fast storage location where they write cache files, previews, and temporary render data. If that scratch disk is a slow hard drive, your previews lag, scrubbing stutters, and renders crawl. A RAM disk solves this by turning part of your memory into an ultra-fast virtual drive, so the editor writes cache data at memory speed instead of waiting on a mechanical disk.
This guide explains why a RAM disk is such a good fit for editing work, how much memory to allocate, how to create the disk with Qiling Disk Master, and how to point Adobe Premiere Pro, Photoshop, After Effects, and DaVinci Resolve at it. It also covers the limitations you should keep in mind before you commit.
PAGE CONTENT
- Why Editing Needs a Fast Scratch Disk
- What a RAM Disk Does for Video and Photo Editing
- Step 1: Size the RAM Disk for Your Footage
- Step 2: Create the RAM Disk with Qiling Disk Master
- Step 3: Point Premiere Pro and Photoshop at the RAM Disk
- Step 4: After Effects and DaVinci Resolve
- Best Practices and Limitations + FAQs
- Back Up Windows Before You Change Settings
Why Editing Needs a Fast Scratch Disk
Editing software is constantly reading and writing temporary data. When you scrub through a timeline, the program writes preview frames to disk. When you apply effects, it renders cached versions so playback stays smooth. When you edit a large photo with many layers, Photoshop spills data to a scratch disk as memory fills up.
All of this data moves through the scratch disk. If that disk is slow, the editor waits on it, and you feel it as lag:
- Preview rendering — slow writes mean previews take longer to appear.
- Timeline scrubbing — stutter when the cache cannot keep up.
- Exports and renders — the encoder waits on disk instead of the CPU or GPU.
- Photoshop operations — large files and many layers cause heavy scratch usage.
The faster the scratch disk, the smoother the entire edit.
What a RAM Disk Does for Video and Photo Editing
A RAM disk is the fastest scratch disk you can have. Because it lives in memory, its read and write speeds are many times higher than an SSD, and its latency is near zero.
Benefits for editors:
- Lightning-fast previews — cache files are written and read at memory speed.
- Smooth scrubbing — the editor rarely waits on disk.
- Faster renders — temporary render files move quickly.
- Less SSD wear — heavy cache writes go to RAM instead of your SSD.
- Clean state — cache and scratch files are wiped on reboot, so stale data never slows you down.
The catch is capacity: a RAM disk is limited by your spare memory, and its contents disappear on shutdown. For scratch and cache data, that is a good thing, but it means you should never store your project files or footage on the RAM disk.
Step 1: Size the RAM Disk for Your Footage
The right size depends on your footage and your total RAM. Larger caches hold more preview data, but you must leave enough memory for the editor itself.
- 16 GB RAM — use a 2-4 GB RAM disk for photo work; skip it for heavy video editing.
- 32 GB RAM — use a 4-8 GB RAM disk for 1080p and light 4K editing.
- 64 GB RAM or more — use an 8-32 GB RAM disk for 4K and 8K footage and large Photoshop files.
As a rule, leave at least half your RAM free for Windows and the editing application. Editing software already uses a lot of memory, and starving it will slow you down more than a small scratch disk would.
Step 2: Create the RAM Disk with Qiling Disk Master
Qiling Disk Master creates a RAM disk in a few clicks. Follow these steps.
Step 1. Download and install Qiling Disk Master. The free edition includes the RAM disk feature.
Step 2. Open the Tools and Utilities page. In the main window, look for the tools section.
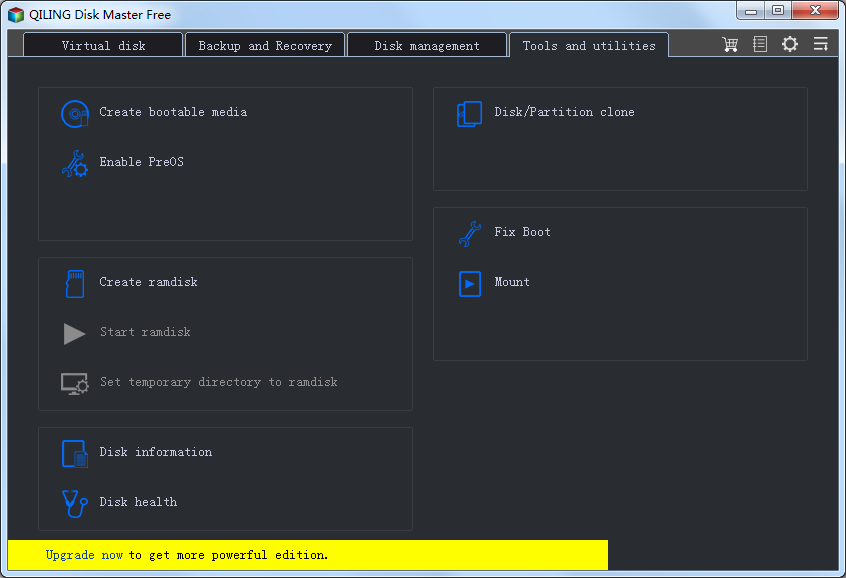
Step 3. Click "Create ramdisk". The configuration dialog opens.
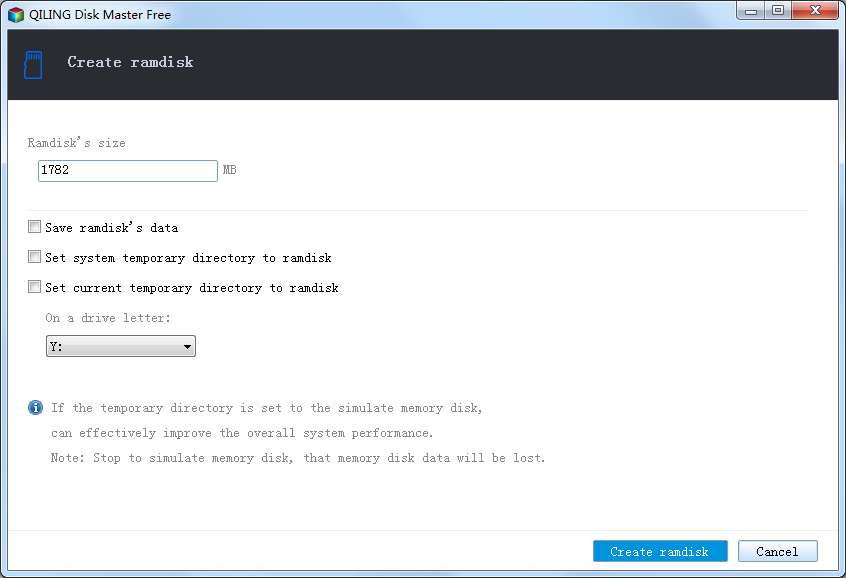
Step 4. Set the size and drive letter. For editing, allocate the size you chose in Step 1 and pick a drive letter such as R:. Choose NTFS so large cache files are supported, and enable auto-mount at startup so the disk is ready every time you edit.
Step 5. Click the Create ramdisk button. The RAM disk appears in File Explorer.
Step 6. Create scratch folders. On the RAM disk, create folders such as R:\Scratch, R:\Cache, and R:\Previews to keep each application's data separate.
For a full walkthrough, see How to Create a RAM Disk in Windows 11.
Step 3: Point Premiere Pro and Photoshop at the RAM Disk
Once the RAM disk exists, tell each editor to use it as a scratch or cache location. Menu names may differ slightly by version, but the paths below are the common ones.
Adobe Premiere Pro — Scratch Disks
Step 1. Open your project. Go to File > Project Settings > Scratch Disks.
Step 2. For each category — Captured Video, Captured Audio, Video Previews, Audio Previews — click Browse and select a folder on your RAM disk, such as R:\Scratch.
Step 3. For the media cache, go to Edit > Preferences > Media Cache and set the Media Cache Files location to R:\Cache.
Step 4. Click OK. Premiere Pro now writes previews and cache data to the RAM disk.
Adobe Photoshop — Scratch Disks
Step 1. Go to Edit > Preferences > Scratch Disks.
Step 2. Enable the checkbox next to your RAM disk so Photoshop can use it as primary scratch space.
Step 3. Use the arrows to move the RAM disk to the top of the list, making it the first-choice scratch disk.
Step 4. Click OK and restart Photoshop for the change to take effect.
Step 4: After Effects and DaVinci Resolve
Adobe After Effects — Disk Cache
Step 1. Go to Edit > Preferences > Media & Disk Cache.
Step 2. Under Disk Cache, uncheck Enable Disk Cache, then set the folder to R:\Cache and re-enable it, or click Choose Folder and select your RAM disk folder.
Step 3. Set the maximum disk cache size appropriately for your RAM disk size, then click OK.
DaVinci Resolve — Working Folders
Step 1. Open Preferences and go to System > Media Storage. Add your RAM disk so Resolve can see it.
Step 2. Open your project and go to Project Settings > Master Settings > Working Folders.
Step 3. Set Cache Files Location to a folder on your RAM disk, such as R:\Cache.
Step 4. Click Save. Resolve now writes its cache and optimized media to the RAM disk.
- Note
- Exact menu names vary between versions. If you cannot find a setting, search the application's preferences for "scratch" or "cache" to locate it.
Best Practices and Limitations + FAQs
Follow these tips to get the most from a RAM disk scratch setup.
- Keep projects off the RAM disk. Store projects and footage on a real drive; only cache and scratch go to RAM.
- Match cache size to disk size. Set each app's cache limit below your RAM disk size so it never fills up and crashes.
- Prepare for the reboot wipe. Cache is cleared on shutdown, so the first render after a reboot takes a little longer.
- Add a startup script. Recreate the scratch folders at login so apps always find them.
Is a RAM disk worth it for video editing?
Yes, for small and medium projects on a machine with plenty of RAM. It speeds up previews, scrubbing, and cache writes. For very large 8K projects, dedicated NVMe scratch storage may be more practical because it is persistent and can be much larger.
How much RAM should I leave free?
Leave at least half of your total RAM for Windows and the editing app. Editors are memory-hungry, and a starved app is slower than one with a smaller scratch disk.
Will I lose my renders if the PC restarts?
Rendered previews and cache are lost, but your project and footage are safe on your real drives. The editor simply rebuilds the cache next time.
Can I use the RAM disk for media files?
You can, but it is not recommended. Media files are large and should persist, so keep them on an SSD or HDD and use the RAM disk only for scratch and cache.
Back Up Windows Before You Change Settings
A RAM disk is safe to create, but a backup protects your system if you also change application settings or storage configuration. Qiling Disk Master creates a full Windows image you can restore from if anything goes wrong.
Part 1: Create a Full System Backup
Step 1. Install and open Qiling Disk Master. On the home screen, open "Backup and Recovery" and choose "System Backup". This option automatically includes Windows and the hidden boot partitions, so you do not have to select them one by one.

Step 2. Check the source. The disk where Windows is installed and its system partitions are already ticked for you. If you only need your personal documents, run a separate "File Backup" task instead.

Step 3. Click the destination box and choose where the image should be saved. Use an external HDD or SSD, a NAS, or any drive other than the one Windows is installed on, and make sure it has enough free space.

Step 4. Review the task summary and click "Proceed". Wait until the progress bar reaches 100%. Do not unplug the drive or turn off the PC while the backup is running.

Part 2: Restore Windows from the Backup
Step 1. Open Qiling Disk Master again, go to "Backup and Recovery", and select the recovery option. Your backup images are listed, so pick the one you created before the changes began.

Step 2. Choose the target disk or partition. Normally you restore to the original system disk. If the drive was replaced, select the new disk instead, and the restore rebuilds Windows together with its boot partitions.

Step 3. Preview the restore plan, click "Proceed", and confirm the warning. The PC restarts to finish the job, and Windows comes back exactly as it was on the day the image was created, with your files and programs intact.

- Note
- Keep the backup image on a separate drive, and refresh it before changing application settings or storage configuration.
Conclusion
A RAM disk is one of the best upgrades you can give a video or photo editing workstation. By serving as an ultra-fast scratch disk, it speeds up previews, scrubbing, and cache writes while cutting wear on your SSD. Create a 4-32 GB RAM disk with Qiling Disk Master, make dedicated scratch and cache folders, then point Premiere Pro, Photoshop, After Effects, and DaVinci Resolve at it. Keep your projects and footage on a real drive, leave at least half your RAM free, and recreate the scratch folders at startup so the setup survives reboots. With these steps, editing feels noticeably smoother.
Protect your PC with Qiling Backup—create a system image before your next round of settings changes.
For more Windows 11 performance guides, see How to Create a RAM Disk in Windows 11, Move TEMP Folder to RAM Disk, Best RAM Disk Software for Windows 11, SSD Cache vs RAM Disk, and Windows 11 Fast Cache.
Related Articles
- Best RAM Disk Software for Windows 11 in 2026
- Windows 11 Guide: Features, Upgrade Tips and What to Know
- How to Use a RAM Disk as a Photoshop Scratch Disk on Windows 11
- How to Speed Up 3D Rendering with a RAM Disk and Disk Cache
- Lightroom Classic Cache: Where It Lives and How to Speed It Up
- Speed Up CAD Software with a RAM Disk and SSD Cache
Products
Articles & Tutorials
- Data Recovery
- Data Backup
- File Recovery
- File Backup
- System Backup and Restore
- Disk and Partition Clone
- Technical articles
- Mobile articles
- Disk Master Help
- Windows Data Recovery Tutorials
- Windows Secure Delete Tutorials
- Windows Partition Management Tutorials
- Windows File Backup and Restore Tutorials
- Windows System Backup and Restore Tutorials
- Windows Disk Backup and Restore Tutorials
- Windows Clone Tutorials