How to Speed Up 3D Rendering with a RAM Disk and Disk Cache
3D work is usually described as CPU or GPU bound, and for the actual rendering that is true. But around the render there is a surprising amount of disk activity: simulations baked to cache files, intermediate frames written to disk, textures and HDRIs loaded over and over, and temporary data from denoising and compositing. Those parts respond very well to faster storage, and a RAM disk plus a disk cache cover them at no cost to quality.
This guide separates the parts of a 3D workflow that belong in memory from the parts that belong in a cache, and shows how to configure both with Qiling tools on Windows 11.
PAGE CONTENT
- Where a 3D Workflow Touches the Disk
- What Belongs on a RAM Disk
- What Belongs on a Disk Cache
- Step 1: Create the RAM Disk and Point Your Tools at It
- Step 2: Cache the Drive That Holds Assets and Projects
- Sizing, Safety, and What Not to Put in Memory
- FAQs About 3D Rendering and Caching
- Back Up Windows Before You Change Settings
Where a 3D Workflow Touches the Disk
Four kinds of file activity dominate a 3D session:
- Simulation and bake caches. Cloth, hair, fluids, smoke, and particles are calculated once and stored as cache files, which are then read back on every playback and every frame of the render. These files are large and read constantly.
- Intermediate render output. Multi-frame renders write images to disk as they finish. Dozens or hundreds of files, written and then read again by the compositor or encoder.
- Asset libraries. Textures, HDRIs, models, and material libraries are opened at the start of every project, and often re-read when a scene is reloaded.
- Temporary data. Denoise scratch files, viewport caches, and temporary exports.
The first two are the interesting ones, because they are both large and disposable — exactly the profile that suits a RAM disk. The third is repetitive but must persist, which suits a cache.
What Belongs on a RAM Disk
- Simulation caches under construction. While you iterate on a simulation, the cache is rewritten repeatedly. Putting it in memory makes bake-and-scrub cycles far quicker.
- Intermediate render frames. If the frames are written to memory and then copied to the real drive, you avoid the constant read-modify-write of the drive.
- Denoise and compositing scratch. Temporary files that exist only while a frame is processed.
- The application's temporary files directory, which many 3D tools use for assorted internal work.
Every item on that list can be regenerated. That is the test: if losing it after a reboot costs you time, it belongs in memory; if it costs you work, it does not.
- Note
- Final render output should always be written to a real drive. The RAM disk is a staging area for temporary frames, not the destination for a finished shot.
What Belongs on a Disk Cache
Your asset library is the opposite case: it is large, it must persist, and it is read repeatedly. Caching the drive that holds it speeds up project loading, texture loading at render start, and viewport responsiveness — without moving or duplicating anything.
The same applies to project files themselves. Opening the same scene several times a day means reading the same files several times a day, which a cache turns into fast reads.
Step 1: Create the RAM Disk and Point Your Tools at It
Step 1. Download and install Qiling Disk Master. The free edition includes the RAM disk feature.
Step 2. Open the Tools and Utilities page and click Create ramdisk.
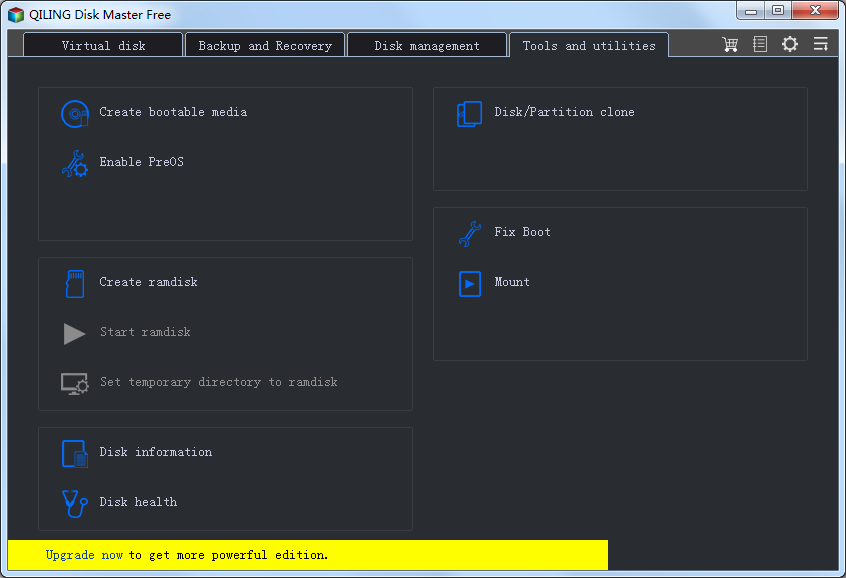
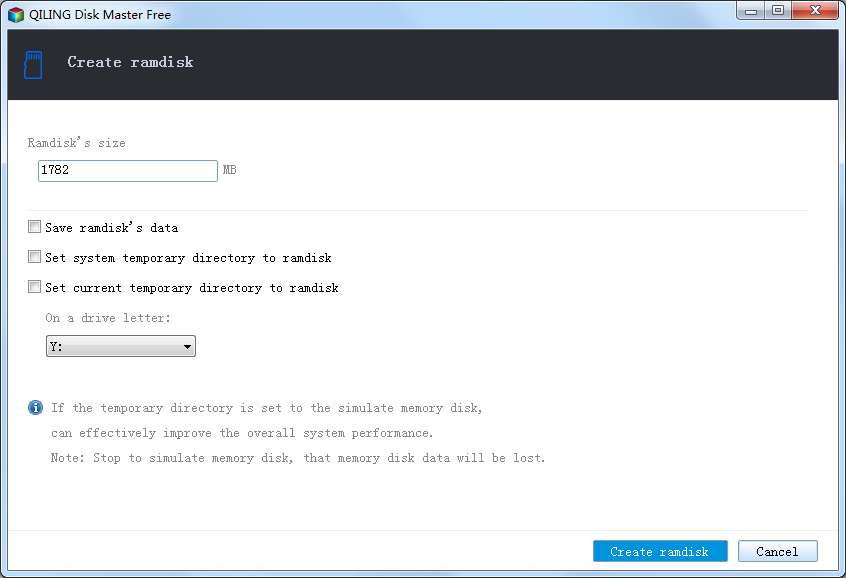
Step 3. Set the size, choose a free drive letter such as R:, select NTFS, enable mounting at startup, and click Create. Create folders such as R:\simcache, R:\render_tmp, and R:\temp.
Step 4. Point your software at those folders:
- Blender — set Edit > Preferences > File Paths > Temporary Files to R:\temp. For simulations, open the physics modifier's cache panel and set its cache directory to R:\simcache.
- Other DCC applications — look for a temporary files or scratch directory in preferences, and a separate cache path for simulations or baking.
- Render output — if you want frames staged in memory, set the output path to R:\render_tmp and copy or encode from there, keeping your final destination on a real drive.
Step 2: Cache the Drive That Holds Assets and Projects
Step 1. Download and install Qiling Fast Cache.
Step 2. Open the program, click the + button, and select the drive that holds your projects and asset library.

Step 3. Set a generous cache size — asset libraries and project files are large, so this is one case where a bigger SSD tier pays off. Add the SSD tier if you have a spare SSD, and click OK.

Step 4. Work normally for a few sessions. Scene loading and texture loading should feel quicker, and the hit rate tells you how much of the repeated reading is now served from fast storage.

Sizing, Safety, and What Not to Put in Memory
- Leave room for the application. 3D software is memory-hungry. On a 32 GB machine, a 4-8 GB RAM disk is a sensible ceiling; on a 16 GB machine, skip the RAM disk and use a cache instead.
- Never put the only copy of anything valuable in memory. Source files, final renders, and asset libraries all live on real drives.
- Copy render frames out promptly. If a render writes to the RAM disk, run a copy to your real drive as part of the job, or use a script that does it when the render finishes.
- Expect simulation caches to be rebuilt after a crash. That is the price of keeping them in memory, and it is usually much cheaper than the time saved while iterating.
- Measure the parts you can measure. Time scene loading, a simulation bake, and a short render before and after the changes rather than relying on impressions.
FAQs About 3D Rendering and Caching
Will a RAM disk make my renders finish faster?
Only where storage is the wait — for example simulation playback, frame writing, and denoise scratch. The ray tracing itself is limited by CPU or GPU, which no disk change affects.
Should I put the asset library on a RAM disk?
No. Libraries are large and must persist. Cache the drive that holds them so repeated reads are fast, and keep the RAM disk for disposable data.
Why does scrubbing a simulation get faster with a RAM disk?
Because playback re-reads the cached simulation data for every frame. Moving those reads into memory removes the drive from the loop.
What if my machine has only 16 GB of RAM?
Skip the RAM disk. Use a disk cache on the project drive, and let the application keep as much memory as possible — 3D tools use it well.
Can I cache an external drive that holds my assets?
Yes, an external SSD or HDD can be cached like any other local volume. See Use an SSD Cache for an External Drive.
Does this help video editing too?
Yes, the same logic applies to media caches and scratch disks, which are covered in RAM Disk for Video Editing.
Back Up Windows Before You Change Settings
Changing cache paths is safe, but a project machine holds work you cannot recreate. Qiling Disk Master creates a full Windows image you can restore from if anything goes wrong.
Part 1: Create a Full System Backup
Step 1. Install and open Qiling Disk Master. On the home screen, open "Backup and Recovery" and choose "System Backup". This option automatically includes Windows and the hidden boot partitions, so you do not have to select them one by one.

Step 2. Check the source. The disk where Windows is installed and its system partitions are already ticked for you. If you only need your personal documents, run a separate "File Backup" task instead.

Step 3. Click the destination box and choose where the image should be saved. Use an external HDD or SSD, a NAS, or any drive other than the one Windows is installed on, and make sure it has enough free space.

Step 4. Review the task summary and click "Proceed". Wait until the progress bar reaches 100%. Do not unplug the drive or turn off the PC while the backup is running.

Part 2: Restore Windows from the Backup
Step 1. Open Qiling Disk Master again, go to "Backup and Recovery", and select the recovery option. Your backup images are listed, so pick the one you created before the changes began.

Step 2. Choose the target disk or partition. Normally you restore to the original system disk. If the drive was replaced, select the new disk instead, and the restore rebuilds Windows together with its boot partitions.

Step 3. Preview the restore plan, click "Proceed", and confirm the warning. The PC restarts to finish the job, and Windows comes back exactly as it was on the day the image was created, with your files and programs intact.

- Note
- Keep the backup image on a separate drive, and refresh it before changing cache paths or storage settings.
Conclusion
In a 3D workflow, the disk matters around the render rather than inside it. Simulation caches, staging frames, and denoise scratch files are disposable and heavily rewritten, so they belong on a RAM disk created with Qiling Disk Master. Your asset library and project files are large and must persist, so leave them where they are and let Qiling Fast Cache accelerate the drive that holds them. Keep 16 GB machines out of the RAM disk game entirely, always copy finished frames to real storage, and measure scene loading and a simulation bake to confirm the gain.
Protect your PC with Qiling Backup—create a system image before your next round of settings changes.
For more Windows 11 performance guides, see RAM Disk for Video Editing, Use a RAM Disk as a Photoshop Scratch Disk, Windows 11 Fast Cache, Is a RAM Disk Worth It?, and How Big Should Your Cache Be?.
Related Articles
- RAM Disk for Video Editing: A Practical Guide
The same staging strategy applied to media caches. - How to Use a RAM Disk as a Photoshop Scratch Disk
Scratch-space guidance for the 2D side of a creative pipeline. - Is a RAM Disk Worth It? An Honest Look
- How Big Should Your Disk Cache Be?
- Windows 11 Fast Cache: Speed Up HDD with RAM and SSD Cache
- Speed Up CAD Software with a RAM Disk and SSD Cache
Products
Articles & Tutorials
- Data Recovery
- Data Backup
- File Recovery
- File Backup
- System Backup and Restore
- Disk and Partition Clone
- Technical articles
- Mobile articles
- Disk Master Help
- Windows Data Recovery Tutorials
- Windows Secure Delete Tutorials
- Windows Partition Management Tutorials
- Windows File Backup and Restore Tutorials
- Windows System Backup and Restore Tutorials
- Windows Disk Backup and Restore Tutorials
- Windows Clone Tutorials