How to Use a RAM Disk as a Photoshop Scratch Disk on Windows 11
Photoshop does not keep an open document entirely in memory. Once a file grows large, or once you build up lots of history states and layers, Photoshop starts spilling data to a scratch disk on your storage drive. If that drive is slow, every filter, history step, and save drags; if it fills up, Photoshop stops working until you free space. A RAM disk gives Photoshop a scratch disk that is faster than any SSD, and because it is wiped at shutdown, stale scratch files never pile up.
This guide explains how the scratch disk works, when a RAM disk is the right choice, how much memory to allocate, and how to create the RAM disk in Windows 11 with Qiling Disk Master and point Photoshop at it.
PAGE CONTENT
- What a Photoshop Scratch Disk Does
- Why a RAM Disk Makes a Great Scratch Disk
- How Much RAM and Scratch Space You Need
- Step 1: Create the RAM Disk with Qiling Disk Master
- Step 2: Set the RAM Disk as the Scratch Disk
- Step 3: Keep the Setup Healthy
- FAQs About Photoshop Scratch Disks
- Back Up Windows Before You Change Settings
What a Photoshop Scratch Disk Does
Photoshop uses two kinds of working space. The first is RAM, which is fast and holds the active parts of your document. The second is the scratch disk, a folder on a storage drive that Photoshop uses when RAM is not enough. History states, layer data, and the extra tiles Photoshop needs for filters and transformations all spill over to the scratch disk.
Two things follow from this:
- Speed matters. If the scratch disk is a mechanical hard drive, actions that need scratch space become slow, which shows up as laggy brushes, slow filter previews, and long history jumps.
- Free space matters. Photoshop needs plenty of free space on the scratch disk. When it runs out, you see the classic error about the scratch disks being full, and you cannot edit until you free space or change the scratch disk.
By default Photoshop uses the drive where Windows is installed. On a modern PC that is an SSD, which is why many users never notice the scratch disk at all — until they work with very large files.
Why a RAM Disk Makes a Great Scratch Disk
A RAM disk turns part of your system memory into a virtual drive. For scratch data, its properties line up almost perfectly with what Photoshop needs:
- Extreme speed — reads and writes happen at memory speed, with no seek time and almost no latency, so Photoshop spends less time waiting on storage.
- No SSD wear — scratch files are written and rewritten constantly during a session. Putting that traffic in RAM keeps it off your SSD.
- Automatic cleanup — scratch data is temporary by nature. Because a RAM disk empties at shutdown, you never have to clear it manually.
- Full disk speed all the time — unlike a cache that needs to warm up, a RAM disk is at full speed from the first write.
The trade-off is that RAM is volatile and limited. If you shut down or lose power, whatever is on the RAM disk is gone. For scratch data that is acceptable, but you should still save your documents to a real drive as you work.
- Note
- Never store the only copy of a PSD or RAW file on a RAM disk. Save to your normal drive and keep a backup, then let the RAM disk handle scratch data only.
How Much RAM and Scratch Space You Need
A RAM disk takes memory away from Photoshop itself, so sizing matters. Leave at least 8 GB for Windows and your applications, and use the rest of your spare memory for scratch:
| Total RAM | Suggested RAM disk | Notes |
|---|---|---|
| 16 GB | Not recommended | Photoshop needs most of this. Use a fast NVMe SSD as the scratch disk instead. |
| 32 GB | 4-8 GB | Works well for photo editing and moderate retouching. |
| 64 GB | 8-16 GB | Comfortable for large composites and heavy history use. |
| 128 GB or more | 16-32 GB | Plenty of room for very large files, 3D, and video tools that also use scratch space. |
Whatever you choose, keep a second scratch disk on a fast SSD. If the RAM disk ever fills, Photoshop can fall back to the SSD instead of stopping with an error.
Step 1: Create the RAM Disk with Qiling Disk Master
Qiling Disk Master includes a one-click RAM disk in its free edition. The drive is recreated automatically at startup, so it is ready whenever Photoshop opens.
Step 1. Download and install Qiling Disk Master, then launch it.
Step 2. In the main window, open the Tools and Utilities page.
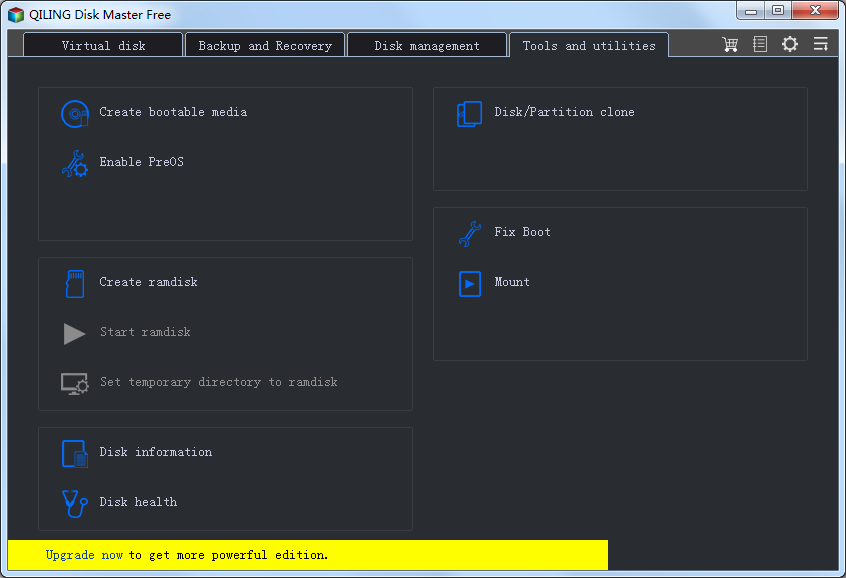
Step 3. Click Create ramdisk.
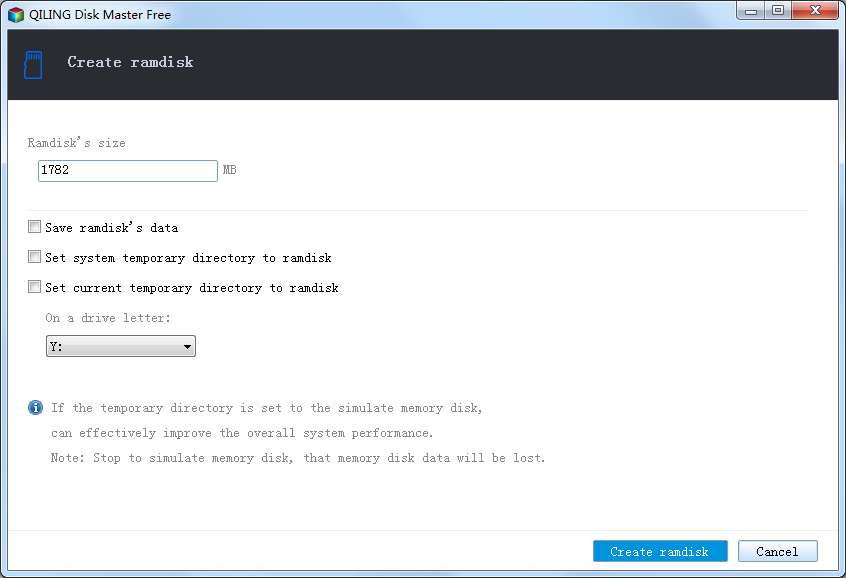
Step 4. Set the size according to the table above, choose a free drive letter such as R:, and select NTFS as the file system.
Step 5. Turn on automatic mounting at startup so the drive is present every time Windows boots, then click Create.
Step 6. Open File Explorer and confirm that the new drive appears with the size you set.
Step 2: Set the RAM Disk as the Scratch Disk
Step 1. Open Photoshop on Windows 11 and go to Edit > Preferences > Scratch Disks.
Step 2. Tick the checkbox next to your RAM disk drive letter, for example R:. If you also want a fallback, tick your system SSD as well.
Step 3. Use the arrow buttons to move the RAM disk to the top of the list, so Photoshop uses it first and only falls back to the SSD when it is full.
Step 4. Click OK and restart Photoshop. The change takes effect the next time the program starts.
Step 5. Optional: if you work with RAW files, go to Edit > Preferences > Camera Raw, open the performance or cache settings, and point the Camera Raw cache to the RAM disk as well for faster thumbnails and previews.
- Note
- Photoshop reports how much scratch space is in use in the status bar at the bottom of the document window. If the RAM disk fills regularly, increase its size or add the SSD as a second scratch disk.
Step 3: Keep the Setup Healthy
- Save often to a real drive. The RAM disk only holds working data, so save your PSD to your SSD or HDD and let your backup tool protect it.
- Keep a second scratch disk. A fast NVMe SSD as the fallback prevents the full-scratch-disk error during long sessions.
- Watch your free memory. If Windows starts using the page file heavily or apps feel sluggish, reduce the RAM disk size.
- Do not put the TEMP folder there if an installer needs persistence. Scratch use is fine, but some installers expect TEMP to survive a reboot.
- No spare RAM? Cache instead. If you have a spare SSD but little free memory, Qiling Fast Cache can accelerate the drive that holds your Photoshop files and scratch folder without taking memory away from the application.
FAQs About Photoshop Scratch Disks
Is a RAM disk safe as a Photoshop scratch disk?
Yes. Scratch data is temporary working data, not your saved file. A power failure loses unsaved edits, which would happen anyway, but it cannot damage your saved PSDs because they live on a real drive.
Does Photoshop use a scratch disk if I have 32 GB of RAM?
Only when a document and its history exceed the memory Photoshop is allowed to use. The RAM disk does not reduce that usage; it makes the spillover much faster when it happens.
Which is better, a RAM disk or a fast SSD for scratch?
A fast NVMe SSD is the safe general answer and works on any PC. A RAM disk is faster and avoids SSD writes, but it needs spare memory and is cleared at every reboot. If you have 32 GB or more, using both — RAM disk first, SSD second — gives the best of each.
Why did Photoshop say the scratch disks are full?
The scratch disk ran out of free space. Free up space, increase the RAM disk size, or add a second scratch disk on a drive with plenty of room, then restart Photoshop.
Can I use the RAM disk for Lightroom or Premiere too?
Yes. Lightroom Classic uses a Camera Raw cache that benefits from a fast location, and Premiere and other video editors have a media cache that can also be pointed at the RAM disk. The same sizing rules apply.
Will a RAM disk speed up every Photoshop action?
No. Actions that fit in RAM are already fast. The gain shows up in large documents, heavy history use, and operations that spill over to scratch, which is exactly when the scratch disk becomes the bottleneck.
Back Up Windows Before You Change Settings
Creating a RAM disk and changing Photoshop preferences is safe, but a backup protects your system and your artwork. Qiling Disk Master creates a full Windows image you can restore from if anything goes wrong.
Part 1: Create a Full System Backup
Step 1. Install and open Qiling Disk Master. On the home screen, open "Backup and Recovery" and choose "System Backup". This option automatically includes Windows and the hidden boot partitions, so you do not have to select them one by one.

Step 2. Check the source. The disk where Windows is installed and its system partitions are already ticked for you. If you only need your personal documents, run a separate "File Backup" task instead.

Step 3. Click the destination box and choose where the image should be saved. Use an external HDD or SSD, a NAS, or any drive other than the one Windows is installed on, and make sure it has enough free space.

Step 4. Review the task summary and click "Proceed". Wait until the progress bar reaches 100%. Do not unplug the drive or turn off the PC while the backup is running.

Part 2: Restore Windows from the Backup
Step 1. Open Qiling Disk Master again, go to "Backup and Recovery", and select the recovery option. Your backup images are listed, so pick the one you created before the changes began.

Step 2. Choose the target disk or partition. Normally you restore to the original system disk. If the drive was replaced, select the new disk instead, and the restore rebuilds Windows together with its boot partitions.

Step 3. Preview the restore plan, click "Proceed", and confirm the warning. The PC restarts to finish the job, and Windows comes back exactly as it was on the day the image was created, with your files and programs intact.

- Note
- Keep the backup image on a separate drive, and refresh it before making changes to Photoshop, storage, or cache settings.
Conclusion
A RAM disk is one of the best scratch disks you can give Photoshop on Windows 11. It is faster than any SSD, it keeps constant scratch writes off your SSD, and it clears itself at every reboot, so there is no cleanup to remember. Create the drive with Qiling Disk Master from the Tools and Utilities page, choose a size that leaves at least 8 GB of RAM for Windows, then set it as the first scratch disk in Edit > Preferences > Scratch Disks, with your system SSD as the fallback. Save your documents to a real drive as usual, and the RAM disk handles the rest. If you have little spare memory but a spare SSD, Qiling Fast Cache can accelerate the Photoshop drive instead.
Protect your PC with Qiling Backup—create a system image before your next round of settings changes.
For more Windows 11 performance guides, see How to Create a RAM Disk in Windows 11, RAM Disk for Video Editing, How to Use Extra RAM to Speed Up Your PC, Windows 11 Fast Cache, and Move the TEMP Folder to a RAM Disk.
Related Articles
- How to Create a RAM Disk in Windows 11: Step-by-Step Guide
Full walkthrough of the RAM disk feature, sizing advice, and the best uses. - RAM Disk for Video Editing: A Practical Guide
Apply the same scratch-disk idea to Premiere, DaVinci Resolve, and other editors. - How to Use Extra RAM (16GB/32GB) to Speed Up Your PC
- Best RAM Disk Software for Windows 11
- Lightroom Classic Cache: Where It Lives and How to Speed It Up
- Speed Up CAD Software with a RAM Disk and SSD Cache
Products
Articles & Tutorials
- Data Recovery
- Data Backup
- File Recovery
- File Backup
- System Backup and Restore
- Disk and Partition Clone
- Technical articles
- Mobile articles
- Disk Master Help
- Windows Data Recovery Tutorials
- Windows Secure Delete Tutorials
- Windows Partition Management Tutorials
- Windows File Backup and Restore Tutorials
- Windows System Backup and Restore Tutorials
- Windows Disk Backup and Restore Tutorials
- Windows Clone Tutorials