Speed Up CAD Software with a RAM Disk and SSD Cache
CAD work is not like editing a document. A single assembly can reference hundreds of part files, and every rotation, rebuild, or section view reads those files again. On a mechanical hard drive, that is where your working day disappears.
Two tools attack different parts of the problem. A RAM disk gives the software a very fast place to put scratch and temporary data, while a disk cache speeds up the project files you reopen every day. This guide explains what each one fixes, what it cannot fix, and how to set both up.
PAGE CONTENT
- Why CAD Software Feels Slow
- RAM Disk vs SSD Cache: Which Solves What
- Set Up a RAM Disk for CAD Scratch Files
- Cache the Drive That Holds Your Projects
- Settings That Actually Matter
- FAQs About Caching for CAD
- Back Up Windows Before You Change Settings
Why CAD Software Feels Slow
Design software is unusually demanding on storage because it works with many files at once and revisits them constantly:
- Assemblies reference other files. One assembly document can point to hundreds of individual part files. Opening it means opening all of them.
- Drawings re-read their models. Generating a drawing view pulls geometry from the referenced part again.
- Rebuilds repeat the work. Every rebuild re-resolves references, so the same reads happen over and over in a session.
- Undo history lives in memory - until it does not. When RAM runs short, CAD working sets spill to disk.
- Scratch and temporary files appear constantly. Rendering, simulation, drawing generation, and mesh export all stage data through temporary files.
- Autosave writes on a timer. It is valuable, but on a slow disk it interrupts you at the worst moment.
On a hard drive, thousands of small scattered reads are the worst possible pattern, and that is exactly what a part library produces. A cache and a RAM disk both reduce that traffic, but in different places.
RAM Disk vs SSD Cache: Which Solves What
Match the tool to the data, because they are not interchangeable:
- Scratch and temporary files - a RAM disk. Temp data is disposable, so volatile storage is safe, and memory is far faster than any SSD.
- Render and simulation staging - a RAM disk, provided it is large enough for the files. If the job is bigger than the disk, the software fails mid-run, so size it generously or leave this one alone.
- Part libraries and assemblies you reopen - an SSD cache. This data is permanent and often far larger than your memory, so it needs persistent storage.
- Program files and DLLs - an SSD cache. The same libraries are loaded at every launch, which makes them ideal cache material.
- Autosave files - neither. Keep autosave on real storage. Losing an autosave to a reboot defeats its purpose.
The summary: RAM disk for what you throw away, SSD cache for what you keep. Many CAD workstations end up using both.
Set Up a RAM Disk for CAD Scratch Files
A RAM disk is a drive that lives in memory. Everything on it disappears at shutdown, which makes it ideal for scratch data and dangerous for anything else.
Step 1. Check how much memory is actually free. Open Task Manager, look at the Performance tab, and note the available memory while CAD is running with a typical project open.
Step 2. Install Qiling Disk Master. The free edition includes the RAM disk feature.
Step 3. Open the Tools and Utilities page and click Create ramdisk.
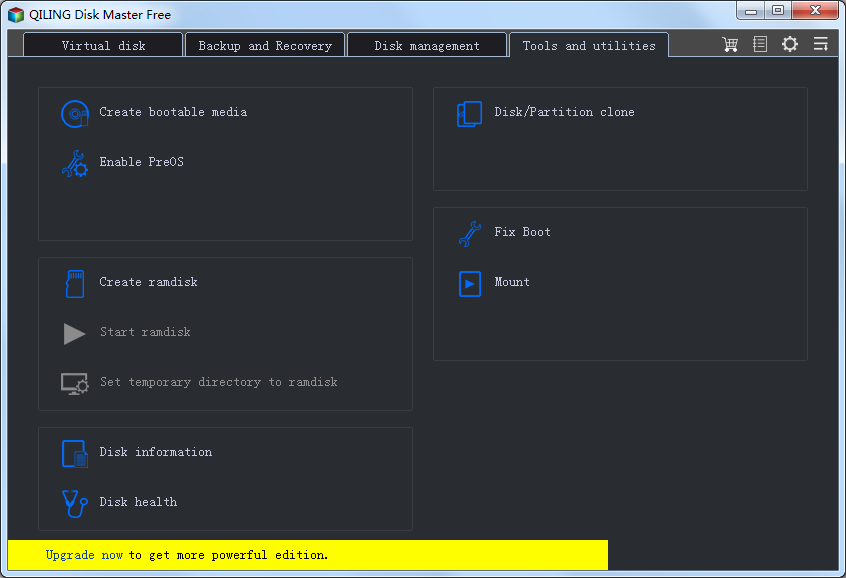
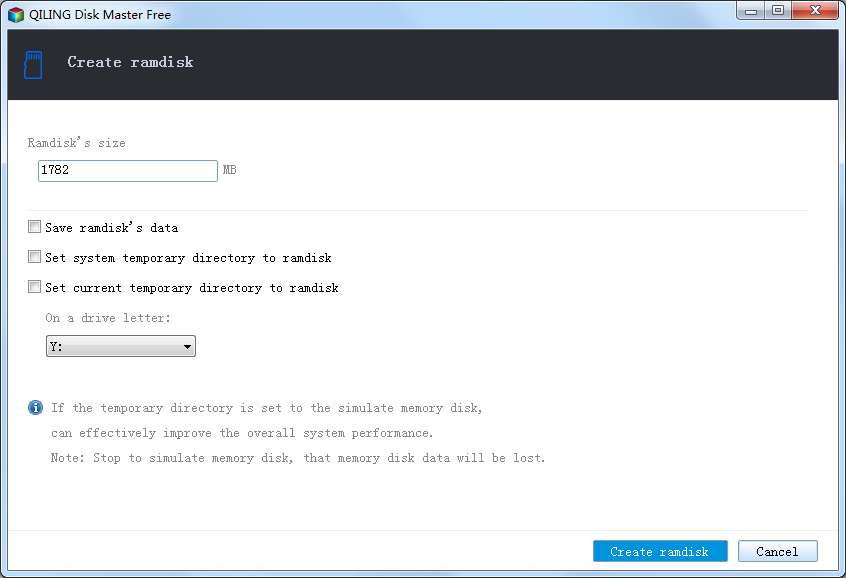
Step 4. Allocate no more than a quarter to a third of your available memory, choose a drive letter such as R:, select NTFS, and enable mounting at startup so the disk exists every time you log in.
Step 5. Point your CAD software's scratch and temporary folder at R:. Keep the size generous, because a scratch operation that runs out of space fails outright, and a failed render wastes more time than the memory saved.
Step 6. Test with one workload before moving more. If the job completes cleanly and the software feels no different, the RAM disk is not your bottleneck and you can simply delete it.
- Note
- Do not move autosave to the RAM disk, and do not disable the page file to free up memory for it. Both trade safety for a small gain.
Cache the Drive That Holds Your Projects
While the RAM disk handles disposable data, the cache handles the files you keep. Qiling Fast Cache keeps copies of the most-read blocks on RAM or an SSD, so reopening the same assemblies stops touching the hard drive.
Step 1. Download, install, and open Qiling Fast Cache. On first run the task list is empty.

Step 2. Click the "+" button to create a cache task, then select the drive that holds your part library and project files.
Step 3. Choose the cache medium and size. A small RAM tier accelerates the hottest blocks, and an SSD tier keeps the wider working set after a restart.

Step 4. Create the task and work normally for a few sessions. The hit rate climbs as the cache learns which assemblies and libraries you reopen.

Settings That Actually Matter
- Cache the project drive, not the archive drive. A cache only pays off on data you read repeatedly, so caching a drive of old deliverables gains nothing.
- Keep the part library on a local drive. Files on an SMB network share cannot be cached the same way, so a NAS-based library stays slow; see SSD cache for a NAS.
- Give the RAM disk a fixed, generous size. CAD temporary files spike during rendering and drawing generation rather than during normal modelling.
- Leave autosave on real storage. It exists to survive a crash, and a RAM disk cannot do that.
- Keep the page file enabled. CAD working sets are large, and removing the page file causes failures rather than speed. See why the page file should not go on a RAM disk.
- Confirm with numbers. Check the hit rate after a few days of normal work; if it stays low, the drive simply is not read often enough to benefit.
FAQs About Caching for CAD
Will a RAM disk speed up rendering in CAD?
Only the part that touches temporary files. Rendering itself is limited by the CPU or GPU, so a RAM disk shortens the file staging around a render rather than the render itself.
How much RAM do I need for a CAD RAM disk?
32 GB is comfortable for a scratch disk of 8-12 GB alongside CAD. On a 16 GB machine keep the RAM disk to a few gigabytes or skip it, because CAD needs that memory more.
Can I put my whole part library on a RAM disk?
No. Libraries regularly run to hundreds of gigabytes, far beyond any practical memory size, and a reboot would erase them. Use a cache for the library instead.
Does an SSD cache help if my projects are already on an SSD?
Much less. When the project drive is already fast, the cache has little to add, and the memory or SSD space it occupies is better used elsewhere.
Do I need both a RAM disk and a cache?
Only if you have both problems. A workstation with a mechanical project drive and spare memory benefits from both, while a single-SSD machine usually needs neither.
Back Up Windows Before You Change Settings
Moving scratch folders and cache configuration is safe, but if you also change system paths, a backup protects your setup. Qiling Disk Master creates a full Windows image you can restore from if anything goes wrong.
Part 1: Create a Full System Backup
Step 1. Install and open Qiling Disk Master. On the home screen, open "Backup and Recovery" and choose "System Backup". This option automatically includes Windows and the hidden boot partitions, so you do not have to select them one by one.

Step 2. Check the source. The disk where Windows is installed and its system partitions are already ticked for you. If you only need your personal documents, run a separate "File Backup" task instead.

Step 3. Click the destination box and choose where the image should be saved. Use an external HDD or SSD, a NAS, or any drive other than the one Windows is installed on, and make sure it has enough free space.

Step 4. Review the task summary and click "Proceed". Wait until the progress bar reaches 100%. Do not unplug the drive or turn off the PC while the backup is running.

Part 2: Restore Windows from the Backup
Step 1. Open Qiling Disk Master again, go to "Backup and Recovery", and select the recovery option. Your backup images are listed, so pick the one you created before the changes began.

Step 2. Choose the target disk or partition. Normally you restore to the original system disk. If the drive was replaced, select the new disk instead, and the restore rebuilds Windows together with its boot partitions.

Step 3. Preview the restore plan, click "Proceed", and confirm the warning. The PC restarts to finish the job, and Windows comes back exactly as it was on the day the image was created, with your files and programs intact.

- Note
- Keep the backup image on a separate drive, and refresh it before changing storage cache settings.
Conclusion
CAD performance problems are usually storage problems wearing a disguise. A RAM disk removes the constant scratch and temporary traffic from your drive, and an SSD cache removes the repeated reads of part libraries and assemblies you open every day. Neither will speed up a rebuild that is limited by the processor, and neither can rescue a drive that is failing. For a workstation with a mechanical project drive and enough memory, the combination is one of the cheapest upgrades available. Start with the cache, add a small RAM disk for scratch files, and confirm the result with the hit rate rather than with a feeling.
Protect your PC with Qiling Backup—create a system image before your next round of settings changes.
For more Windows 11 performance guides, see How to Create a RAM Disk in Windows 11, Windows 11 Fast Cache, Use a RAM Disk as a Photoshop Scratch Disk, Speed Up 3D Rendering with a RAM Disk and Disk Cache, and Can You Use an SSD Cache for a NAS or Network Drive?.
Related Articles
- How to Use a RAM Disk as a Scratch Disk for Video Editing
The same scratch-disk idea applied to video editing, where temporary files can reach hundreds of gigabytes. - How to Speed Up Programming Builds with a RAM Disk on Windows 11
- Is a RAM Disk Worth It? An Honest Look at Speed and Risk
- How Big Should Your Disk Cache Be? A Practical Sizing Guide
- How to Use Extra RAM (16GB/32GB) to Speed Up Your PC
Products
Articles & Tutorials
- Data Recovery
- Data Backup
- File Recovery
- File Backup
- System Backup and Restore
- Disk and Partition Clone
- Technical articles
- Mobile articles
- Disk Master Help
- Windows Data Recovery Tutorials
- Windows Secure Delete Tutorials
- Windows Partition Management Tutorials
- Windows File Backup and Restore Tutorials
- Windows System Backup and Restore Tutorials
- Windows Disk Backup and Restore Tutorials
- Windows Clone Tutorials