How to Speed Up Programming Builds with a RAM Disk on Windows 11
A build is a storage stress test. Compilers write and delete thousands of intermediate files, package managers unpack archives, and bundlers emit megabytes of output — over and over. On a laptop SSD that is survivable; on a hard drive it is painful. A RAM disk gives all of that short-lived traffic a home that is faster than any SSD and that erases itself when you shut down.
This guide shows which files belong on a RAM disk, how to create the drive with Qiling Disk Master, and the exact settings for npm, Yarn, pnpm, pip, NuGet, Gradle, Maven, and Visual Studio builds.
PAGE CONTENT
- Why Builds Are Storage-Bound
- What Belongs on a RAM Disk (and What Does Not)
- Step 1: Create the RAM Disk
- Step 2: Move Package Caches to the RAM Disk
- Step 3: Redirect Build Temp and Output
- Step 4: Measure the Gain and Stay Safe
- FAQs About RAM Disks for Developers
- Back Up Windows Before You Change Settings
Why Builds Are Storage-Bound
Modern toolchains generate an enormous amount of small file activity. A single compile of a large C++ project can create and delete tens of thousands of object files, a Node build resolves dependencies and writes temporary bundles, and a Java build rewrites class files every time you change one line. Each of those operations is a small random read or write, which is exactly the workload a hard drive handles worst and where even a good SSD spends its time.
Because the data is disposable — intermediate files are regenerated on the next build — it is the perfect candidate for memory. Nothing needs to survive a reboot, and the faster it is, the less time you spend waiting.
What Belongs on a RAM Disk (and What Does Not)
Good candidates:
- Compiler temporary files — the TMP and TEMP folders used during compilation and linking.
- Build output folders — bin, obj, dist, and build directories that are regenerated.
- Package manager caches — downloaded packages and tarballs that are read repeatedly during dependency resolution.
- Tool caches — compiler caches such as ccache or sccache, and bundler caches.
Keep these on real storage:
- Your source code. Keep it in version control on a normal drive. Never let the only copy of your work exist on a RAM disk.
- Very large dependency trees on machines with limited memory. A node_modules folder or a full Gradle cache can be many gigabytes; if it does not fit comfortably, caches on the SSD are better.
- Databases and local servers whose data you expect to persist between sessions.
- Note
- A RAM disk is cleared at every shutdown, so caches stored there are repopulated after each restart. That is a good trade for repeated builds in one session, but if you build rarely, an SSD cache that persists across reboots may suit you better.
Step 1: Create the RAM Disk
Qiling Disk Master includes a one-click RAM disk in its free edition and remounts it automatically at startup, so your paths always exist.
Step 1. Download and install Qiling Disk Master, then launch it.
Step 2. Open the Tools and Utilities page in the main window.
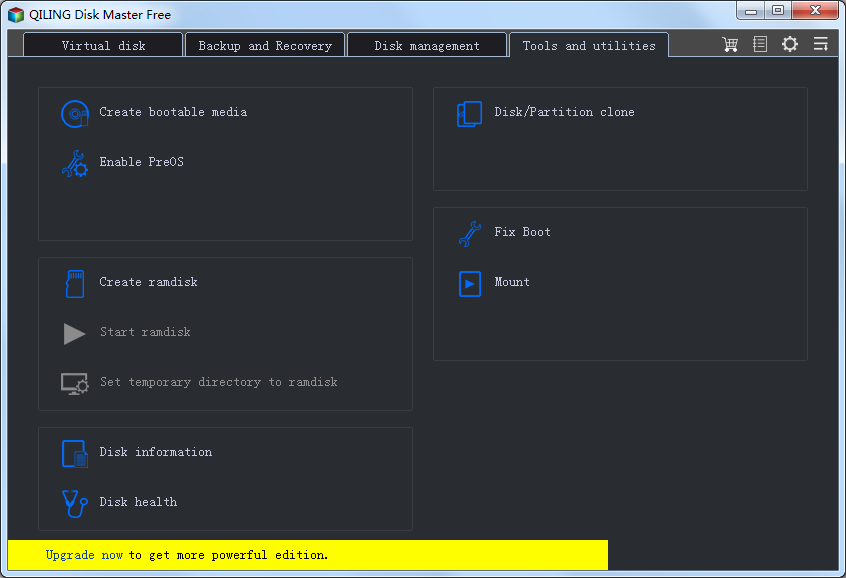
Step 3. Click Create ramdisk.
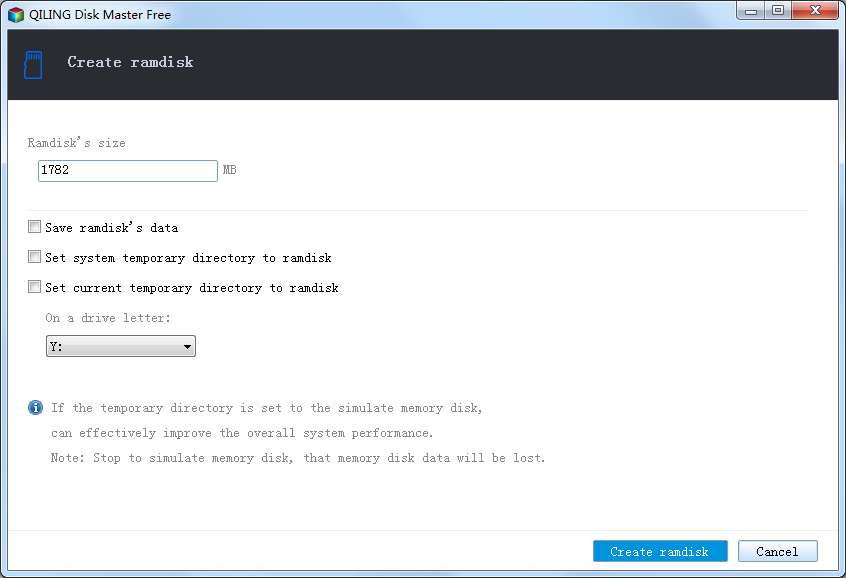
Step 4. Set the size. Use 4-8 GB on a 32 GB machine, and 16 GB or more if you compile large projects and have the memory to spare. Always leave at least 8 GB for Windows and your tools.
Step 5. Choose a free drive letter such as R:, select NTFS, enable mounting at startup, and click Create.
Step 6. Verify the drive in File Explorer, then create a folder for each purpose, for example R:\caches and R:\TEMP.
Step 2: Move Package Caches to the RAM Disk
Package caches are read constantly during dependency resolution, so they benefit immediately. Run the command for each tool you use in a terminal:
- npm — npm config set cache R:\caches\npm
- Yarn — yarn config set cache-folder R:\caches\yarn
- pnpm — pnpm config set store-dir R:\caches\pnpm
- pip — setx PIP_CACHE_DIR R:\caches\pip
- NuGet — setx NUGET_PACKAGES R:\caches\nuget
- Gradle — setx GRADLE_USER_HOME R:\caches\gradle
- Maven — point the local repository at the RAM disk in your settings.xml with a localRepository entry, for example R:\caches\m2
- ccache or sccache — setx CCACHE_DIR R:\caches\ccache
Close and reopen your terminals and editor after setting these, so the new paths are picked up. If a tool does not appear in the list, check its documentation for an environment variable that controls its cache location; most modern toolchains have one.
Step 3: Redirect Build Temp and Output
Next, send the disposable build traffic to the RAM disk:
- Compiler TEMP for the session. In the terminal that runs your build, set TMP and TEMP to R:\TEMP before building. This keeps intermediate files off the SSD without changing system-wide settings.
- Webpack and Vite. Use the cache directory option to store the bundler cache on R:\caches\webpack or the equivalent for your setup.
- CMake and Make. Point the build directory at the RAM disk — for example configure the build into R:\build — which keeps object files and generated code in memory.
- MSBuild and Visual Studio. Keep the source on your normal drive but send intermediate output to the RAM disk with the BaseIntermediateOutputPath property, or simply build from a terminal with TEMP redirected.
- Test runners. Coverage reports, snapshot output, and temporary test databases can all live on the RAM disk.
Because these folders are rebuilt on demand, nothing important is lost when the RAM disk is cleared at shutdown.
Step 4: Measure the Gain and Stay Safe
Measure before and after so you know the change was worth it:
- Time a clean build and an incremental build with the caches on the SSD, then with them on the RAM disk. Incremental builds usually improve the most, because they read the cache heavily.
- Watch the first build after a restart. It will be slower because the caches are empty and packages must be fetched or unpacked again. Compare steady-state builds, not the cold one.
- Keep an eye on memory. If Windows starts paging heavily during a build, the RAM disk is too large for the machine.
Stay safe with three simple rules: your source code lives in Git and on a real drive, your build output is disposable, and anything you cannot regenerate does not go on the RAM disk.
FAQs About RAM Disks for Developers
Should I put my source code on a RAM disk?
No. A power loss or restart would destroy unsaved work. Keep source in version control on a normal drive and move only caches and build output to RAM.
How big should the RAM disk be for development?
On a 32 GB machine, 4-8 GB covers compiler temp files and typical package caches. If you work on very large projects, 16 GB or more helps, as long as at least 8 GB stays available for Windows and your tools.
Why was my first build after a reboot slower?
Because the RAM disk is empty. Package caches have to be repopulated and compiler caches rebuilt. That is expected, and later builds in the same session are the ones that benefit.
Is a RAM disk better than a fast NVMe SSD for builds?
A RAM disk is faster and avoids SSD wear, but it is smaller and cleared at every reboot. On a fast NVMe drive the gain is smaller, though it is still noticeable for builds that generate a lot of intermediate files.
Will this wear out my SSD?
Actually, the opposite. Moving repeated temporary writes to RAM reduces the total bytes written to the SSD, which helps its endurance. See How to Extend Your SSD Lifespan.
What if I need the cache to survive a reboot?
Use a disk cache on a spare SSD instead. Qiling Fast Cache can accelerate the drive that holds your repositories and caches, and unlike a RAM disk it keeps its contents across restarts.
Back Up Windows Before You Change Settings
Redirecting caches and environment variables is safe, but a backup protects your system and your projects. Qiling Disk Master creates a full Windows image you can restore from if anything goes wrong.
Part 1: Create a Full System Backup
Step 1. Install and open Qiling Disk Master. On the home screen, open "Backup and Recovery" and choose "System Backup". This option automatically includes Windows and the hidden boot partitions, so you do not have to select them one by one.

Step 2. Check the source. The disk where Windows is installed and its system partitions are already ticked for you. If you only need your personal documents, run a separate "File Backup" task instead.

Step 3. Click the destination box and choose where the image should be saved. Use an external HDD or SSD, a NAS, or any drive other than the one Windows is installed on, and make sure it has enough free space.

Step 4. Review the task summary and click "Proceed". Wait until the progress bar reaches 100%. Do not unplug the drive or turn off the PC while the backup is running.

Part 2: Restore Windows from the Backup
Step 1. Open Qiling Disk Master again, go to "Backup and Recovery", and select the recovery option. Your backup images are listed, so pick the one you created before the changes began.

Step 2. Choose the target disk or partition. Normally you restore to the original system disk. If the drive was replaced, select the new disk instead, and the restore rebuilds Windows together with its boot partitions.

Step 3. Preview the restore plan, click "Proceed", and confirm the warning. The PC restarts to finish the job, and Windows comes back exactly as it was on the day the image was created, with your files and programs intact.

- Note
- Keep the backup image on a separate drive, and refresh it before making bulk changes to environment variables.
Conclusion
Builds are one of the best real-world uses for a RAM disk. Compiler temp files, package caches, bundler caches, and build output are all disposable, repeatedly rewritten, and heavily read — exactly the traffic that benefits from memory speed and that you would rather not write to your SSD. Create the drive with Qiling Disk Master, point npm, Yarn, pnpm, pip, NuGet, Gradle, Maven, and your compiler's TEMP folder at it, and measure a clean build against an incremental one to confirm the gain. Keep your source code in Git on a real drive, and if you need caches that survive a reboot, add Qiling Fast Cache on the drive that holds your repositories.
Protect your PC with Qiling Backup—create a system image before your next round of settings changes.
For more Windows 11 performance guides, see How to Create a RAM Disk in Windows 11, Move the TEMP Folder to a RAM Disk, Windows 11 Fast Cache, How to Extend Your SSD Lifespan, and What Is Cache Warm-Up?.
Related Articles
- Move the Windows TEMP Folder to a RAM Disk
The system-wide version of the temp redirection used in this guide. - How to Create a RAM Disk in Windows 11: Step-by-Step Guide
Sizing advice and the full feature walkthrough. - How to Use Extra RAM (16GB/32GB) to Speed Up Your PC
- How to Extend Your SSD Lifespan
- Speed Up Music Production with a RAM Disk and SSD Cache
- Speed Up Game Development with a RAM Disk and Disk Cache
Products
Articles & Tutorials
- Data Recovery
- Data Backup
- File Recovery
- File Backup
- System Backup and Restore
- Disk and Partition Clone
- Technical articles
- Mobile articles
- Disk Master Help
- Windows Data Recovery Tutorials
- Windows Secure Delete Tutorials
- Windows Partition Management Tutorials
- Windows File Backup and Restore Tutorials
- Windows System Backup and Restore Tutorials
- Windows Disk Backup and Restore Tutorials
- Windows Clone Tutorials