How to Extend SSD Lifespan by Reducing Writes
An SSD stores data in flash memory cells that can only be written a limited number of times. Every write gradually wears the drive, and when its endurance is spent, the SSD can no longer hold data. Modern drives are durable enough that most people replace them long before they wear out, but if you write a lot — heavy browser use, video editing, or frequent large installs — reducing writes can meaningfully extend your SSD lifespan.
The most effective way to cut SSD writes is to move temporary, high-churn data into memory. This guide explains what wears out an SSD, which activities generate the most writes in Windows 11, and how to use a RAM disk built with Qiling Disk Master to keep those writes off your SSD.
PAGE CONTENT
- What Actually Wears Out an SSD
- The Biggest Sources of SSD Writes
- How a RAM Disk Reduces SSD Writes
- Step 1: Create a RAM Disk
- Step 2: Move Browser Cache and TEMP to the RAM Disk
- Step 3: Reduce Other Major SSD Writes
- More Ways to Extend SSD Life + FAQs
- Back Up Windows Before You Change Settings
What Actually Wears Out an SSD
SSD wear comes from writes, not reads. Each cell endures a finite number of program/erase cycles, and manufacturers rate a drive by its total bytes written (TBW). Once the rated endurance is reached, the drive may still work but is no longer guaranteed.
Two points worth remembering:
- Reads are free. Reading data does not wear the cells. Only writing and erasing does.
- Modern SSDs are tough. Many consumer drives are rated for hundreds of terabytes written, so normal use takes years to reach that limit. Reducing writes matters most for heavy workloads and small or older drives.
The goal is not to stop using your SSD, but to avoid unnecessary, repetitive writes that add wear without benefit.
The Biggest Sources of SSD Writes
In Windows 11, a handful of activities generate the most background writes:
- Browser cache — every page you visit writes images, scripts, and data to the browser cache. On a heavy browsing day this can add up to gigabytes.
- Temporary files — installers, archives, and many apps write scratch data to the TEMP folder.
- Log files — Windows and applications write logs continuously.
- Windows updates — downloading and installing updates writes large amounts of data.
- Page file — if RAM runs low, Windows swaps data to the page file on disk.
- Telemetry and background services — some services write data periodically.
Browser cache and temporary files are the easiest to redirect and often the biggest win, because they are written, deleted, and rewritten constantly.
How a RAM Disk Reduces SSD Writes
A RAM disk is a virtual drive in memory. Anything you store there is written to RAM instead of your SSD. Because browser cache and temporary files are disposable, they are the perfect candidates: they never need to survive a reboot, and moving them to RAM removes their writes from your SSD entirely.
The benefits for SSD longevity:
- No wear from cache and temp writes — the biggest repetitive writes now hit RAM.
- Faster browsing and installs — memory is far faster than an SSD.
- Automatic cleanup — cache and temp files vanish on shutdown, so nothing accumulates.
A RAM disk does not eliminate all SSD writes — Windows still writes to the drive — but it removes a large, unnecessary share of them.
- Note
- Only move disposable data to the RAM disk. Never store documents, photos, or project files there, since their contents are lost on shutdown.
Step 1: Create a RAM Disk
Qiling Disk Master creates a RAM disk in a few clicks.
Step 1. Download and install Qiling Disk Master. The free edition includes the RAM disk feature.
Step 2. Open the Tools and Utilities page.
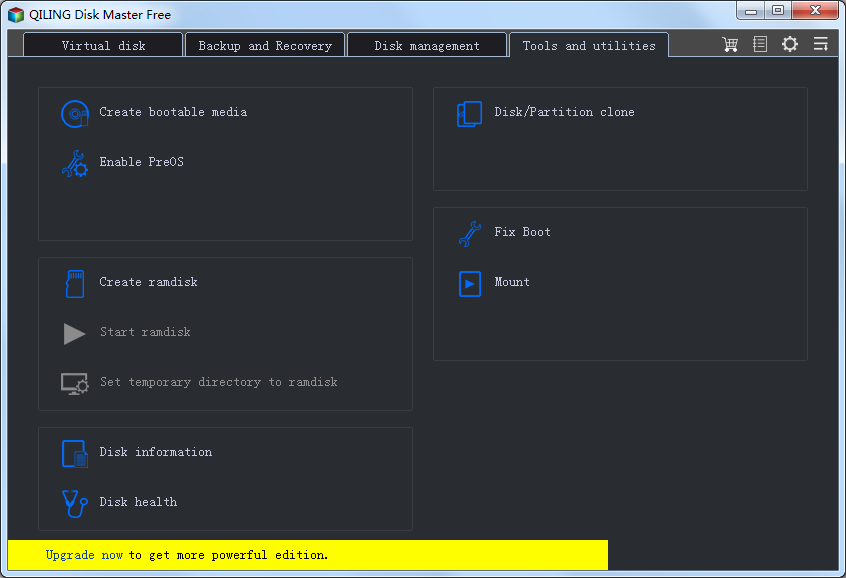
Step 3. Click "Create ramdisk".
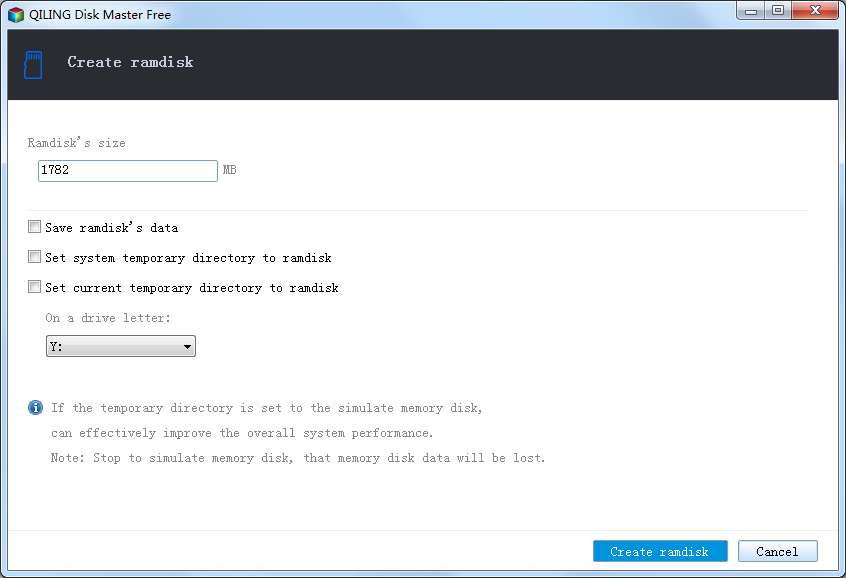
Step 4. Set the size (2-4 GB is plenty), choose a drive letter such as R:, and select NTFS. Enable auto-mount at startup, then click the Create ramdisk button.
For the complete walkthrough, see How to Create a RAM Disk in Windows 11.
Step 2: Move Browser Cache and TEMP to the RAM Disk
With the RAM disk ready, redirect the two biggest write sources onto it.
Windows TEMP folder:
- Create a folder such as R:\TEMP on the RAM disk.
- Open System Properties > Advanced > Environment Variables and change the user and system TEMP and TMP variables to R:\TEMP.
- Restart so the change takes effect.
Full steps: How to Move Windows TEMP Folder to a RAM Disk.
Browser cache:
- For Chrome and Edge, add
--disk-cache-dir="R:\Cache"to the shortcut Target. - For Firefox, set
browser.cache.disk.parent_directoryto R:\Cache inabout:config.
Full steps: How to Move Browser Cache to RAM Disk in Windows 11.
Together these two changes remove a large share of the small, repetitive writes that would otherwise hit your SSD every day.
Step 3: Reduce Other Major SSD Writes
Beyond cache and temp files, a few tweaks further cut writes:
- Keep enough free RAM. If Windows depends heavily on the page file, it writes constantly. Adding RAM or closing memory-hungry apps reduces page-file writes.
- Run Storage Sense. It removes leftover temp files automatically, keeping churn low.
- Do not defragment an SSD. Windows handles SSD optimization with TRIM. Manual defragmentation adds writes with no benefit.
- Stage large downloads on another drive. When possible, download and extract big files to the RAM disk or a secondary drive first.
- Let Windows manage the page file. Unless you are an advanced user with a specific need, the default settings are fine and avoid mistakes.
More Ways to Extend SSD Life + FAQs
- Keep some free space. SSDs need free capacity for wear leveling; avoid filling them completely.
- Keep firmware and drivers updated. Firmware updates sometimes improve endurance management.
- Monitor drive health. Tools that read SMART data can show total bytes written and remaining life so you know if you are writing heavily.
Will moving cache to RAM really extend my SSD's life?
Yes, if you write a lot. Removing browser cache and temp writes eliminates a substantial share of daily writes. On a lightly used drive the effect is small, since modern SSDs have high endurance.
How large should the RAM disk be?
2-4 GB covers browser cache and temp files for most users. Increase it if you handle very large files or do heavy browsing.
Do I need to disable the page file on the SSD?
No. Disabling the page file can cause instability and is not recommended. Reducing how much Windows uses it, by having enough RAM, is a safer approach.
Is a RAM disk safe for my data?
Yes, as long as you only store disposable data on it. Documents and project files should always live on a real drive.
Does this also make my PC faster?
Yes. Cache and temp operations run at memory speed, so browsing and installs feel snappier in addition to reducing SSD wear.
Back Up Windows Before You Change Settings
Creating a RAM disk is safe, but changing environment variables or other settings benefits from a backup. Qiling Disk Master creates a full Windows image you can restore from if anything goes wrong.
Part 1: Create a Full System Backup
Step 1. Install and open Qiling Disk Master. On the home screen, open "Backup and Recovery" and choose "System Backup". This option automatically includes Windows and the hidden boot partitions, so you do not have to select them one by one.

Step 2. Check the source. The disk where Windows is installed and its system partitions are already ticked for you. If you only need your personal documents, run a separate "File Backup" task instead.

Step 3. Click the destination box and choose where the image should be saved. Use an external HDD or SSD, a NAS, or any drive other than the one Windows is installed on, and make sure it has enough free space.

Step 4. Review the task summary and click "Proceed". Wait until the progress bar reaches 100%. Do not unplug the drive or turn off the PC while the backup is running.

Part 2: Restore Windows from the Backup
Step 1. Open Qiling Disk Master again, go to "Backup and Recovery", and select the recovery option. Your backup images are listed, so pick the one you created before the changes began.

Step 2. Choose the target disk or partition. Normally you restore to the original system disk. If the drive was replaced, select the new disk instead, and the restore rebuilds Windows together with its boot partitions.

Step 3. Preview the restore plan, click "Proceed", and confirm the warning. The PC restarts to finish the job, and Windows comes back exactly as it was on the day the image was created, with your files and programs intact.

- Note
- Keep the backup image on a separate drive, and refresh it before changing environment variables or system paths.
Conclusion
SSD lifespan is limited by writes, and Windows 11 generates a steady stream of unnecessary ones through browser cache and temporary files. The easiest way to cut them is a RAM disk built with Qiling Disk Master. Create a 2-4 GB RAM disk, then point the Windows TEMP folder and your browser cache at it so those writes go to memory instead of flash. Add a few more habits — enough free RAM, Storage Sense, and no manual defrag on the SSD — and you extend the drive's useful life while also making everyday tasks faster. Modern SSDs are durable, but reducing needless writes is a simple, low-risk way to protect your investment.
Protect your PC with Qiling Backup—create a system image before your next round of settings changes.
For more Windows 11 performance guides, see How to Create a RAM Disk in Windows 11, Move Browser Cache to RAM Disk, Move TEMP Folder to RAM Disk, SSD Cache vs RAM Disk, and How to Use Extra RAM to Speed Up Your PC.
Related Articles
- How to Move Browser Cache to RAM Disk in Windows 11
Cut one of the biggest sources of SSD writes with a shortcut change. - How Long Do SSDs Last?
- Can a Disk Cache Reduce TRIM and Defrag Work?
- Lightroom Classic Cache: Where It Lives and How to Speed It Up
- SSD SLC Cache vs Software Disk Cache: What's the Difference?
- Can a Disk Cache Hide a Failing Drive?
Products
Articles & Tutorials
- Data Recovery
- Data Backup
- File Recovery
- File Backup
- System Backup and Restore
- Disk and Partition Clone
- Technical articles
- Mobile articles
- Disk Master Help
- Windows Data Recovery Tutorials
- Windows Secure Delete Tutorials
- Windows Partition Management Tutorials
- Windows File Backup and Restore Tutorials
- Windows System Backup and Restore Tutorials
- Windows Disk Backup and Restore Tutorials
- Windows Clone Tutorials