Lightroom Classic Cache: Where It Lives and How to Speed It Up
Lightroom Classic is one of the few programs with three separate caches, and almost every performance complaint traces back to one of them sitting on the wrong drive. The catalog tracks your edits, the previews folder holds rendered images for browsing, and the Camera Raw cache stores decoded raw data for the Develop module. Put them in the right places and the interface stops hesitating.
This guide explains what each one does, where it should live, how to move the Camera Raw cache to a RAM disk, and how to keep the whole system responsive as your library grows.
PAGE CONTENT
- The Three Caches in Lightroom Classic
- Where Each One Belongs
- Step 1: Move the Camera Raw Cache to a RAM Disk
- Step 2: Keep the Catalog and Previews on a Fast Drive
- Step 3: Cache the Drive That Holds Your Photos
- Sizing, Safety, and What to Expect
- FAQs About Lightroom Performance
- Back Up Windows Before You Change Settings
The Three Caches in Lightroom Classic
Confusing them is easy, so start with what each one actually stores:
- The catalog — a database file with your folder structure, keywords, collections, develop settings, and history. It is small relative to your photos but it is read and written constantly, and it is the single most important file to back up.
- The previews folder — rendered thumbnails and screen-sized previews that make the Grid and Loupe views instant. In recent versions this lives in a folder alongside the catalog and can grow to many gigabytes.
- The Camera Raw cache — decoded raw data that the Develop module reads when it opens an image. It is shared with Photoshop's Camera Raw, and it is the cache you can safely move, because Lightroom rebuilds it automatically.
Where Each One Belongs
| Component | Best location | Why |
|---|---|---|
| Catalog | A reliable internal SSD, included in your backup routine | Constant small reads and writes; must never be lost |
| Previews | The same SSD as the catalog | Large, read constantly while browsing |
| Camera Raw cache | Your fastest storage, including a RAM disk | Disposable, rebuilt if lost, speeds up Develop |
| Photos | Any drive, ideally cached | Read during import and when rendering new previews |
The important distinction: the catalog and previews must persist, so they belong on real storage that you back up. The Camera Raw cache is regenerated on demand, so it is the one component that belongs in memory.
Step 1: Move the Camera Raw Cache to a RAM Disk
Step 1. Download and install Qiling Disk Master. The free edition includes the RAM disk feature.
Step 2. Open the Tools and Utilities page and click Create ramdisk.
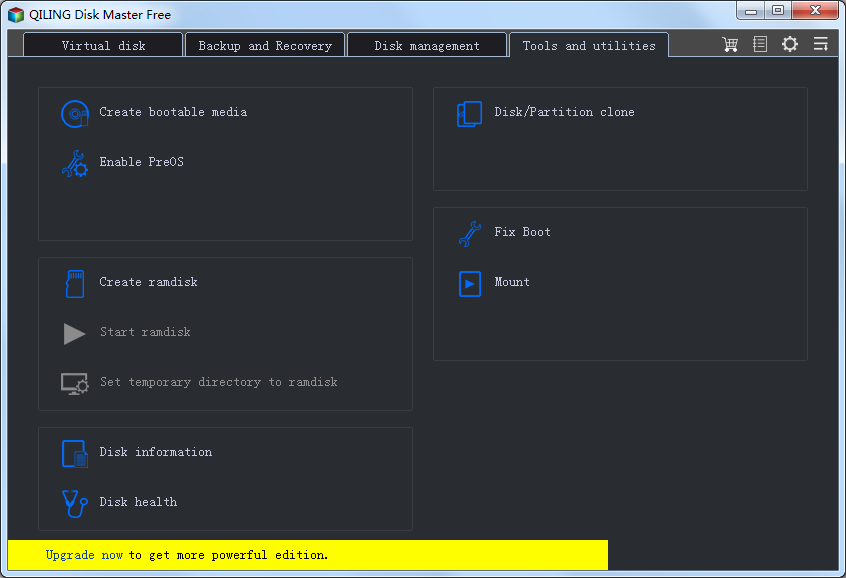
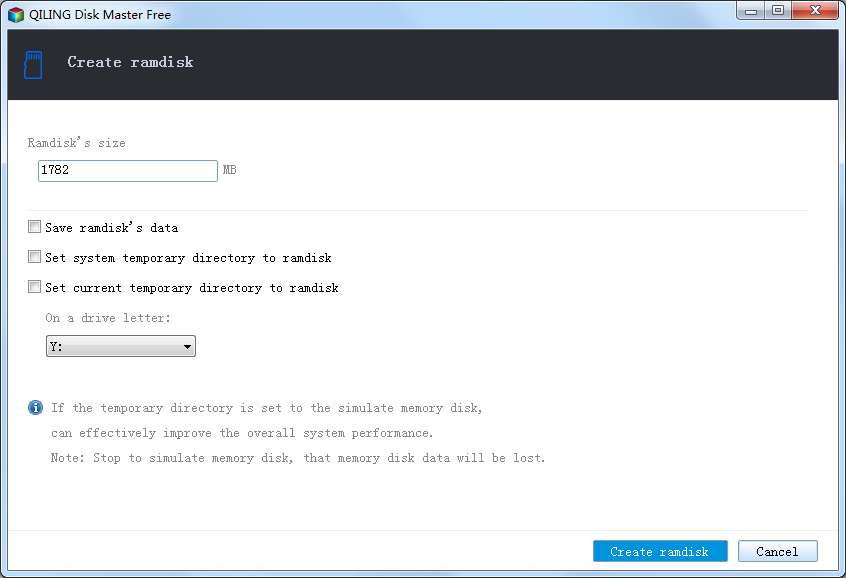
Step 3. Choose a size — 4 GB suits most photographers, and 8-16 GB is comfortable if you work with very large raw files or heavy local adjustments. Keep at least 8 GB of RAM for Windows and Lightroom itself, pick NTFS, and enable mounting at startup so the drive is always present.
Step 4. In Lightroom Classic, open Edit > Preferences > Performance > Camera Raw Cache Settings. Set the location to a folder on your RAM disk, for example R:\CameraRawCache, and raise the maximum size to several gigabytes if you have room.
Step 5. Restart Lightroom and open a few raw files in the Develop module. The first open of each file rebuilds its cache entry; later opens are faster.
- Note
- The Camera Raw cache is rebuilt automatically, so pointing it at a RAM disk costs you nothing but a slower first pass after each reboot. Never redirect the catalog or previews there.
Step 2: Keep the Catalog and Previews on a Fast Drive
Step 1. Confirm where your catalog lives. Open Edit > Catalog Settings > General to see the location and file name of the .lrcat file.
Step 2. If the catalog sits on a slow external drive, move it to an internal SSD. Close Lightroom, then copy both the .lrcat file and its companion previews folder to the new location, and open the catalog from there. Keep the original copy until you are sure everything works.
Step 3. Keep previews modest. Preview size and quality are set in Catalog Settings > File Handling. Standard-size previews are enough for most editing and take far less space than 1:1 previews, which you can build only when needed.
Step 4. Back up the catalog folder on a schedule. Lightroom's own backup runs on exit, but it writes to the location you choose, so point it at a different drive and keep a second copy elsewhere.
Step 3: Cache the Drive That Holds Your Photos
Importing and building previews reads every file on your photo drive. Caching that drive speeds up repeated work, such as returning to a shoot to re-edit a selection.
Step 1. Download and install Qiling Fast Cache.
Step 2. Open the program, click the + button, and select the drive that holds your photos.

Step 3. Set the cache size, add the SSD tier if you have a spare SSD so the cache survives reboots, and click OK.

Step 4. On a photo drive, many files are read once and never again, so expect a moderate hit rate rather than a spectacular one. The gain shows up in repeat sessions and in browsing.

Sizing, Safety, and What to Expect
- Size the RAM disk for its one job. The Camera Raw cache is the only component there, so 4-8 GB is usually plenty and leaves memory for Lightroom's own working space.
- Never put the catalog on a RAM disk. A lost catalog means lost edits and keywords, which is real work, not a rebuildable cache.
- Expect gains where storage is the bottleneck. Browsing, Develop module previews, and re-rendering existing images all speed up. Exporting is a large sequential write, so a cache changes it very little.
- Consider Photoshop too. It shares the Camera Raw cache and uses its own scratch disk; see Use a RAM Disk as a Photoshop Scratch Disk.
- Keep the photo drive healthy. If your library lives on a mechanical drive, a disk cache helps the browsing experience as well as imports; see How Big Should Your Cache Be?
FAQs About Lightroom Performance
Can I put the Lightroom catalog on a RAM disk?
No. The catalog holds your edits, keywords, and history, and it must survive a reboot. Put only the Camera Raw cache in memory.
Will a RAM disk make Lightroom exports faster?
Barely. Export is a large sequential write of finished files, and it is limited by the encoding work and the destination drive rather than by cached reads.
Why is the Develop module slow the first time I open an image?
Because the raw data is decoded and cached. The second open is fast. A RAM disk makes that cache faster to read and rebuild.
How big should the Camera Raw cache be?
Lightroom's default is far too small for a large library. Set it to several gigabytes, and if it lives on a RAM disk, size the disk so the cache fits comfortably.
Do Lightroom and Photoshop share the Camera Raw cache?
Yes, they use the same setting, so changing the location affects both programs. That is another reason to keep it on fast storage.
Will caching my photo drive speed up imports?
Only slightly on the first import of new photos, because those files have never been read. It helps much more when you revisit and re-edit material you have already worked with.
Back Up Windows Before You Change Settings
Moving catalogs and cache folders is safe when done carefully, but your photo library and edits are irreplaceable work. Qiling Disk Master creates a full Windows image you can restore from if anything goes wrong.
Part 1: Create a Full System Backup
Step 1. Install and open Qiling Disk Master. On the home screen, open "Backup and Recovery" and choose "System Backup". This option automatically includes Windows and the hidden boot partitions, so you do not have to select them one by one.

Step 2. Check the source. The disk where Windows is installed and its system partitions are already ticked for you. If you only need your personal documents, run a separate "File Backup" task instead.

Step 3. Click the destination box and choose where the image should be saved. Use an external HDD or SSD, a NAS, or any drive other than the one Windows is installed on, and make sure it has enough free space.

Step 4. Review the task summary and click "Proceed". Wait until the progress bar reaches 100%. Do not unplug the drive or turn off the PC while the backup is running.

Part 2: Restore Windows from the Backup
Step 1. Open Qiling Disk Master again, go to "Backup and Recovery", and select the recovery option. Your backup images are listed, so pick the one you created before the changes began.

Step 2. Choose the target disk or partition. Normally you restore to the original system disk. If the drive was replaced, select the new disk instead, and the restore rebuilds Windows together with its boot partitions.

Step 3. Preview the restore plan, click "Proceed", and confirm the warning. The PC restarts to finish the job, and Windows comes back exactly as it was on the day the image was created, with your files and programs intact.

- Note
- Keep the backup image on a separate drive, and refresh it before moving catalogs or changing cache locations.
Conclusion
Lightroom Classic has three caches and they need three different homes. Keep the catalog and previews on a fast internal SSD that you back up religiously, because they hold real work. Move the Camera Raw cache to a RAM disk created with Qiling Disk Master, since it is rebuilt automatically and speeds up the Develop module. Then cache the drive that holds your photos with Qiling Fast Cache so revisiting an old shoot is quick. Do that, and the interface stops making you wait — while your edits stay safely on storage that survives a reboot.
Protect your PC with Qiling Backup—create a system image before your next round of settings changes.
For more Windows 11 performance guides, see Use a RAM Disk as a Photoshop Scratch Disk, How to Create a RAM Disk in Windows 11, Windows 11 Fast Cache, 3D Rendering with a RAM Disk and Disk Cache, and How Big Should Your Cache Be?.
Related Articles
- How to Use a RAM Disk as a Photoshop Scratch Disk
The companion workflow, including the shared Camera Raw cache. - How to Speed Up 3D Rendering with a RAM Disk and Disk Cache
Apply the same asset-versus-temp split to other creative tools. - How to Create a RAM Disk in Windows 11
- Is a RAM Disk Worth It? An Honest Look
- How to Use an SSD Cache for an External Hard Drive
Products
Articles & Tutorials
- Data Recovery
- Data Backup
- File Recovery
- File Backup
- System Backup and Restore
- Disk and Partition Clone
- Technical articles
- Mobile articles
- Disk Master Help
- Windows Data Recovery Tutorials
- Windows Secure Delete Tutorials
- Windows Partition Management Tutorials
- Windows File Backup and Restore Tutorials
- Windows System Backup and Restore Tutorials
- Windows Disk Backup and Restore Tutorials
- Windows Clone Tutorials