ReadyBoost vs RAM Disk vs SSD Cache: Which to Use in Windows 11
Three popular ways to make a slow Windows 11 PC feel faster are ReadyBoost, a RAM disk, and an SSD cache. They sound similar because all three put fast storage in front of a slow drive, but they use different hardware, behave differently after a reboot, and suit different jobs. Picking the wrong one wastes money or memory, while the right one can cut boot and app-launch times dramatically.
This guide explains how each option works, compares them side by side, and shows how to set each one up, including Qiling Fast Cache for SSD caching and Qiling Disk Master for a RAM disk.
PAGE CONTENT
- What Each Option Really Does
- Key Differences at a Glance
- Which One Should You Choose?
- Setting Up ReadyBoost
- Setting Up an SSD Cache with Qiling Fast Cache
- Creating a RAM Disk with Qiling Disk Master
- FAQs About Acceleration Options
- Back Up Windows Before You Change Settings
What Each Option Really Does
ReadyBoost is a built-in Windows feature that uses a USB flash drive or SD card as an extra read cache for a mechanical hard drive. Windows copies frequently used blocks onto the flash drive and serves future reads from there, which helps most with small random reads. ReadyBoost only works when the drive being accelerated is a traditional HDD, and the flash drive must pass a speed test before Windows accepts it.
A RAM disk takes part of your system memory and presents it as a normal drive letter. Because RAM has no moving parts and almost no latency, it is the fastest storage a PC can have. The catch is that RAM is volatile: everything on the RAM disk disappears when the PC shuts down or restarts, so it is only suitable for temporary data such as browser cache, TEMP files, and scratch space.
An SSD cache is software that watches which blocks on a slow drive you read most often, then keeps copies on a fast SSD or in RAM. Reads of those hot blocks come from the fast device, while everything else stays on the original drive. Unlike a RAM disk, cached data survives reboots, and unlike ReadyBoost, it can accelerate an SSD as well as an HDD.
Key Differences at a Glance
| Factor | ReadyBoost | RAM Disk | SSD Cache |
|---|---|---|---|
| What it uses | USB flash drive or SD card | Spare system RAM | Spare SSD, plus optional RAM |
| Speed | Moderate, limited by USB | Extreme (memory speed) | Fast (SSD speed) |
| Capacity | 4-32 GB | 2-32 GB | Up to hundreds of GB |
| Survives a reboot | Yes | No | Yes |
| Can accelerate | HDD only | Any app you point at it | HDD or SSD |
| Apps need changes | No | Yes | No |
| Cost | A spare USB drive | Free if you have spare RAM | A spare SSD |
| Main risk | Small gains on modern PCs | Data is lost at shutdown | Cache loss if power fails mid-write |
None of the three is universally best because they solve different problems. ReadyBoost is a low-cost upgrade for an old HDD laptop, a RAM disk is the fastest option for temporary data, and an SSD cache gives the largest, most transparent speedup for everyday work.
Which One Should You Choose?
Use these rules of thumb:
- Choose ReadyBoost if you have an older laptop with a slow HDD, a spare USB 3.0 flash drive, and no free SSD or RAM. Expect a modest but real improvement in app launches.
- Choose a RAM disk if you have 16 GB of RAM or more and want to speed up browser cache, TEMP files, or a scratch disk while reducing writes to your SSD.
- Choose an SSD cache if you want the biggest speedup with the least effort, especially if you still boot from an HDD or keep large projects on a data HDD. The cache is transparent and stays warm across reboots.
You can also combine the last two. Many users run an SSD cache over the system drive and a small RAM disk for temporary files, which covers both persistent acceleration and zero-wear scratch space.
Setting Up ReadyBoost
Step 1. Plug a USB 3.0 flash drive with at least 8 GB of free space into a USB 3.0 port. A slow drive will fail the speed test, so use a quality stick.
Step 2. Open File Explorer, right-click the flash drive, and choose Properties.
Step 3. Select the ReadyBoost tab. If the tab is missing, Windows rejected the drive as too slow, or the drive you are trying to accelerate is already an SSD.
Step 4. Choose Dedicate this device to ReadyBoost, or select Use this device and set how much space to reserve.
Step 5. Click Apply and then OK. Read caching starts immediately and improves as Windows learns your usage.
- Note
- ReadyBoost helps only when the system drive is a mechanical HDD. On a PC that already boots from an SSD, Windows disables the feature because it adds nothing.
Setting Up an SSD Cache with Qiling Fast Cache
Qiling Fast Cache is a software cache that can use spare RAM as a first-level cache and a spare SSD as a second-level cache to accelerate a slow drive. Setup takes only a few clicks.
Step 1. Download and install Qiling Fast Cache.
Step 2. Open the program and click the + button to create a new cache task.

Step 3. Choose the drive you want to speed up, then set how much RAM and, if you have a spare SSD, how much SSD space to use as cache.

Step 4. Click OK to start caching. The main window then shows live hit-rate and read statistics as the cache warms up.

Creating a RAM Disk with Qiling Disk Master
Qiling Disk Master includes a one-click RAM disk feature in its free edition. Follow these steps to create one.
Step 1. Download and install Qiling Disk Master, then launch it.
Step 2. In the main window, open the Tools and Utilities page.
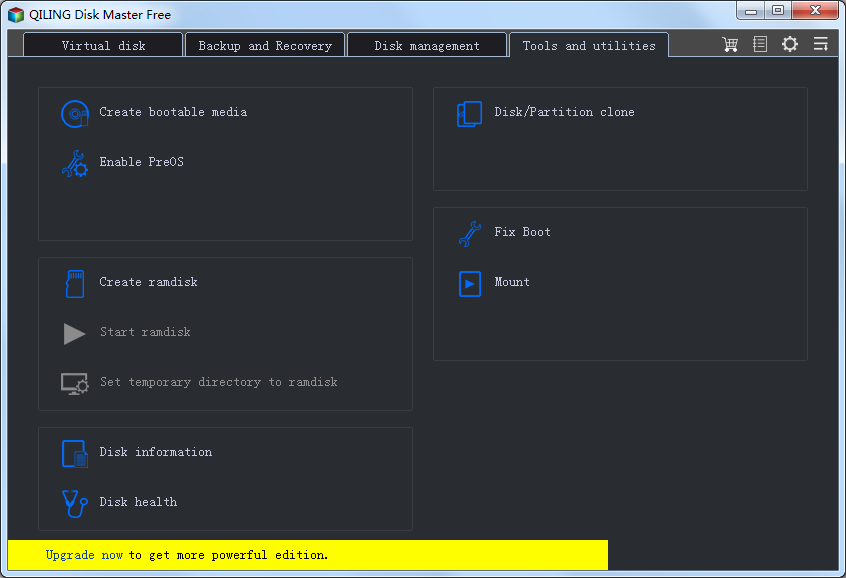
Step 3. Click Create ramdisk.
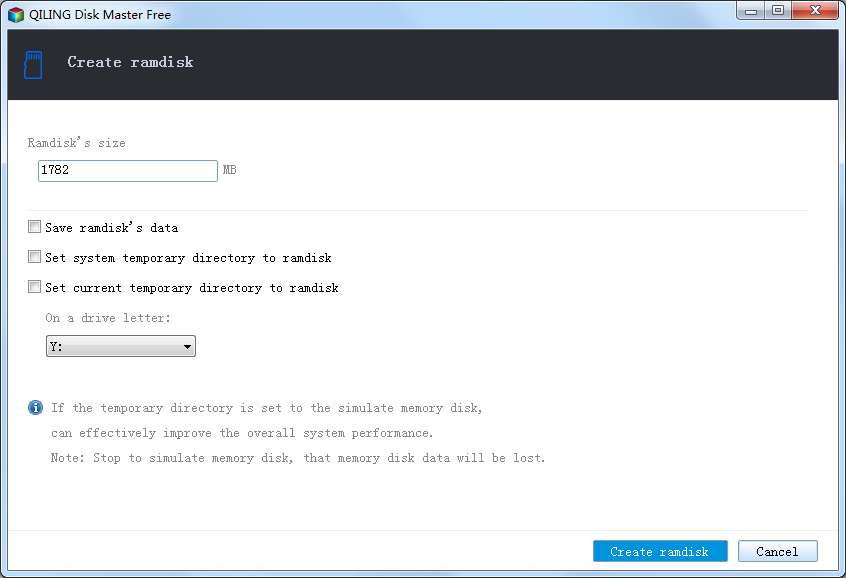
Step 4. Set the size to 2-4 GB to start, choose a free drive letter such as R:, and select NTFS as the file system.
Step 5. Enable automatic mounting at startup so the drive is ready every time Windows boots, then click Create.
Step 6. Point your browser cache or the Windows TEMP folder to R: to put the RAM disk to work. For detailed steps, see Move Browser Cache to a RAM Disk.
FAQs About Acceleration Options
Is ReadyBoost still useful in Windows 11?
Yes, if your system drive is a mechanical HDD. On a PC that already boots from an SSD, Windows disables ReadyBoost because it would add nothing.
Which is faster, a RAM disk or an SSD cache?
Per access, a RAM disk is faster because memory has lower latency. In practice, an SSD cache often feels faster overall because it is transparent, persists across reboots, and can hold far more data.
Can I use ReadyBoost and an SSD cache together?
It makes little sense. An SSD cache is many times faster than a USB stick, so the flash drive would not add measurable benefit. Use it for file transfers instead.
Can I run a RAM disk and an SSD cache at the same time?
Yes, and they work well together. The SSD cache accelerates your system and data drives, while the RAM disk handles temporary files that do not need to survive a reboot.
Does an SSD cache wear out my SSD?
Caching adds writes to the SSD, but on a modern drive with a reasonable endurance rating the extra wear is modest, and it is usually far less than the wear you would save by keeping an HDD busy.
Does ReadyBoost wear out my USB drive?
Windows limits and encrypts the writes it makes, and the drive is only written when the cache changes, so normal use does not wear out a quality flash drive.
Back Up Windows Before You Change Settings
Adding a cache or a RAM disk is safe, but if you also change storage settings, a backup protects your system. Qiling Disk Master creates a full Windows image you can restore from if anything goes wrong.
Part 1: Create a Full System Backup
Step 1. Install and open Qiling Disk Master. On the home screen, open "Backup and Recovery" and choose "System Backup". This option automatically includes Windows and the hidden boot partitions, so you do not have to select them one by one.

Step 2. Check the source. The disk where Windows is installed and its system partitions are already ticked for you. If you only need your personal documents, run a separate "File Backup" task instead.

Step 3. Click the destination box and choose where the image should be saved. Use an external HDD or SSD, a NAS, or any drive other than the one Windows is installed on, and make sure it has enough free space.

Step 4. Review the task summary and click "Proceed". Wait until the progress bar reaches 100%. Do not unplug the drive or turn off the PC while the backup is running.

Part 2: Restore Windows from the Backup
Step 1. Open Qiling Disk Master again, go to "Backup and Recovery", and select the recovery option. Your backup images are listed, so pick the one you created before the changes began.

Step 2. Choose the target disk or partition. Normally you restore to the original system disk. If the drive was replaced, select the new disk instead, and the restore rebuilds Windows together with its boot partitions.

Step 3. Preview the restore plan, click "Proceed", and confirm the warning. The PC restarts to finish the job, and Windows comes back exactly as it was on the day the image was created, with your files and programs intact.

- Note
- Keep the backup image on a separate drive, and refresh it before changing storage or cache settings.
Conclusion
ReadyBoost, a RAM disk, and an SSD cache are all valid ways to speed up a slow PC, but they are not interchangeable. ReadyBoost is a cheap fix for an old HDD laptop, a RAM disk is the fastest place for temporary data, and an SSD cache delivers the largest transparent speedup while keeping its data across reboots. With Qiling Fast Cache you can set up a RAM plus SSD cache in a few clicks, and with Qiling Disk Master you can create a RAM disk for browser cache and TEMP files. Use the comparison table above to match the option to your hardware, and let any cache warm up for a day before you judge the results.
Protect your PC with Qiling Backup—create a system image before your next round of settings changes.
For more Windows 11 performance guides, see Windows 11 Fast Cache, SSD Cache vs RAM Disk, How to Create a RAM Disk in Windows 11, How to Check Cache Hit Rate, and Speed Up Windows 11 with RAM and SSD Cache.
Related Articles
- SSD Cache vs RAM Disk: Which Speeds Up Windows 11 More?
Go deeper on the two software options with a full comparison table. - How to Create a RAM Disk in Windows 11: Step-by-Step Guide
- Best RAM Disk Software for Windows 11
- How to Use Extra RAM (16GB/32GB) to Speed Up Your PC
- Windows 11 Fast Cache: Speed Up HDD with RAM and SSD Cache
- How to Speed Up an Old Laptop with a Disk Cache
Products
Articles & Tutorials
- Data Recovery
- Data Backup
- File Recovery
- File Backup
- System Backup and Restore
- Disk and Partition Clone
- Technical articles
- Mobile articles
- Disk Master Help
- Windows Data Recovery Tutorials
- Windows Secure Delete Tutorials
- Windows Partition Management Tutorials
- Windows File Backup and Restore Tutorials
- Windows System Backup and Restore Tutorials
- Windows Disk Backup and Restore Tutorials
- Windows Clone Tutorials