NVMe SSD Not Detected in a USB Enclosure for Cloning
An M.2 connector does not tell you whether a drive is NVMe or SATA. An NVMe SSD in a SATA-only enclosure, or the reverse, may not appear in Windows at all. Before launching a clone, determine whether the PC, USB bridge, and cloning program can each see the same physical target.
Check the SSD and enclosure match
Step 1. Find the exact SSD and enclosure model numbers. Compare the SSD's protocol, M.2 key, length, and power requirements with the enclosure specification. A physical fit is not sufficient proof of protocol support.
Step 2. Shut down or safely disconnect the enclosure, reseat the SSD according to its manual, and connect it directly to a reliable USB port. Try another cable and computer if available.
Step 3. Check whether the enclosure reports a normal capacity or zero media size. If the bridge repeatedly disconnects, stop testing it as a migration target until the hardware is stable.
Separate Windows detection from clone-tool detection
Open Device Manager and Disk Management. If the physical disk appears by model and capacity but has no drive letter, it may still be a valid clone destination; an unallocated new disk does not need a formatted volume first. If it contains data you need, do not initialize or format it to “make it visible.”
If it appears in firmware but not Windows, check storage-controller drivers and the PC manufacturer's slot or USB guidance. If it appears in Windows but not in Qiling Disk Master Pro, restart the application after reconnecting the enclosure and check whether another process has locked the disk.
Clone Windows to the detected NVMe SSD
For a Windows migration, use System clone so the required boot and Windows partitions are selected together. This workflow does not copy unrelated data partitions from the old disk; back those up separately if you need them. Connect the new NVMe SSD in the enclosure only after Windows detects it reliably. Save any files already on the target elsewhere: cloning will overwrite its contents. Record the source and target model numbers and capacities before you begin.
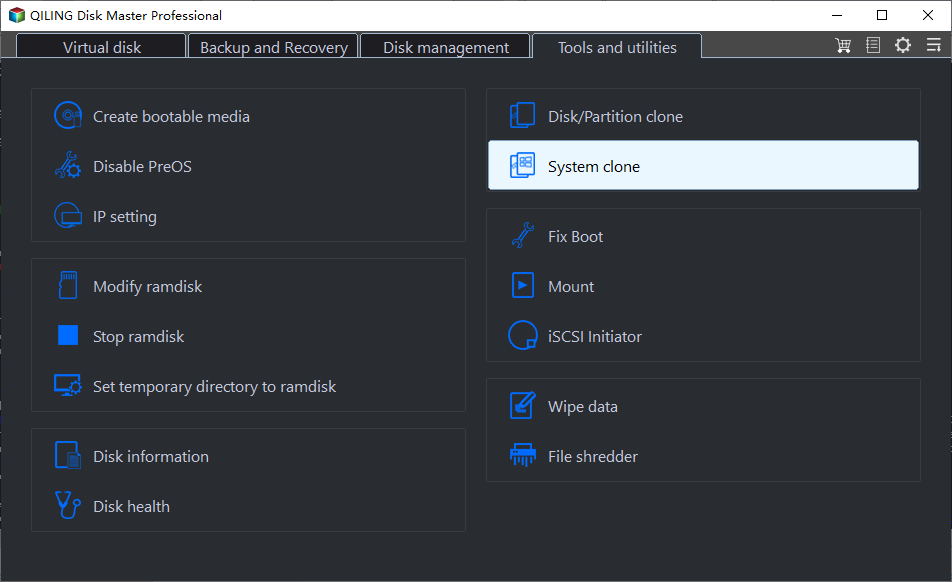
Step 1. In Qiling Disk Master Pro, open Tools and utilities > System clone. Do not choose Disk/Partition clone if your goal is to move only the bootable Windows installation.
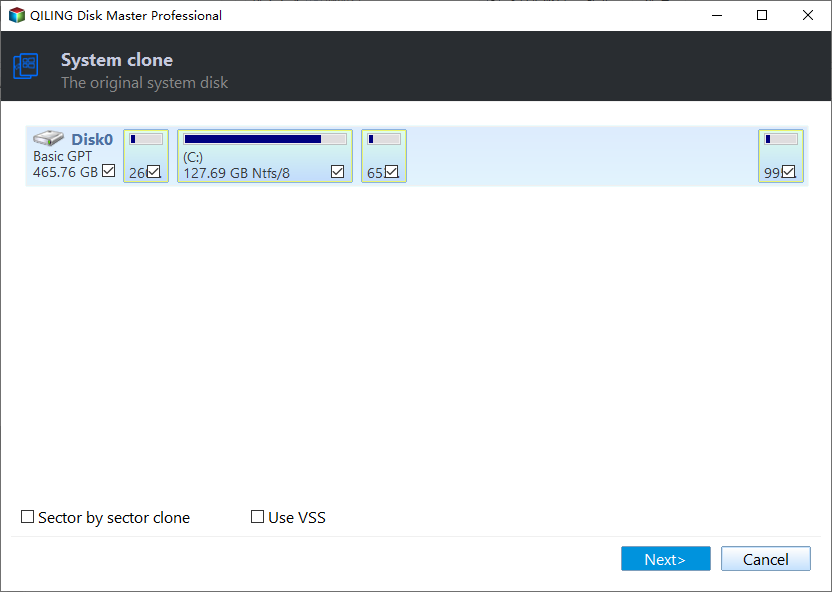
Step 2. On The original system disk screen, verify that the displayed disk is your current Windows drive. The required boot and Windows partitions are checked together. Check the disk capacity against your notes, then click Next. If this is not the expected source, cancel rather than guessing.
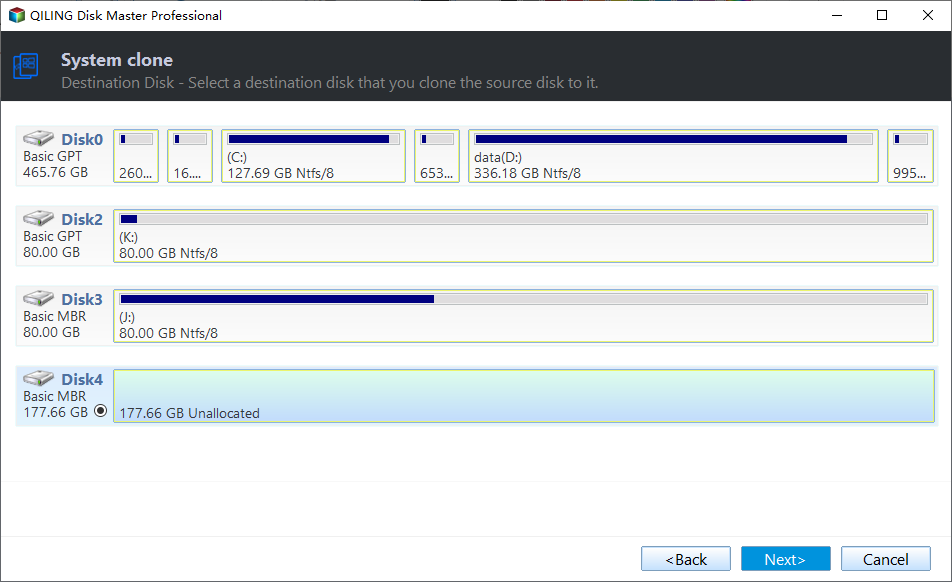
Step 3. On Destination Disk, select the NVMe SSD in the USB enclosure. Compare its model and capacity with what Windows reported, and make sure it is not your external backup drive. Click Next. If the SSD is missing, cancel and return to the enclosure and Windows-detection checks above.
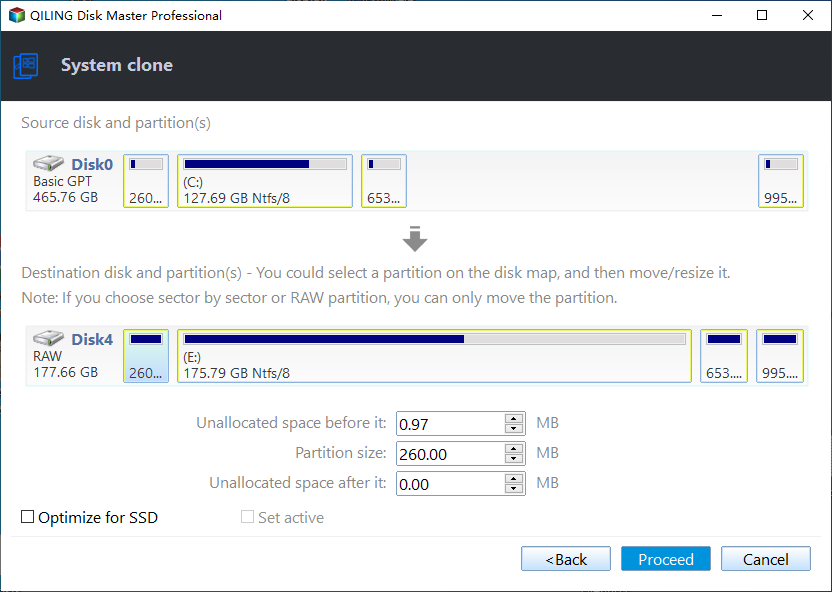
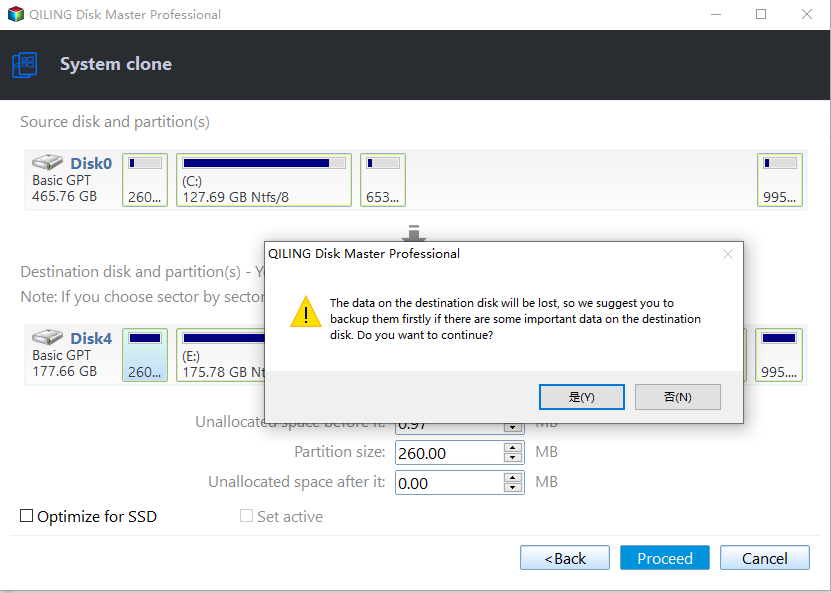
Step 4. At the preview, check the arrow from the original system partitions to the NVMe target, the target capacity, and the proposed partition layout. Adjust the destination layout only if necessary, and select Optimize for SSD if offered. Do not proceed if the source and target are reversed or if the target contains the only copy of important data.
Step 5. Click Proceed. Read the warning that data on the destination disk will be lost. Confirm only after you have backed up anything needed from that NVMe SSD and rechecked its identity. Keep the PC powered and the enclosure connected until the clone reports completion.
Step 6. When the task finishes successfully, shut down the PC, install the NVMe SSD in its intended internal slot, and try booting from it with the original drive temporarily disconnected. If Windows does not start, keep the original drive unchanged while you check firmware boot order and the cloned disk's connection.
Avoid a false successful migration
Confirm that Windows starts, the expected partitions appear, and your files open before reusing or erasing the old drive. An enclosure that exposes a disk correctly does not prove the SSD will boot internally or that a laptop accepts its physical size. If you need every data partition from the original disk rather than only Windows, plan a separate whole-disk clone or file transfer after checking the target capacity.
Related Articles
- SSD Upgrade Plan
Verify boot and capacity after migration. - NVMe Link Speed
Check slot and enclosure limits separately.
Products
Articles & Tutorials
- Data Recovery
- Data Backup
- File Recovery
- File Backup
- System Backup and Restore
- Disk and Partition Clone
- Technical articles
- Mobile articles
- Disk Master Help
- Windows Data Recovery Tutorials
- Windows Secure Delete Tutorials
- Windows Partition Management Tutorials
- Windows File Backup and Restore Tutorials
- Windows System Backup and Restore Tutorials
- Windows Disk Backup and Restore Tutorials
- Windows Clone Tutorials