Windows Will Not Boot After a Clonezilla Disk Clone
A completed Clonezilla job does not prove that Windows can boot from the destination. Before modifying partitions, separate a hardware-detection failure from a firmware boot-entry issue, an incomplete clone, or an encryption recovery prompt.
Check the target and firmware first
Shut down and make sure the replacement drive is installed in a slot that supports its SATA or NVMe protocol. In firmware setup, confirm that the drive is detected at the expected capacity. If it is absent, inspect the port, seating, power, and enclosure; Windows repair commands cannot fix an undetected disk.
Disconnect the old boot disk for the first test when practical. Select Windows Boot Manager for the new disk, not a stale entry associated with the original. If Windows starts only with the original attached, the clone may still depend on boot files left on that disk.
Check Clonezilla choices and the partition layout
Use the official Clonezilla disk-to-disk guide to confirm you selected device-device and disk_to_local_disk, then the correct physical source and target. A partition-only copy may omit EFI or System Reserved. Inspect the target from Windows installation media or another PC without erasing the original.
Match firmware mode to the installation: UEFI/GPT normally needs an EFI System Partition; Legacy/MBR uses a different boot path. Do not apply MBR repair commands to a UEFI system merely because the disk fails to start. If partition sizes changed, inspect the recovery partition and unallocated space separately.
Choose the next repair safely
A BitLocker recovery prompt is an encryption event, not necessarily a broken bootloader. Supply the saved key and confirm the disk unlocks. If the complete layout exists but Windows still does not start, use Startup Repair from official Windows installation media and record its result.
If EFI or another required partition never made it to the target, make a verified backup and repeat a whole-disk migration with a suitable tool. Retain the source unchanged until the replacement starts independently and important files open.
Redo an Incomplete Windows Clone with Qiling System Clone
Use this path only after confirming the target is compatible and the original Clonezilla copy omitted Windows boot partitions. It is not a substitute for fixing an undetected drive.
Step 1. Connect the compatible target and choose Tools and utilities > System clone in Qiling Disk Master. Attach both healthy disks and save any files already on the target.
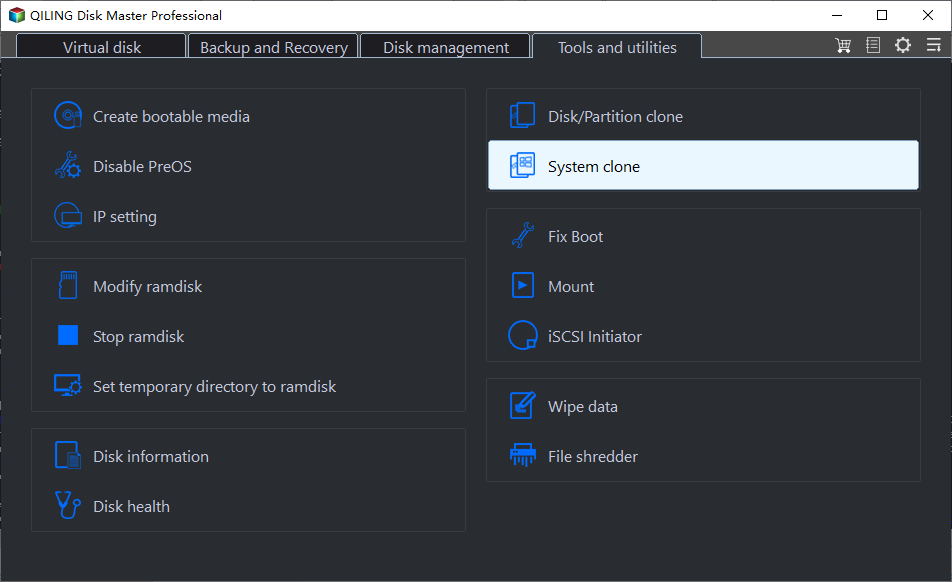
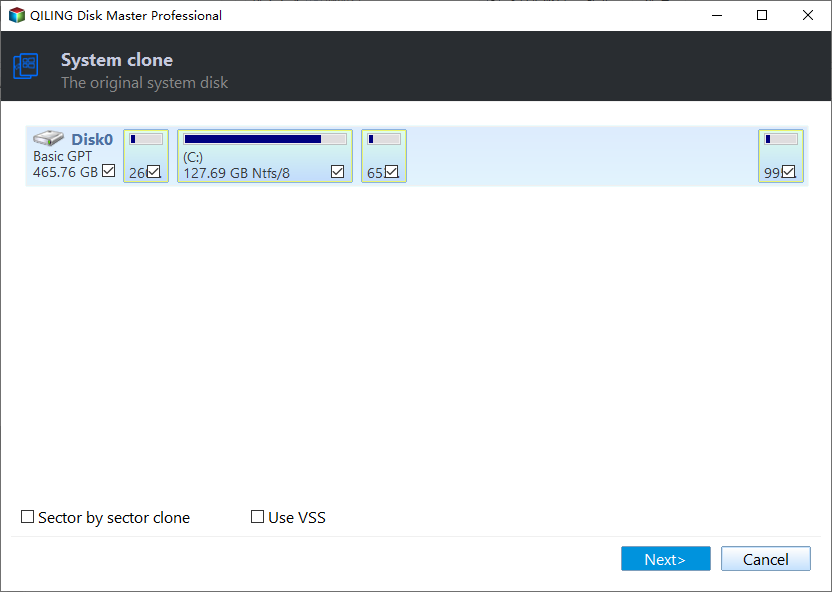
Step 2. Check that the wizard automatically selected the intended Windows installation and its system partitions; click Next. Confirm the wizard found the intended Windows installation and its boot partitions.
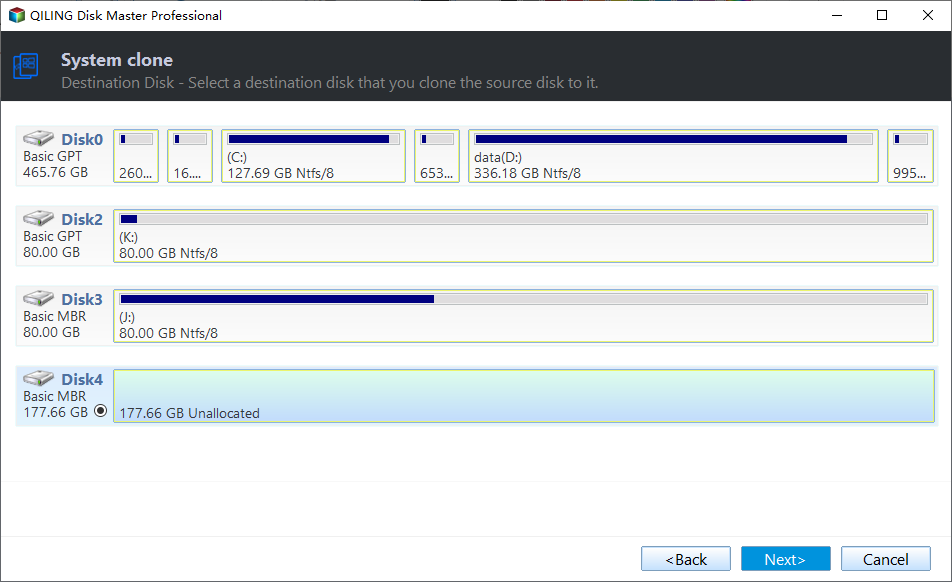
Step 3. Choose the replacement disk by model and capacity, then click Next. Its existing data will be overwritten. Select the replacement drive, not the original.
Step 4. Inspect the proposed layout, click Proceed, accept the destination warning, and wait for completion. Ensure the layout includes the boot partitions before Proceed.

Step 5. Shut down and test the new disk without the old boot drive attached when practical. Select the new Windows Boot Manager and test several restarts.
If separate data partitions must also move, choose a whole-disk clone instead of System clone.
Frequently Asked Questions
Should I rebuild the MBR?
Only after confirming a Legacy/MBR boot issue. UEFI/GPT has a different boot path.
Why does the PC boot with the old disk connected?
Firmware may still load boot files from that disk; test and inspect the new disk independently.
Conclusion
Diagnose detection, boot mode, partition layout, and encryption in order. Re-clone only when the original copy is incomplete.
Related Articles
- SATA-to-NVMe Clone Will Not Boot
Check NVMe-specific firmware and EFI issues. - Clone HDD to SSD with Clonezilla
Review the correct disk-to-disk choices.
Products
Articles & Tutorials
- Data Recovery
- Data Backup
- File Recovery
- File Backup
- System Backup and Restore
- Disk and Partition Clone
- Technical articles
- Mobile articles
- Disk Master Help
- Windows Data Recovery Tutorials
- Windows Secure Delete Tutorials
- Windows Partition Management Tutorials
- Windows File Backup and Restore Tutorials
- Windows System Backup and Restore Tutorials
- Windows Disk Backup and Restore Tutorials
- Windows Clone Tutorials