How to Fix Mac Update Taking Forever [2023 Guideline]
Apple is a highly sought-The technological brand, known for constant innovation, frequently releases new operating systems, prompting users to update. While the Mac's architecture is robust, issues can arise, with some users experiencing the Mac update taking an excessively long time.
| Workable Solutions | Step-by-step Troubleshooting |
|---|---|
| Fix 1. Restart Your Mac | The simplest solution to resolve the Mac update taking the problem forever is to restart...Full steps |
| Fix 2. Empty the Trash | Not having enough space on the disk leads to update errors. It is vital to understand that...Full steps |
| Fix 3. Check Apple Servers | Sometimes, the problem might not be on your end. You checked Apple's servers to see...Full steps |
| Fix 4. Disable FileVault | FileVault is one of the most desirable features of macOS. It is mainly designed to combat...Full steps |
| Fix 5. Restart Mac Safe Mode | Safe mode is the mode where Mac runs on the bare minimum. It means it runs the...Full steps |
When macOS Ventura was released, some users experienced issues while installing it, particularly with the Software Update tool, which can cause the Mac to freeze during the downloading or installation process.
If you're experiencing a long Mac update, you might encounter a frozen Apple logo on your screen or an unresponsive screen. Fortunately, there are several solutions to resolve this issue, allowing you to get back to using your Mac.
Causes of Mac Updates Taking Forever
You're experiencing a slow Mac update because the update process involves several steps, including downloading and installing the update, which can take time, especially if your internet connection is slow or if the update is large. Additionally, the update process may involve background tasks, such as cleaning up temporary files, which can also slow down the process. Furthermore, if your Mac is old or has limited resources, it may struggle to handle the update, leading to a slow process. It's also possible that the update is being held up by other system tasks or software conflicts. Try checking your internet connection, closing unnecessary apps, and restarting your Mac to see if it speeds up the process.
Let's take a look at the reasons:
Bad Internet Connection
A slow internet connection can cause the Mac update to take a long time, and if the connection is stable but slow, the download or installation may get stuck. To resolve this, ensure the internet connection is stable or try using another Wi-Fi connection.
Viruses or Malware
Installing reliable anti-virus software can prevent malware attacks that can interfere with the system's updating process, protecting valuable data from being lost.
Corrupted System Files
If your Mac update is taking forever, try rebooting the system to resolve the issue. If that doesn't work, consider other methods.
Mac Startup Issues
Mac startup issues can be caused by problems starting up, which can be resolved by booting in safe mode, using the Disk Utility app, or other troubleshooting methods.
Low Disk Space
Updates on a startup disk with limited space can be slow due to the need to download and install new files, which can be time-consuming if the disk is nearly full. To avoid this, it's recommended to have at least 12 gigabytes of free space on the startup disk to accommodate significant updates. This will ensure that updates can be installed efficiently and without delays.
First-Aid: Recover Your Data When macOS Update Failed
Losing precious data due to a stuck Mac update can be frustrating, and it's not just limited to updates. Data loss can occur in various situations, such as system file errors or operations shutting down unexpectedly, making data protection a top priority.
Mac users can use specialized data recovery software, such as Deep Data Recovery for Mac Pro, to backup and retrieve vital data from a disk image, preventing further data loss.
Back Up Your Mac and Never Lose Data
You can back up and restore your MacBook/iMac without relying on Time Machine, iCloud, or external hard drives. To do this, simply go to System Preferences > Time Machine, select "Don't use Time Machine" and then click on "Select Backup Disk".
The software has a user-friendly interface, making it suitable for both beginners and experts. It comes in two versions, free and pro, and also offers a free trial feature.
- Recover data from various devices
- Retrieve different types of data
- Restore lost data to cloud storage
- Expert IT support
To recover deleted files on Mac, download and apply the software immediately. This will allow you to scan your Mac's storage for deleted files and potentially recover them.
5 Fixes: How to Fix Mac Updates Taking Forever
Before moving ahead with solutions to the Mac update taking forever, users should create backups or consider professional recovery software to safeguard existing data in case of loss.
If you're experiencing a Mac update taking forever, there are several solutions you can try to resolve the issue. Check out the fixes listed here.
Fix 1. Restart Your Mac
To resolve the Mac update taking forever, simply restart your system by going to the Apple Menu and selecting the Restart option.
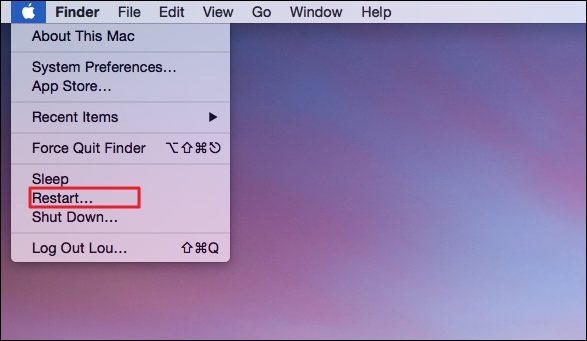
Press the power button and hold it down for 10 seconds. Release the button when you hear the chime. Then, try updating the system again.
Fix. 2. Empty the Trash
Not having enough space on the disk can lead to update errors, as updates are downloaded and installed first. To resolve this, ensure there is enough space available, which can be achieved by emptying the Trash.
Take a look at the steps you need to follow –
Step 1. Go to the Trash icon in the Dock.
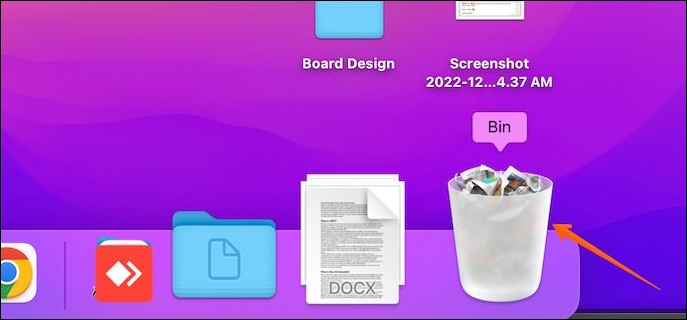
Step 2. Here, you will find two options - Empty one item from the Trash and Empty all of the Trash.
Step 3. Choose the one you want and follow the on-screen instructions.
Note: To empty one item from the Trash, you need to control-click on the item you want.
To empty all of the Trash, go to the Empty button on the upper-right part and click on it. Then, select Delete Immediately and click Delete. Alternatively, you can choose to Empty all of the Trash and confirm the action.

Click on the Finder icon in the Dock, select Finder, and then choose Empty Trash. Pick the option to Empty Trash.
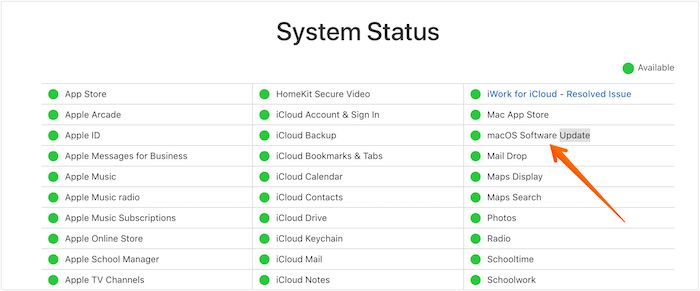
Fix 3. Check Apple Servers
Sometimes, the problem might not be on your end. Have you checked Apple's servers to see if they are working fine? Apple tries to resolve problems immediately, but issues still happen, making the server go down occasionally.
To check if the Apple server is facing issues with macOS software updates, visit the Apple System Status page, where you can locate the macOS Software Update option. If you see a green symbol, it means there are no issues, but a red or yellow dot indicates server problems.
Fix 4. Disable FileVault
FileVault is a macOS feature that safeguards data by encrypting the entire system, but it can sometimes interfere with macOS updates, leading to errors.
To disable FileVault, you'll need to follow these steps.
Step 1. Go to Apple Menu. Click on System Settings.

Step 2. To turn off security and privacy settings, go to the Settings page and click on Security & Privacy on the left-hand sidebar. On the right-hand settings, click on the Turn Off button.
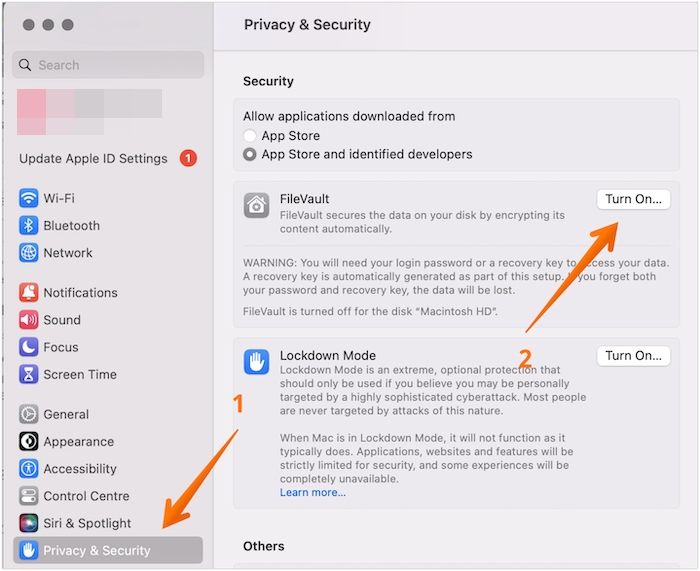
Step 3. To disable FileVault, enter the administrator name and password, then select "Turn Off FileVault".
Fix 5. Restart Mac in Safe Mode
Safe mode is a mode where a Mac runs with the bare minimum, without any third-party applications, allowing you to determine if these apps are causing updating issues.
Here are the steps you should follow –
- For Intel-based Mac:
Step 1. Shut down the system.
Step 2. Wait for a few seconds.
Step 3. Restart the Mac.
Step 4. Press the Shift key and hold it immediately.
Step 5. Release the key when you come across the login window.
- For Silicon-based Mac:
Step 1. Shut down the system. Wait for a few seconds.
Step 2. Press the power button and hold it until you see the window with startup options.
Step 3. Choose the startup disk you want.
Step 4. Now, press the Shift key and hold it. Select Continue.
Step 5. After that, release the Shift key.
- Notice:
- On the screen's top-To continue the macOS update in Safe Mode, click on the Safe Boot option in red, and then click on Continue. This will allow you to complete the macOS update while in Safe Mode.
Final Thoughts
Mac users often experience issues with updates getting stuck or loading forever, but there are solutions to resolve the problem. Various reasons can cause this, including a poor internet connection or low disk space, but troubleshooting these issues can get the update process moving again.
If you're experiencing data loss due to a system crash or Apple server issue, consider restarting the system or checking the Apple servers. If data loss occurs, choose a reliable data recovery software such as Deep Data Recovery for Mac.
Deep Data Recovery for Mac is a reliable and efficient tool that aids users in recovering precious data with ease, requiring no technical expertise and being easy to navigate.
Mac Update Taking Forever FAQs
To resolve the issue of Mac updates taking forever, consider the following solutions. What's the root cause of the problem? Check if your Mac is connected to a stable internet connection, and ensure that the update file is not corrupted.
1. What do I do if my Mac is stuck updating?
To resolve the issue of a Mac getting stuck while updating, a simple solution is to restart the system. If this doesn't work, other solutions such as reinstalling macOS can be tried.
2. How long should a Mac update take?
A Mac update can take anywhere from 40 minutes to 3 hours, but if it exceeds this timeframe, it's likely due to an error that needs to be checked.
3. Why is my Mac update not finishing?
Various reasons can cause a Mac update to not finish, including poor network connection, server issues with Apple, insufficient disk space, and possibly other factors.
4. Can I turn off my Mac while updating?
You cannot turn off your Mac while it is updating, as this can cause damage to the firmware and data within the system.
Related Articles
- [Solved!] Your Device Is Missing Important Security and Quality Fixes
- Solved: PS3 System Storage Not Enough, Not Found or Corrupted
- AHCI VS NVMe: Which Is Better? What's Their Difference?
- Format FS=FAT32 Quick: Full and Comprehensive Guide on Use It
- Stellar Data Recovery Review [2022 Update]
Stellar Data Recovery is a highly-reputed data recovery software available for both Windows and Mac, and we will be providing a comprehensive review of its features, including pricing, plans, and limitations. - Most Reliable Way to Store Data Long Term
If you're looking for a reliable way to store data long term, there are a few efficient and safe methods to consider. Alternatively, if you're experiencing data loss issues, Qiling data recovery software can be a helpful solution. For a detailed step-by-step guide on storing data long term, you can read more.