[Step-by-step Guide] How to Enable and Disable Secure Boot
What Is Secure Boot & How It Works
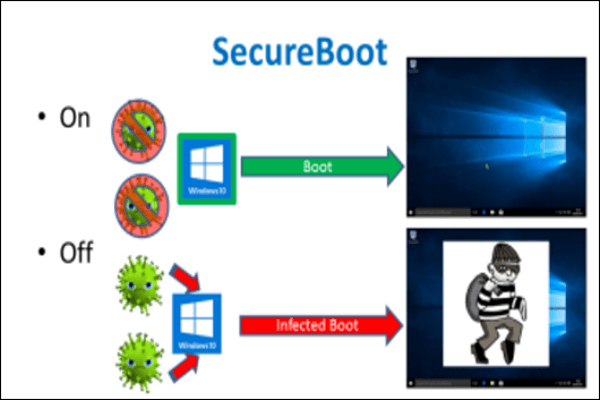
Secure Boot is a safety feature that allows computers to boot only with trusted software, first introduced in Windows 8 and continued in later versions.
Secure boot is designed to protect a computer from malware by verifying the signatures of each part of the boot software (firmware drivers, operating system, EFI Application, etc.) during startup. If the signatures are valid, the firmware allows the operating system to run, and the computer reboots. This process ensures that only authorized software is loaded, preventing unauthorized or malicious code from executing.
What Happens If I Enable/Disable Secure Boot
Enabling Secure Boot is crucial for protecting your PC from malware attacks, including Rootkits that can compromise sensitive data and operations. By activating Secure Boot, you can safeguard your system from malicious software that loads as soon as you start your PC, ensuring data security, optimal speed, and smooth operation.
If you want to use previous Windows, certain graphic cards, and unauthorized software, you can disable secure boot, which allows you to run unverified operating systems and software.
- Booting Windows with an external hard drive or USB.
- Dual Booting like Windows with Linux or Fedora.
- Booting with Windows password recovery tools.
- Operating previous Windows Versions.
Enable Secure Boot for maximum security or disable it for using third-party apps.
How to Enable/Disable Secure Boot on your Computer
To enable or disable Secure Boot on your computer, follow these steps: we've already explained what Secure Boot is and what happens when you enable or disable it. Now, let's dive into the step-by-step guide to enable or disable secure boot on your computer. (Note: I removed the "So far" and "This section" as they are not relevant to the rewritten paragraph)
How to Enable Secure Boot
To enable Secure Boot, ensure your system has a Windows 8 or above operating system, the latest UFI, and necessary firmware options, then follow the specific steps for your device, which may involve accessing UEFI settings, selecting the Secure Boot option, and saving your changes. This process may vary depending on your device's manufacturer and model.
To enable Secure Boot on your PC, follow these steps: Ensure your PC is set to boot from the UEFI firmware instead of the traditional BIOS. This can usually be done by pressing a specific key during startup, such as F2, F12, or Del, and then navigating to the Boot Order settings.
Step 1. To ensure Secure Boot functionality, remove operating systems, software, and graphics cards that are incompatible with Secure Boot. This will prevent any potential security risks and ensure that your system remains secure.
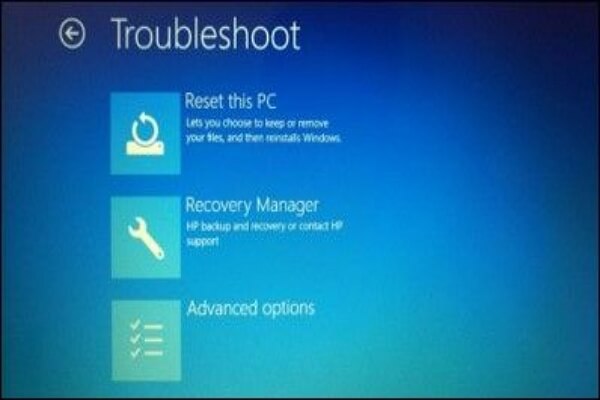
Step 2. To access the PC BIOS menu, press and hold the shift key while selecting "Restart" from the start menu. Then, navigate to Troubleshoot > Advanced Options.
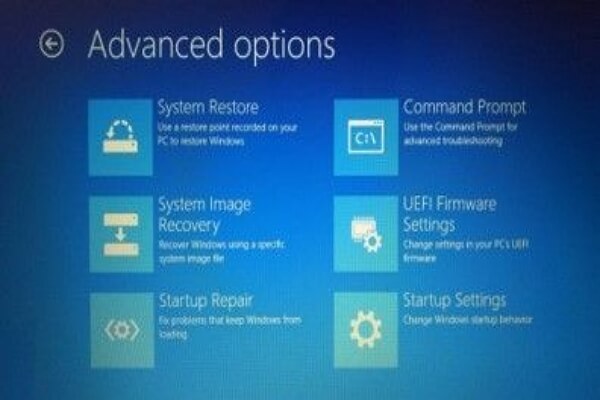
Step 3. In the advanced options menu, select "UEFI Firmware Settings."
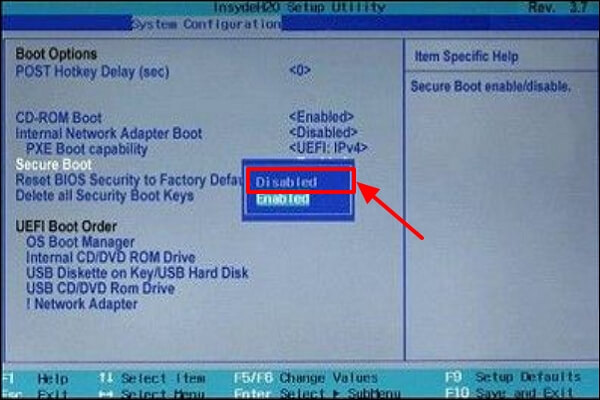
Step 4. To enable Secure Boot, go to the "Secure Boot Settings" option and set it to "Enabled." This setting is typically found in either the Boot Tab or the Security tab.

Step 5. After saving these changes, exit the menu. You can now boot to any media supporting secure boot, install a new operating system, but the Windows partition will be stored as GPT Partitions instead of MBR.
Step 6. After installing the operating system, you can verify if Secure Boot is enabled by typing "msinfo32.exe" in the search bar and checking the Secure Boot status, which should show "On" if it's enabled.
How to Disable Secure Boot
If your PC doesn't allow third-To disable Secure Boot mode, go to your BIOS settings by pressing the designated key (usually F2, F12, or Del) when your computer starts. Navigate to the Security or Boot tab, and look for the Secure Boot option. Disable it by setting it to "Disabled" or "Legacy Boot".
Step 1. Before disabling Secure Boot, check for the latest updates to ensure compatibility with your computer's software, graphics cards, and other components, allowing you to determine if disabling is necessary.
Step 2. To access the BIOS menu, you can either open it directly from the BIOS Menu or restart your computer from Windows while holding the Shift key. Once restarted, go to Troubleshoot > Advanced Options.
Step 3. From the advanced options, go to "UEFI Firmware Settings."
Step 4. To disable Secure Boot, locate the "Secure Boot" option in the available menu and set it to "Disabled." This setting may be found in the Boot or Security tab.
Step 5. Save changes and reboot your PC.
Step 6. Installing any unauthorized operating system or graphics card in your system is not recommended. If it runs successfully, it may indicate that the disabling has been successful. However, this approach is not foolproof and may not accurately determine the disabling status.
Using Professional Backup Software to Protect Computer Data
Secure Boot is a crucial security feature that prevents malicious software from loading when your PC starts up. Most computers are capable of Secure Boot, but in some cases, incorrect settings may cause the computer to appear as if it's not capable of Secure Boot.
To protect your computer data from malicious software, consider using professional backup software like Qiling Backup, which provides a safe and reliable backup of your data.
Qiling Backup Home is a practical backup utility for Windows that allows automatic backups of systems, disks, partitions, files, and more, creating various types of backups, and even creating an iso image from the operating system or hard drive. It preserves data from malicious attacks, ensuring data safety during system startups.
To create a system backup of your computer, you can follow these steps: connect an external hard drive or a USB drive to your computer, open the Backup and Restore (Windows 7) or File History (Windows 8/10) utility, and select the drive as the backup destination. Then, choose the system files and settings you want to back up, such as your operating system, installed programs, and user data.
Step 1. Launch Qiling Backup on your computer, and click System Backup to initiate the backup process.

Step 2. In Windows, the operating system information and system-related files and partitions will be automatically selected, eliminating the need for manual selection. The next step is to choose a location to save the system image backup by clicking on the designated area.

Step 3. The backup location can be another local drive, external hard drive, network, cloud, or NAS, with external physical drives or cloud storage being recommended for preserving system backup files.

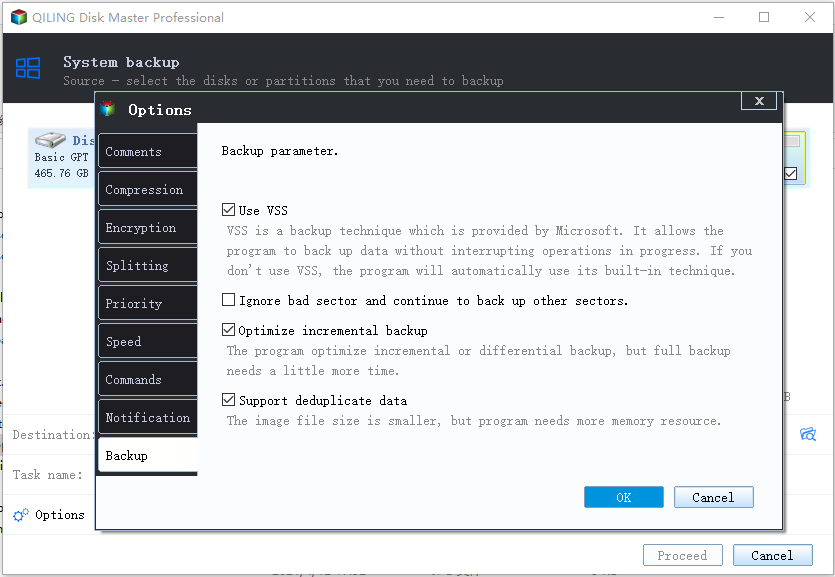
Step 4. The Windows system backup process can be customized with options such as enabling an automatic backup schedule on a daily, weekly, monthly, or event basis, and making differential and incremental backups. This can be accessed through the Options button. Upon proceeding, the backup process will begin, and the completed task will be displayed on the left side in a card style.
The Bottom Line
SecureBoot is a security feature that acts as a wall against malware, improving PC speed, performance, and efficiency, particularly on Windows 8 or above. However, to run previous Windows or unauthorized apps and graphic cards, you may need to disable this feature.
This article provides a step-by-step guide on how to enable and disable Secure Boot. So that you can use the feature as per your requirement, give it a read and let us know your views about this software.
FAQs
1. What is the disadvantage of Secure Boot?
Secure Boot is only compatible with Windows 8 or above, limiting its use with previous Windows versions. It also blocks unlicensed software, which may be necessary for certain tasks, and restricts the system's compatibility with certain graphic cards, potentially hindering the use of professional software and games.
2. Is Secure Boot UEFI or legacy?
Secure boot only supports the latest UFI native boot, while legacy boot is based on traditional BIOS firmware and does not support secure boot.
3. Does Windows 10 require UEFI Secure Boot?
Microsoft is requiring PC manufacturers to enable Secure Boot on new systems to get official Windows certification, but older systems can still upgrade to Windows 10 without it.
4. Is Secure Boot mandatory?
You're referring to the "Windows Defender Firewall" feature in Windows. It's an optional feature that can be enabled or disabled as needed. The operating system will still function properly without it.
Related Articles
- How to Upload Files to Google Drive Automatically
- HP Laptop Slow Startup Fixes for HP Laptop Taking Forever to Restart
- Disk Boot Failure - Insert System Disk and Press Enter in Windows 10
- How to Backup PS4 to External Hard Drive? [Full Guide 2022]
- How to Clear Windows Update Cache | Top Answers
Learn how to clear the Windows Update cache and troubleshoot common update issues with our top answers and step-by-step guides. By following these tips, you can keep your Windows system running smoothly and up to date. - How to Fix 0x4005(16389) Error | Windows Update Failed
If you're trying to upgrade your MS Office, you might run into this error code 0x4005(16389). This post has demonstrated the top 6 ways to fix this error. Go through each steps carefully to get rid of this error.