{Solved}How to Fix No Audio in Windows 11?
Users of the Windows 11 Operating System have been experiencing issues with no audio output, which has been a major concern since the OS update.
After updating to the latest Windows 11, some users experienced the No Audio or Sound issue. If you're facing this problem, don't panic - we've got four methods to help you fix it. These methods can be used to resolve the no audio issue in Windows 11, and we'll outline them in the following post.
4 Methods to Fix No Audio in Windows 11
Let us discuss briefly in detail the steps you need to follow to execute each method appropriately.
Method 1. Update your audio device's driver
To fix the no audio issue in Windows 11, update your audio device's driver to the latest version, which can be done manually or automatically, ensuring the driver is compatible with your computer.
To manually update your audio device's driver, follow these steps: first, go to the official website of your audio device's manufacturer, then click on the "Support" or "Downloads" tab, and select your device model from the list. Next, choose the correct operating system and driver version, and click on the "Download" button to save the driver file to your computer.
Update the device's driver manually
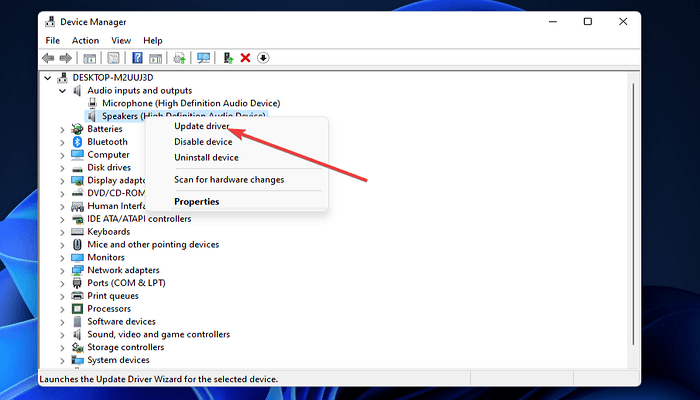
Step 1. To update the audio drivers on your PC, launch Device Manager, then double-click "Audio inputs and outputs" and right-click your specific audio device (such as "Speakers (High-Definition Audio Device)") and select "Update driver".
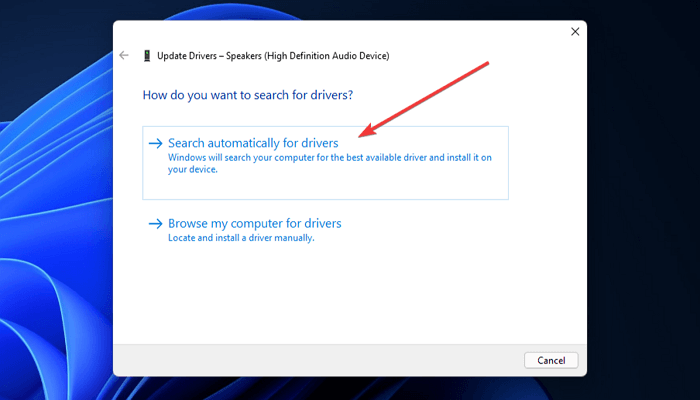
Step 2. After that, click the Search automatically for drivers option.
Update the device's driver automatically
Updating your device's driver automatically can be done using third-party software. This software scans your computer and identifies devices that require new drivers to be installed, making it easier to keep your device's drivers up to date.
Once your device's audio type is detected, you can decide to download and install the latest driver for the audio using third-party software.
Method 2. Update your PC's Windows 11
To update your PC's Windows 11, follow these steps: Ensure your PC is connected to the internet, go to Settings, then click on Update & Security, and finally click on Check for updates. If any updates are available, Windows will automatically download and install them.
Step1. To access the Windows 11 search bar, click the magnifying glass icon at the bottom of the screen, below the desktop area. This will open the search utility where you can type in your query to search for files, applications, and settings.
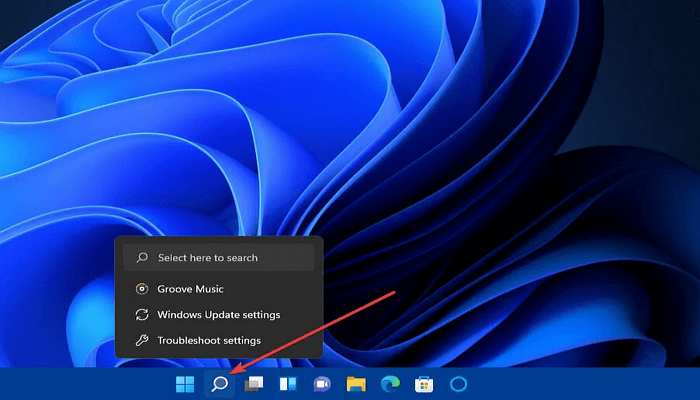
Step 2. To access Windows Update settings, type "Windows update" in the search box and select "Windows update settings" or "Advanced options" to open the settings tab.
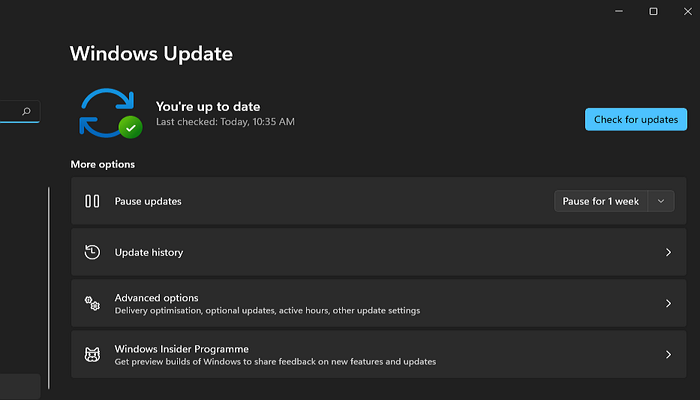
Click the Check for updates button to download and install any newly found patches for Windows 11.
Method 3. Restart the Windows 11 audio service
Follow the step-To restart the Windows 11 audio service, follow these steps: First, press the Windows key + X to open the Quick Link menu and select the Task Manager. Next, in the Task Manager, click on the "Services" tab and search for the "Audio" service.
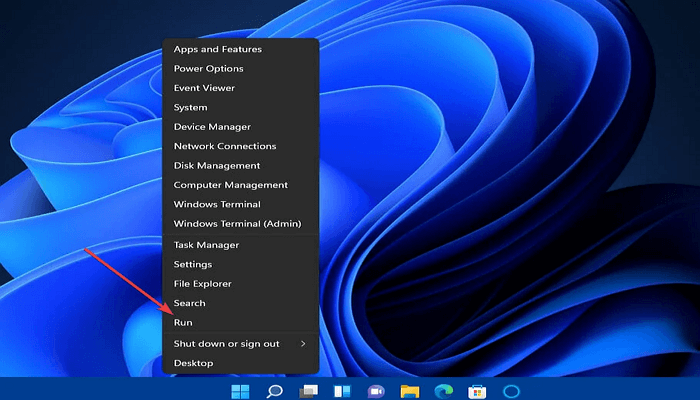
Step 1. To access the Run dialog box, right-click the Start button at the taskbar and select the Run shortcut from the open menu.
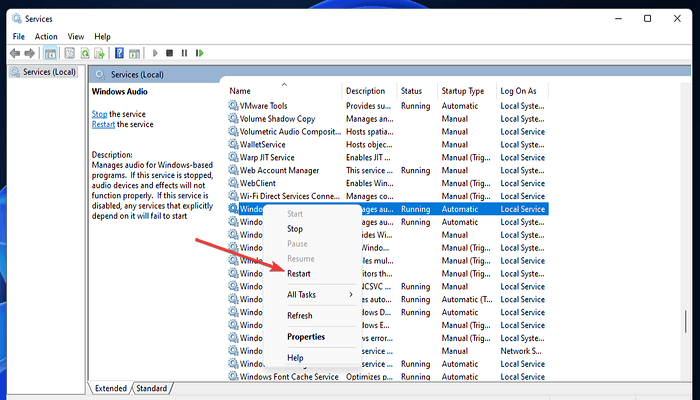
Step 2. To restart the Windows Audio service, open the Services console by typing services.msc in the Run dialog, then click OK to open the Services window. Right-click the Windows Audio service and select Restart. Additionally, double-check that the Startup Type option for each audio service is set to Automatic.
Method 4. Change audio options in sound settings
Go ahead and summarize the last method in one paragraph. I'll wait.
To fix the No Audio issue in Windows 11, change the audio option in sound settings. To do this, follow these steps: gently navigate to the sound settings, and then change the audio option to fix the issue. This simple method can help resolve the No Audio problem in Windows 11.
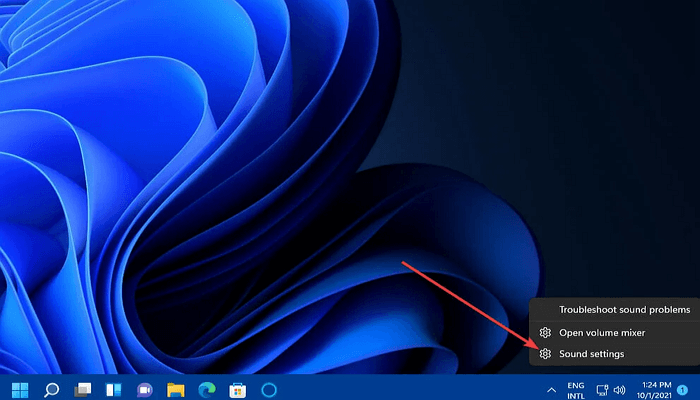
Step 1. Right-click the speaker icon symbol in the desktop area of Windows 11, and choose Sound settings.
Step 2. To adjust the sound output, click on "Choose where to play sound" and select the default sound output. Ensure the volume is not muted by clicking the "Unmute speaker" button on the Volume bar.
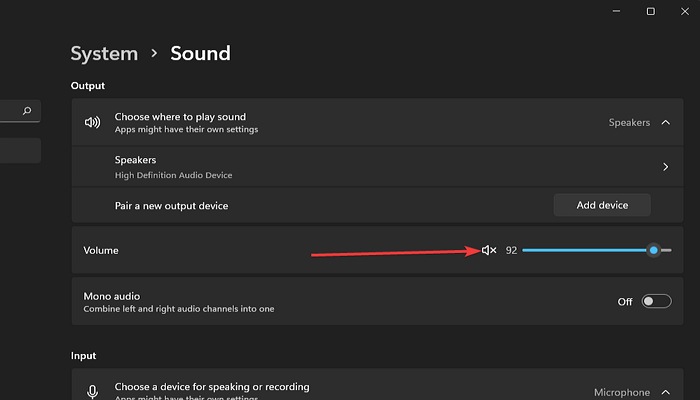
Step 3. To adjust the volume, move the Volume bar to the right if it's currently positioned far to the left. Next, click on the Audio option to enable it. Then, navigate to the advanced settings and select the Volume mixer to access the Volume mixer path.
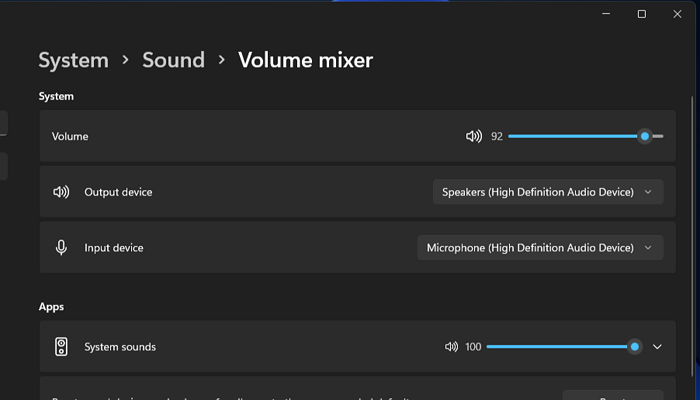
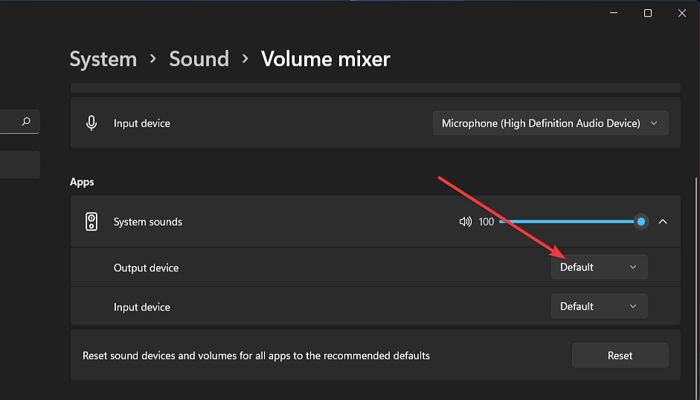
Step 4. Check the Volume and System sound bars to ensure they're fully adjusted to the right, then select system sounds and choose Default at the Output device menu.
Conclusion
The four methods discussed in this post can help fix No Audio issues in Windows 11, ensuring you never suffer from this problem again. By following the step-by-step guides, you can try any of these methods to find the one that works best for your situation. This means you can resolve No Audio issues quickly and easily, without any further hassle.
Related Articles
- How to Fix a Frozen MacBook in macOS Ventura/Monterey/Big Sur
- How to Solve OneDrive Sync Pending Error in Every Possible Way
- How to Recover Your Deleted Firefox Browsing History
- How to Backup Sticky Notes Windows 11 [Step-by-Step Guide]
- Difference Between Cloud Sync and Backup and Cloud Storage
Understand the key differences between cloud sync, cloud backup, and cloud storage. Learn how each service works and which one best fits your data protection needs. - What Is DRM? Introduction to Digital Rights Management [2023 Updated]
Learn what Digital Rights Management (DRM) is, how it works to protect digital content, and why it matters for copyright protection in the modern digital landscape.