How to Change DNS Settings [2023 New]
If a web series is unavailable in my location, I would change my DNS server to access it. This can help bypass location restrictions. It's like being able to keep up with the rest of the world when internet speeds are slow.
Changing your DNS settings can improve your internet connection speed and provide various benefits, such as better functionality and performance from your device's features.
You need not be a developer or technician for the purpose. If you can use your device, you can do this as well. In this article, you will learn how to change the DNS on your device, whether you have a Windows, Mac, iPhone, or Android.
What Is DNS
DNS, or the internet's phone book, connects web browsers to websites by translating domain names into IP addresses, allowing users to load websites by typing in a friendly domain name rather than remembering the IP address for each site.
How Does DNS Work
DNS servers translate URLs and domain names into IP addresses that computers can understand, allowing them to access specific web pages. When you type a URL into your browser's search bar, DNS servers convert it into machine language, which then locates the corresponding web page.
How to Change DNS Settings
Changing DNS servers and using alternative servers is a simple process that can be done on various devices, including Windows PCs, Macs, iPhones, and Androids, albeit with slightly different methods for each.
How to Change the DNS Settings in Windows 11
How to Change DNS Settings in Windows 10
How to Change DNS settings on Mac
How to Change the DNS on iPhone
How to Change DNS settings on Android
How to Change the DNS Settings in Windows 11
To change the DNS settings on Windows 11, go to Settings > Network & Internet > Advanced options > Change the network settings, then select your network connection and click on the "Edit" button. From there, you can add or modify the DNS servers by clicking on the "Edit" button next to "DNS server address.
Step 1: Open "Settings" on your device.
Step 2: Click on "Network and Internet."
Step 3: Expand the Wi-Fi or Ethernet option with which you connect to the internet
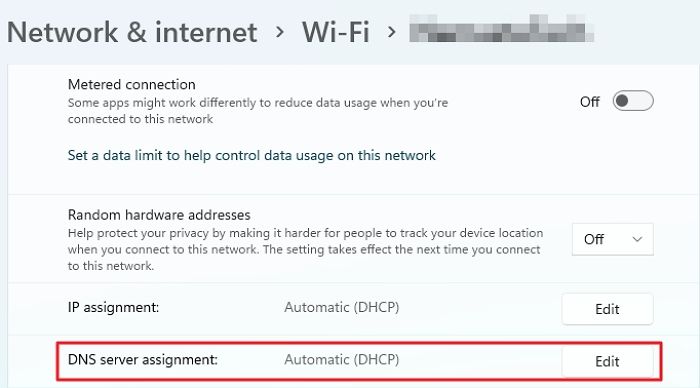
Step 4: Now click on the Edit button near "DNS Server Assignment" settings
Step 5: A drop-down menu appears; in it, select Manual
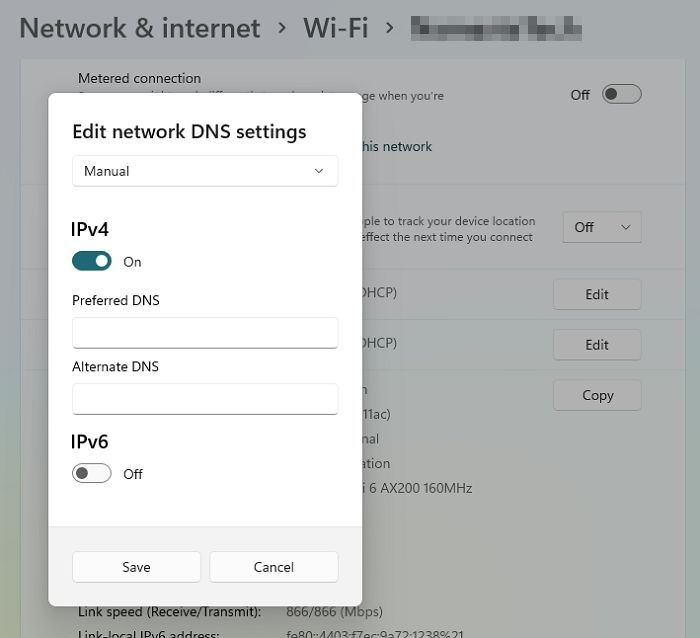
Step 6: Toggle on the IPv4 switch.
Step 7: In the Preferred DNS Settings, input any of the following DNS addresses
For example,
- Cloudflare: 1.1.1.1
- Google Public DNS: 8.8.8.8
- Open DN: 208.67.222.222
Step 8. Select any of the encryption options given below in the Preferred DNS encryption option
- Unencrypted only,
- Encrypted only (DNS over HTTPS),
- Encrypted preferred,
- Unencrypted allowed.
Step 9. Confirm the secondary DNS address in the "Alternate DNS" setting.
For example,
- Cloudflare: 1.0.0.1
- Google Public DNS: 8.8.4.4
- OpenDNS: 208.67.220.220
Step 10. You can also select an "Alternative DNS encryption" setting.
Step 11. Click on the 'Save' Button and restart your device.
If you have a Windows 10 OS, the method is different.
How to Change DNS Settings in Windows 10
To change DNS settings in Windows 10, go to Settings, then click on Network & Internet, followed by the Ethernet or Wi-Fi option depending on your connection type. From there, click on the Advanced option on the right side, then scroll down to the DNS settings section and enter your preferred DNS server addresses in the Preferred DNS server and Alternate DNS server fields. You can also use the Google Public DNS or Cloudflare DNS as alternative options.
Step 1: Open Settings
Step 2: Go to Network and Internet.
Step 3: Click on Wi-Fi.
To connect Windows 10 to a network, you will need to select a connection option that allows your computer to communicate with other devices on the network. This can be done through various methods, such as Wi-Fi, Ethernet, or a VPN connection. The specific steps may vary depending on the type of connection you choose, but generally, you will need to go to the Settings app, click on "Network & Internet," and then select the connection option that suits your needs.
Step 4: Press the Edit button below IP Settings.
Step 5: Now, a drop-down menu appears; select Edit IP Settings and then choose Manual
Step 6: Turn on the IP4 toggle.
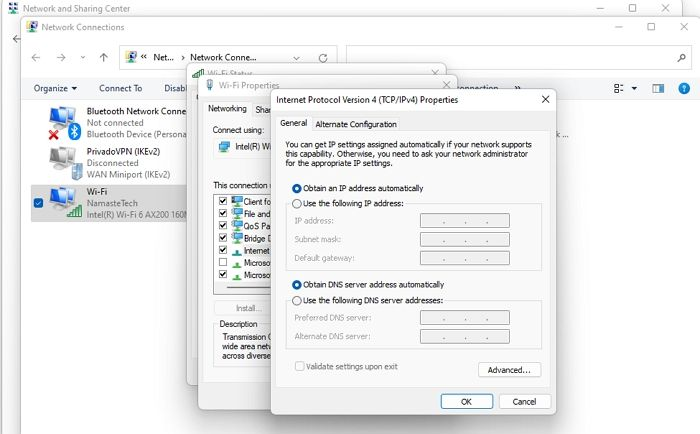
Step 7: Confirm the primary DNS address under the Preferred DNS server.
Step 8: Confirm the Secondary DNS Address below the Alternate DNS Server
Step 9: Click on the Save button and reboot your device
How to Change DNS settings on Mac
Changing DNS Settings on Mac is also easy-peasy.
To change DNS settings on a Mac, follow these steps: Go to System Preferences and click on Network. Select the network connection you want to modify, then click on Advanced.
Step 1: Head over to Apple Menu and select System Preferences
Step 2: Go to Network, click Advanced, and open the DNS tab.
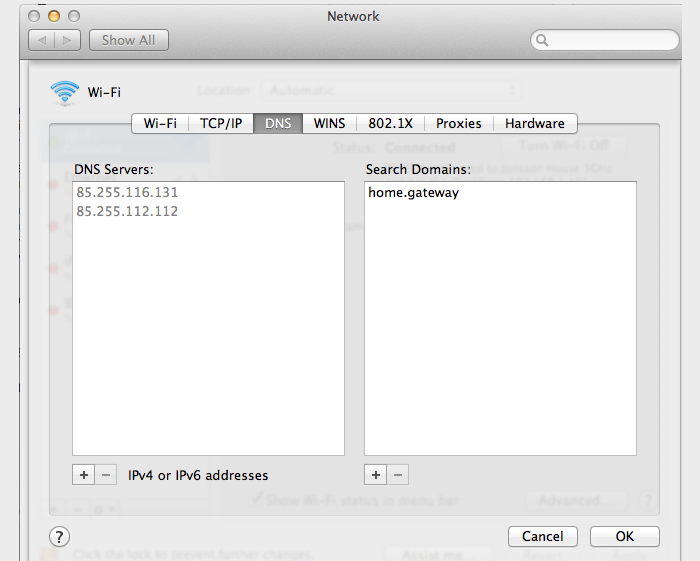
Step 3: Click on the + shaped icon to add a new DNS.
To use the Cloudflare DNS, use these DNS servers:
- 1.1.1.1
- 1.0.0.1
- 2602:4700:4700: :1111
- 2606:4700:4700: :1001
To use Google DNS, use these DNS servers:
- 8.8.8.8
- 8.8.4.4
- 2001:4860:4860: :8888
- 2001:4700:4700: :1001
Step 4: Now, click on the OK button and then select Apply to proceed with your action
If you're using an iPhone, you can easily change your DNS settings. To do this, follow the method below, which will guide you through the process.
How to Change the DNS on iPhone
Changing DNS settings on smartphones is a relatively simple process compared to PCs, as it typically involves accessing the device's settings menu, selecting the Wi-Fi or network settings, and then choosing the option to change or edit the DNS settings. This process usually takes only a few seconds to a minute to complete, depending on the device and operating system being used.
To change the DNS settings on your iPhone, follow these steps:
Step 1: Go to 'Settings of the iPhone
Step 2: Open Wi-Fi and connect to a nearby wireless connection
Step 3: Tap on the connected Wi-Fi network
Step 4: Navigate to Configure DNS
Step 5: Select Static

You can delete the current DNS servers and input the following newer ones to use Cloudflare DNS: 1.1.1.
- 1.1.1.1
- 1.0.0.1
- 2606:4700:4700: : 1111
- 2606:4700:4700: : 1001
You can use the following DNS servers to use Google DNS.
- 8.8.8.8
- 8.8.4.4
- 2001:4860:4860: : 8888
- 2001:4860:4860: : 8844
- Afterward, tap on Save.
Now, the changes will be saved. You can even reboot your system for it to reflect the changes.
How to Change DNS settings on Android
As an Android user, you likely appreciate the comprehensive features offered by your device. However, you may experience issues with your default DNS, which can be resolved by simply changing your DNS settings.
To change the DNS on Android 9 or later versions, follow these steps:
Step 1: Open your phone's Settings.
Step 2: Head overNetworkwork and internet
Step 3: Choose Private DNS and select the private DNS provider hostname.
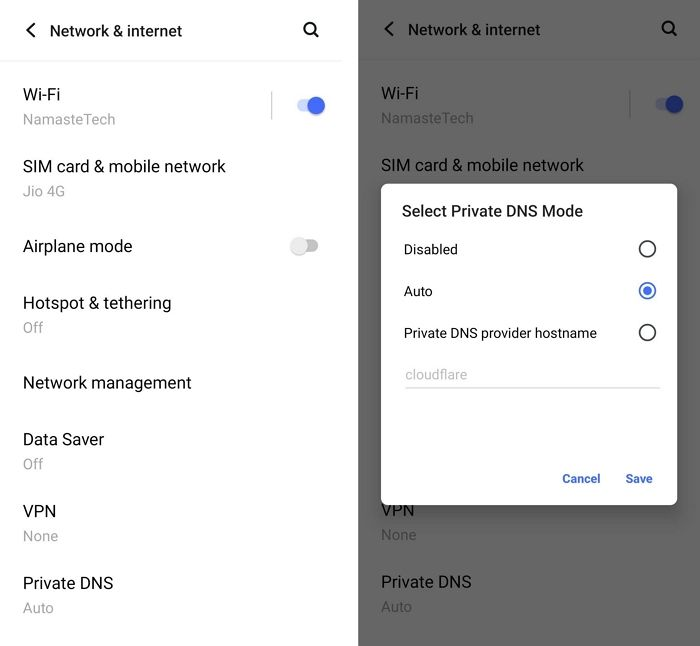
Step 4: Tap on Save to save all your settings.
Now that you have changed your DNS and then the Settings, you have successfully completed the steps to change your DNS settings on your device.
Conclusion
You're saying that having a working DNS is crucial for accessing the internet and that the instructions provided were helpful in setting it up on different devices. Is that correct?
You can now access any website on your device without disruptions from Networktwork. By selecting a suitable method, you can configure a new DNS server in your system, allowing you to access restricted websites freely. This should enable you to browse the internet without any hindrances.
Related Articles
- How to Open Dmg Files on Mac Ventura/Monterey/Big Sur/Catalina [4 Fixes]
- How to Free Up Space on SSD in Windows 10/8/7
- Step-by-Step Guide to Backup Drivers Windows 10 [Powerful Solutions]
- How to Fix macOS 13 Ventura Installation Failed/Stuck/Frozen (2022 Tips)
- How to Connect PC to WiFi and Fix PC Can't Connect to WiFi Issue
Do you want to know how to connect your PC to Wi-Fi but are unsure how to do so? You couldn't have found a better destination! If you follow the guidelines outlined in this article, you will have no trouble connecting to your wireless network. - How to Delete Apps on Chromebook
If you've got any apps you don't want on your laptop anymore, then knowing how to delete apps from a Chromebook will come in handy. Want to learn how to delete apps on Chromebook? Here are the steps for removing different apps based on device type.