How To Check Storage On Mac? [Step By Step]
If you're wondering how to check storage on your Mac, you're likely looking to free up space or troubleshoot storage issues. Checking storage on Mac is a simple process that can be done for various reasons, such as deleting unnecessary files or upgrading your storage capacity. There are three basic methods to check storage on Mac: you can use the About This Mac feature, check the Storage tab in the About This Mac window, or use the Disk Utility app to view storage details. Each method provides a clear picture of your Mac's storage usage, helping you identify which files or apps are taking up the most space.
Why Should We Check Storage on Mac?
You want to check storage on your Mac for various reasons, including ensuring you have enough space for your files, apps, and updates, and to free up space by deleting unnecessary files and apps, and also to troubleshoot issues with your Mac's performance and to maintain your Mac's overall health and performance.
1. To check used and available storage space
Checking storage on your Mac allows you to see the amount of space your files are currently occupying, including pictures, documents, and music, as well as the available storage space for future files.
2. To know the amount of free space
Before installing a large application or storing a big file on your Mac, it's a good idea to check how much free space you have available. This will help you determine if you have enough room to install the new software or save the file. If your Mac is running low on space, you'll need to free up some room first by deleting unnecessary files, emptying the trash, or using other methods to create more space.
3. To know if your Mac needs extra free storage space
Checking storage space on Mac is crucial as it allows you to determine if you have enough space to install a program or store more files, and if not, to free up space before installation.
4. To know if you need to upgrade your Mac
Checking storage space on Mac can help determine if it's time to upgrade to a larger hard drive, such as upgrading from a 1TB to a 2TB or 3TB hard disk, and also consider purchasing a tool for automatic backup to an external hard drive.
Checking storage on Mac is important as it allows you to check used and available storage space, know the amount of free space, and determine whether you need extra free space or if it's time to upgrade your Mac storage.
How to Check Storage on Mac? [3 Ways]
You'll learn about three methods to check the storage on your Mac, with detailed steps provided for each, accompanied by operational images where possible.
- Way 1. Check Your Storage via "About This Mac"
- Way 2. Check Your Mac Storage via "Disk Utility"
- Way 3. Check Your Mac Storage via "System Information"
Way 1. Check Your Storage via "About This Mac"
The About This Mac feature provides an easy way to check the space left on your Mac, giving you a simple breakdown of your Mac storage. To check for storage using this feature, simply follow these steps:
Step 1. To access the About This Mac section, click on the Apple icon located in the top left corner of the screen, then select "About This Mac" from the list of available options.
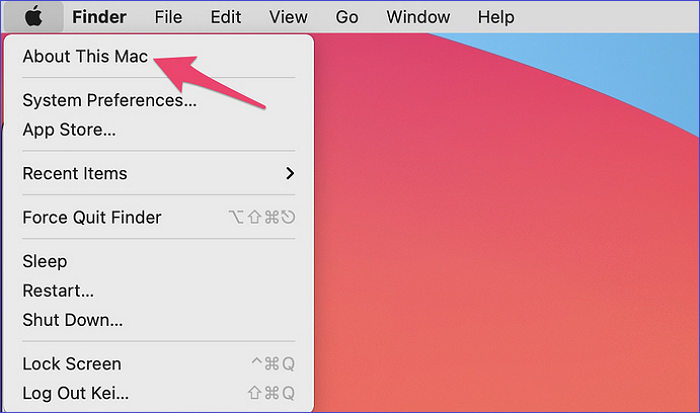
Step 2. Navigate to the "Storage" tab.

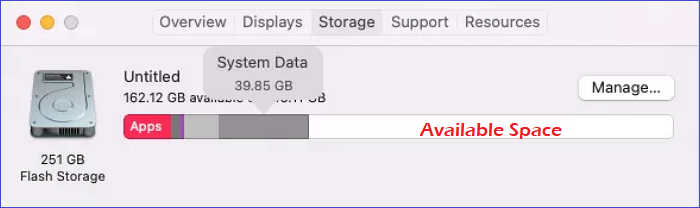
Step 3. The system will display the amount of storage available on your device in the form of a bar graph, with different categories such as System Data, Apps, Bin, Documents, etc. Hovering the mouse over the white section of the bar graph will show the available space.
Way 2. Check Your Mac Storage via "Disk Utility"
As a Mac user, the Disk Utility app allows you to control your internal and external storage, enabling you to create disk images, format drives, or combine several disks into one. To check Mac storage using Disk Utility, follow these steps:
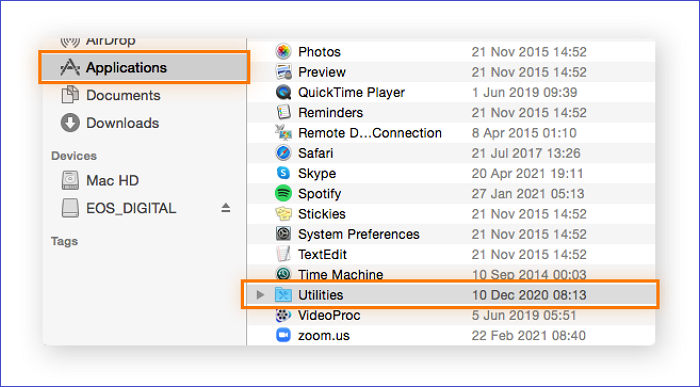
Step 1. Open the Finder app.
Step 2. Navigate to the left panel and click on "Applications", then open the "Utilities" folder.
Step 3. Next, open Disk Utility.
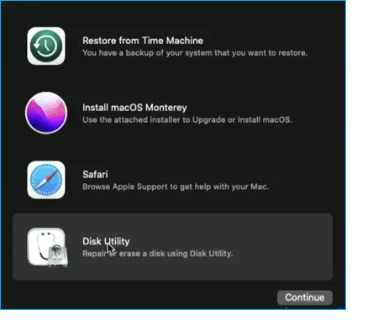
Step 4. Once on Disk Utility, navigate to the left and select the drive you want to check storage, then you'll see used and available space on the selected drive.
Way 3. Check Your Mac Storage via "System Information"
To check your Mac storage using System Information, open the Apple menu and select About This Mac, then click on the Storage tab. This will display the total storage capacity of your main hard drive and the amount of free space available. You can also click on the Manage button to view detailed information about your storage, including the amount of space used by each type of file and the storage capacity of other connected drives. This tool provides a quick and easy way to check your Mac storage and identify any potential storage issues.
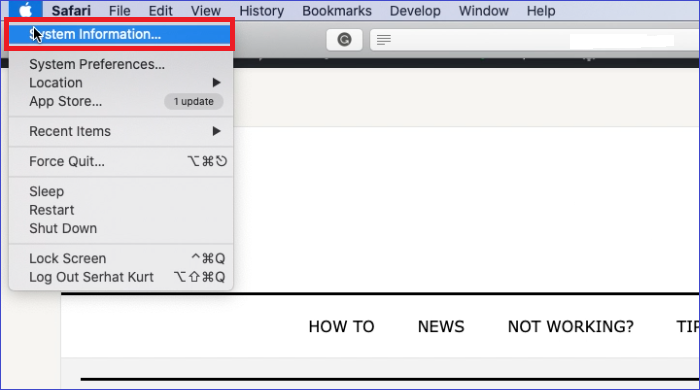
Step 1. Hold the Option key and click the Apple icon on the left of your screen. This will bring up a menu with two options: Restart and Shut Down.
Step 2. Select "System Information."
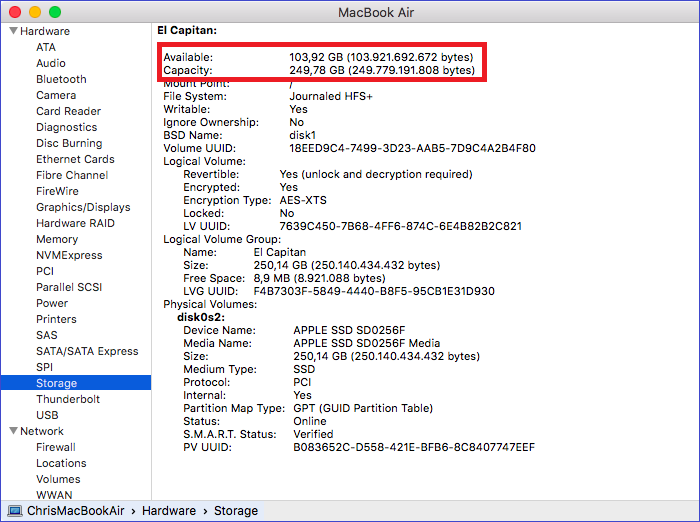
Step 3. Click to expand the "Hardware" section.
Step 4. To view the system information for your drive, click on "Storage" which will display the total device capacity and free space.
Here are the additional methods to check storage on a Mac:
- Using the "Get Info" feature in the Finder app.
- Running a terminal command.
- Using the "Quick Look" feature in the Finder app.
Conclusion
Checking storage on Mac is crucial as it lets you know the used and free space, whether you need extra storage space, or if it's time to upgrade your Mac. You can check storage on Mac using the About This Mac feature, which provides a quick overview, Disk Utility, which offers more detailed information, or System Information, which provides a comprehensive view of your Mac's storage.
To view the available and used disk space, you can use various methods. This is crucial if you want to save new files or install more applications, as it helps you determine if you have enough space on your device.
FAQs
Some of the questions you may want to know about checking storage on Mac include the following.
1. What Is My Storage So Full on Mac?
Clearing duplicate files, junk files, caches, and temporary files can help free up space on your disk, making it less full and more organized.
2. Why Is My Mac Saying I have no Storage?
You're running low on disk space. Try freeing up some space or upgrading to a larger drive.
3. How Do I Empty My Mac Cache?
You can achieve this through the following steps:
Step 1. While on Finder, select "Go" then "Go to Folder."
Step 2. Copy the following command into the search bar: ~/Library/Caches
Step 3. Click on the "Go" button to access the folder that contains cached files on your device.
Step 4. Once the list of cached files displays, press Command+A to select all the files at once.
Step 5. Press Command+Delete to remove the selected files.
Step 6. To complete the process, enter your Mac password on the popup that displays, which will then empty your Mac cache.
Related Articles
- How to Decide the Raid Redundancy over Performance [Everything You Should Know]
- How to Fix Smart Failure Predicted on Hard Disk 0, 2, 4
- Free PDF Editor - Top 6 Best Free PDF Editors 2020 Update
- Windows Update Troubleshooter Download Full Version [2022 Tips]
- How to Find/Redeem Game Key on Epic Games (Complete Guide)
Can't find your Epic Games product key? Learn how to find and redeem game keys on Epic Games, plus bonus tips for transferring games to another PC or drive. - How to Find Office 2016/2019 Product Key (Windows 11 Available)
If you need to reinstall Office 2016/2019 on a new computer or for other reasons, you'll need to find your product key. Fortunately, there are several methods to retrieve your Office product key, which are compatible with Windows 11/10/8/7. These methods can help you access your product key, making it easy to reinstall Office on your new computer.