How to Back Up Photos to Google Drive
Platforms like Google Drive offer a convenient solution for saving backups of data, such as photos, with ease. This allows users to access their backups from online, desktop, or mobile applications, providing a safeguard against losing important photos in case of device damage or failure.
This article will explore techniques for backing up photos to Google Drive with the right approach.
Part 1: Overview of Google Drive Backup Utilities
Google offers a range of backup utilities across the digital space, and in 2017, it expanded its cloud backup services with the launch of Backup and Sync for individual users and Drive File Stream for businesses, allowing users to back up their data to cloud servers.
Google's Backup and Sync service was discontinued in October 2021 and replaced with a single client service, Drive for desktop, available for both Windows and Mac users. In its place, Google introduced dedicated backup services like Google Photos, allowing users to back up content on Google Drive and Google Photos.
Part 2: How to Back Up Photos to Google Drive (PC)
We'll now focus on methods to back up photos using Google Drive. You can try any of these methods that suit your needs to ensure your photos are safely backed up and you don't lose them in the future.
Method 1: Backup Photos Using Google Drive for Desktop
To backup photos with Google Drive on desktop, you can access Google Drive directly across your computer, making it easy to back up your data. To do this, follow the steps provided below.
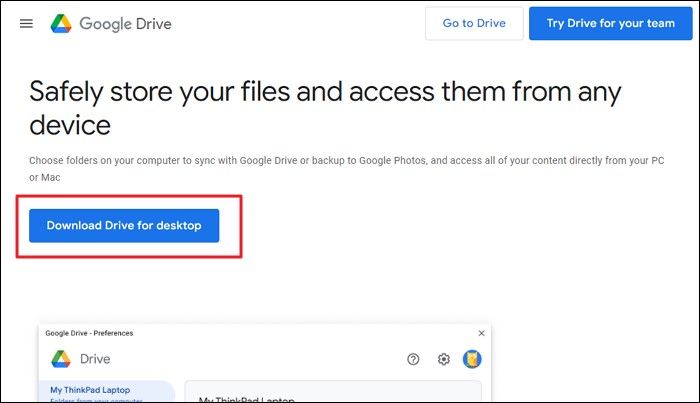
Step 1: Go to the official link, download Drive for desktop, and install it properly on your computer.
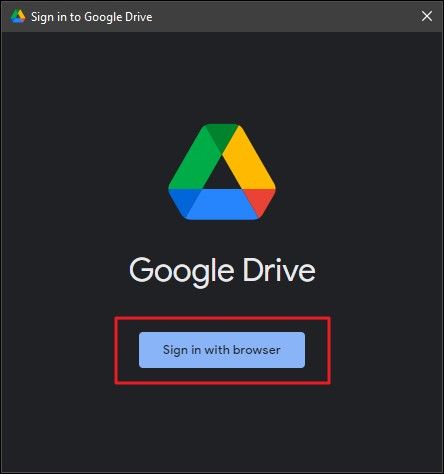
Step 2: Launch Google Drive for Desktop, click the "Sign in with browser" button, and then select the Google Account you want to use to back up your photos in the browser.
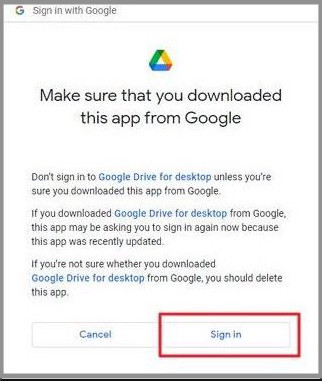
Step 3: You will be redirected to a new screen where you need to click "Sign in" to agree to the connection with Google Drive for Desktop.
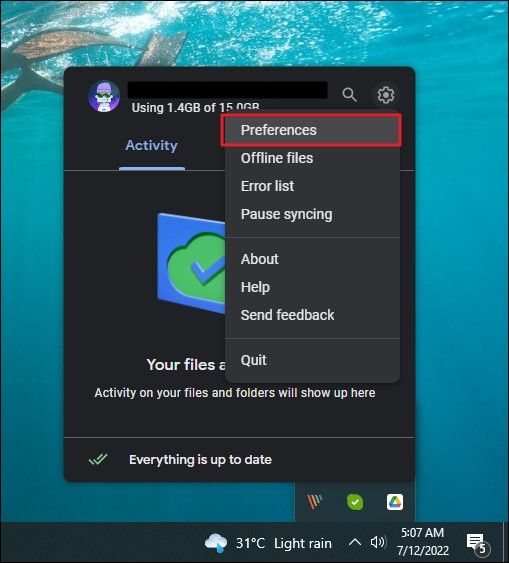
Step 4: After installing Drive for desktop, a dedicated icon will be present on your computer's taskbar. Clicking on this icon will open a list of settings, and selecting the "Gear" icon will allow you to access the "Preferences" to make any necessary adjustments.
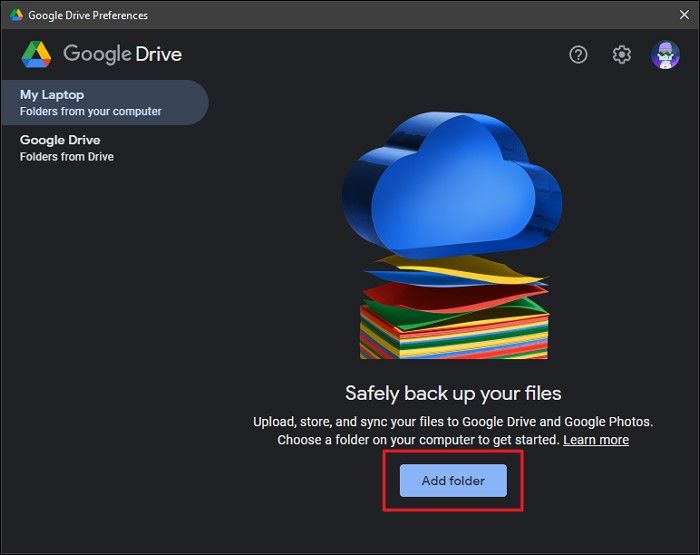
Step 5: To add a folder, tap on the "Add Folder" button and navigate through the folders to locate the photos you want to upload across the Drive.
Step 6: As you add a folder, a pop-up appears. Uncheck the "Back up to Google Photos" box and check the box for "Sync with Google Drive", then select "Done".

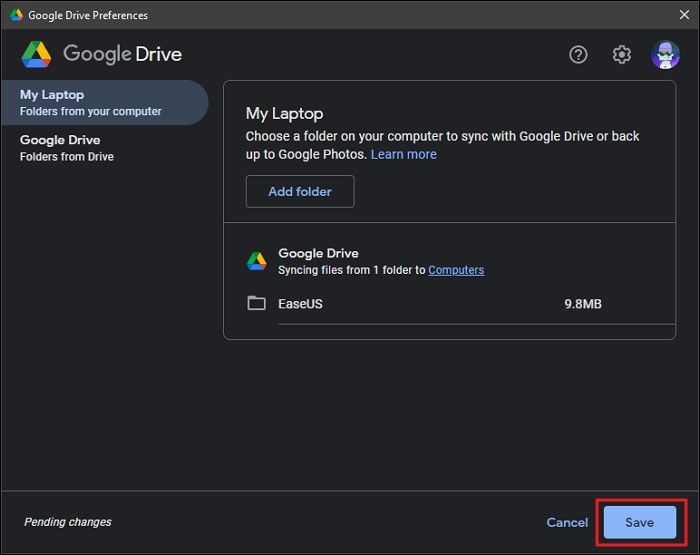
Step 7: To backup folders across Google Drive, select the folders you want to back up, then tap the "Save" button at the bottom of the screen to save the settings across desktop Drive.
Method 2: Backup Photos Using Google Photos
If you don't want to back up photos with Google Drive on your desktop, you can use Google Photos as a source to upload your photos to the cloud and set a backup for your device.
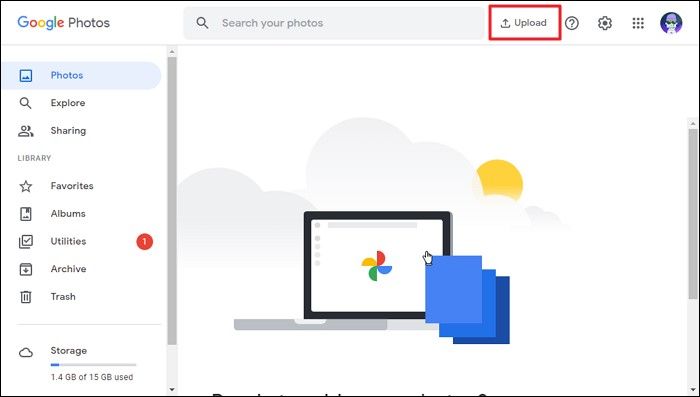
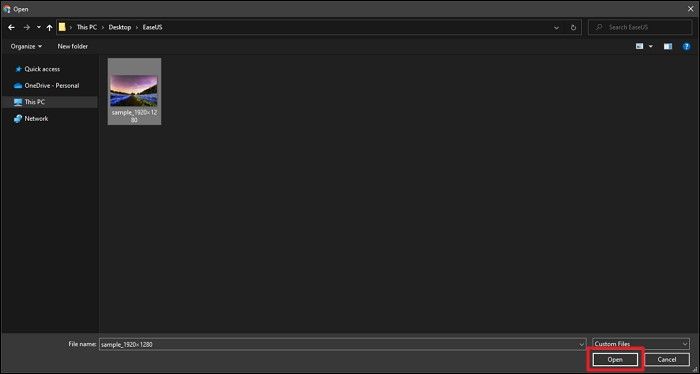
Step 1: To upload photos to Google Photos on your desktop, open the official website on your computer, then click on the "Upload" button located in the top-right corner of the screen.
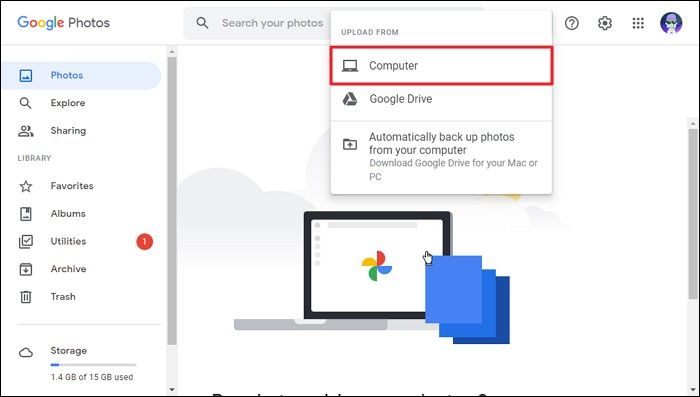
Step 2: To upload photos from your computer, select the "Computer" option from the drop-down menu on the front of the device. This will allow you to access the photos stored on your PC or Mac.
Step 3: To upload photos to Google Photos, select the desired photos from your desktop and tap "Open" to initiate the upload process. This will allow you to successfully upload the chosen photos across Google Photos.
Method 3: Backup Photos Using Qiling Backup
Google Drive is not the only option for photo backup. Services like Qiling Backup offer a competitive alternative with a safe and secure system for keeping backups, providing a high level of data security.
While Google Drive excels in other areas, Qiling Backup stands out with several key features that make it a superior option.
Prominent Features of Qiling Backup
- The app offers a free 250 GB Qiling Cloud (AWS-based) Space for its users.
- This tool helps users backup files, systems, and disks to various cloud services, local drives, and a dedicated cloud service, making it easier to safeguard data.
- A secure and encrypted partition, named the Security Zone, is created to safeguard data from ransomware attacks.
- The software allows for easy setup of backups with a single click, and can recover data instantly with high efficiency.
- The system sends a backup notification to a specified email address, providing real-time updates on the state of the backup.
Steps to Backup Photos Using Qiling Backup
To backup photos using the service, start by creating an account and downloading the app on your device. Next, select the photos you want to back up by choosing the album or folder they are stored in, and then click the "backup" button.
Step 1. When using Qiling Backup for the first time, click on "File backup" on the home screen to select the files you want to back up, including pictures, videos, documents, and other types of files.

Step 2. To backup files, folders, or directories, follow the paths to locate the items you want to back up, then select them all.

Step 3. To select a backup location, you can choose a local drive, a network location, or an external drive. Consider the size of the backup and the available space on the chosen drive.

Step 4. Qiling Backup allows users to save backup files to various devices, including local hard drives, external USB drives, SD cards, network drives, NAS drives, and Qiling cloud drives. It's recommended to save backups to the cloud drive for greater accessibility, flexibility, and safety.

Step 5. To set up an automatic and intelligent backup schedule for the next file backup task, go to the "Options" setting. Here, you can choose to encrypt confidential files, compress the backup image size, or customize the backup scheme to specify the start time for the next backup.

Customize an advanced and automatic backup task here:

Step 6. Click "Proceed" to start the file backup process, and your completed backup files will be displayed in a card style on the left area.

Part 3: How to Back Up and Sync Photos to Google Drive (Android)
To backup and synchronize your photos across Google Drive on Android without using a desktop, follow this guide. This setup allows you to keep your backup restricted to your smartphone, ensuring your photos are safely stored and easily accessible. By following these steps, you can set up a system to back up your photos with Google Drive on your Android device.
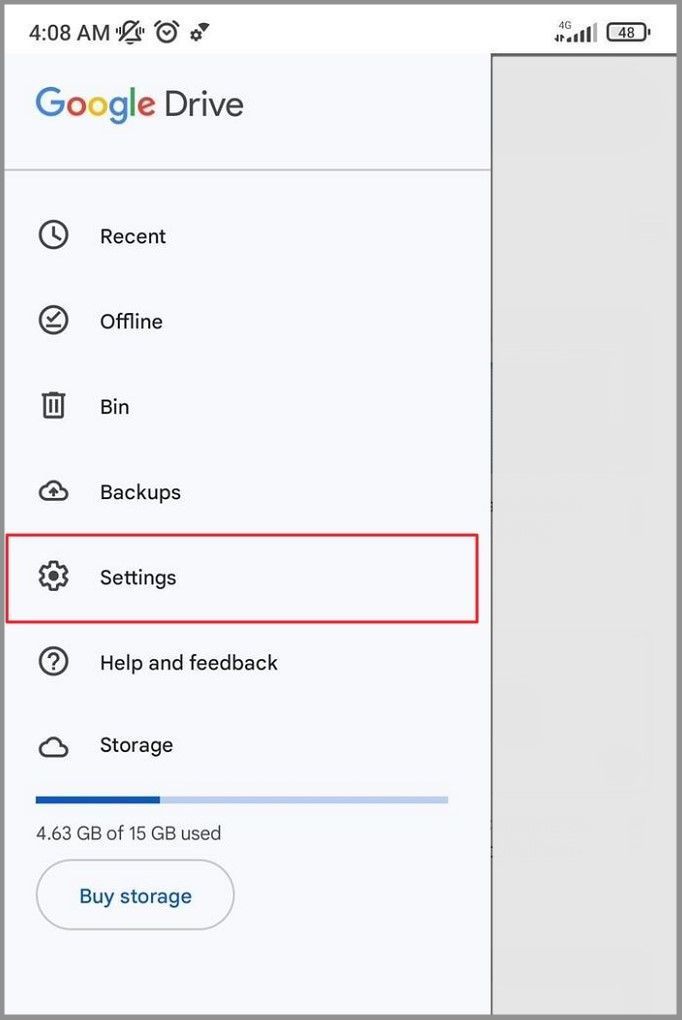
Step 1: To access Google Drive settings on your Android device, open Google Drive, tap the hamburger icon on the top-left corner, and select "Settings" from the list of options.
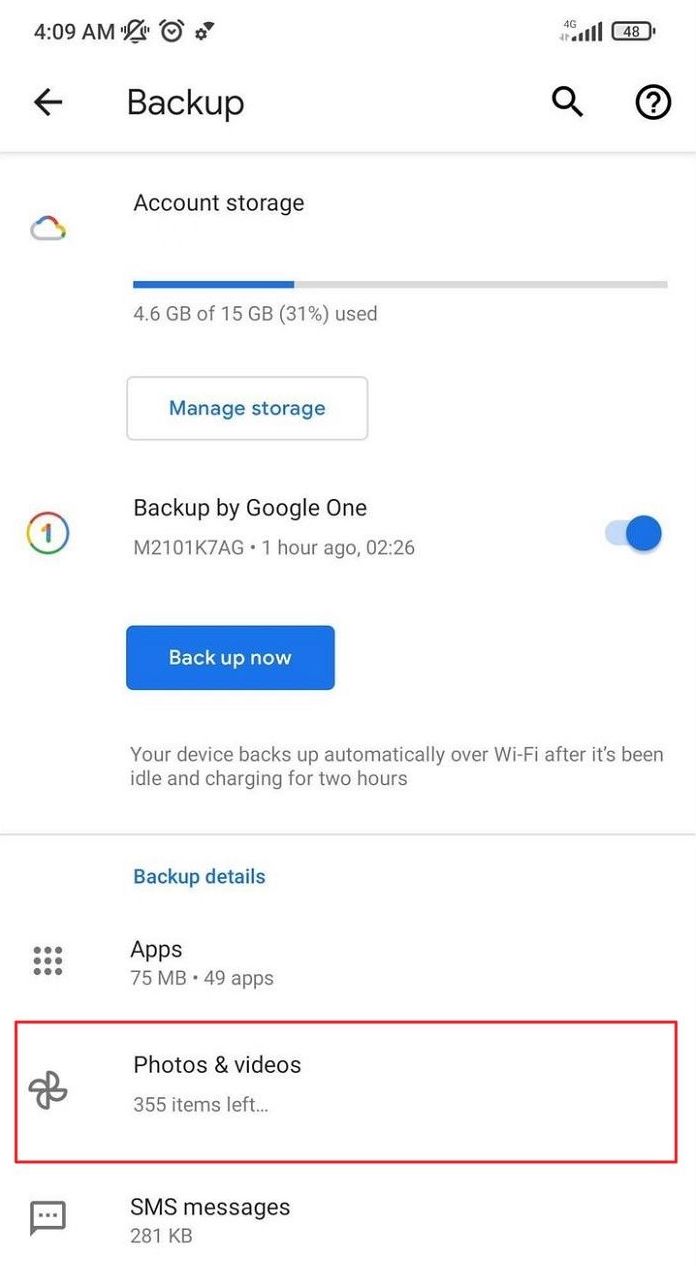
Step 2: To reset your Google Photos, go to the "Settings" menu, then click on "Backup and reset," and select "Photos & videos" from the list of options.
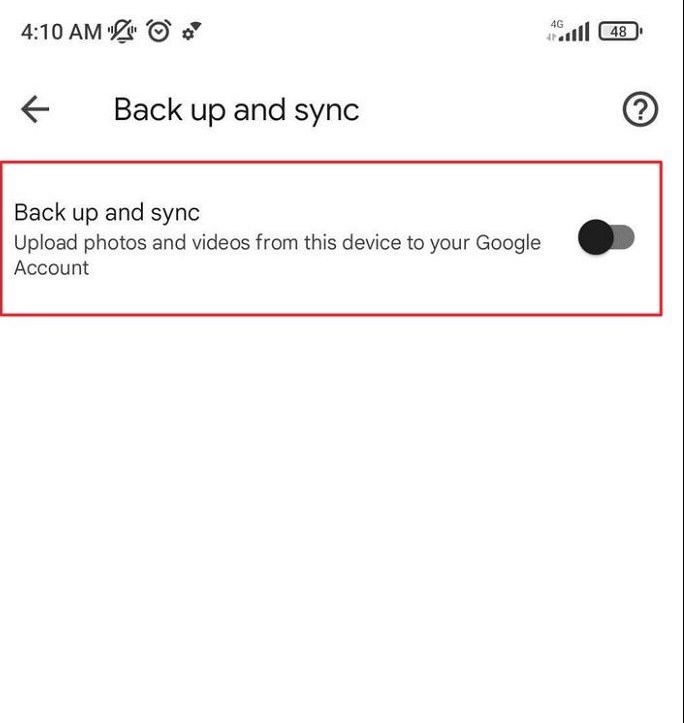
Step 3: To enable the feature of backing up your photos to Google Drive, go to the settings menu, select "Back up and sync", and toggle the switch to the "on" position. This will automatically save your photos to your Google Drive account.
Conclusion
The article provides methods to back up photos with Google Drive, essential for data safety, and also offers alternative techniques through PC and Android, featuring a clear overview of Qiling Backup.
Related Articles
- System Repair Disc vs Recovery Drive: Same or Not?
- Elden Ring Backup Tips: How to Back Up Elden Ring Save Data
- The Best Disk Imaging Software for Windows 11
- Top 6 Best Windows 7 Repair Tools in 2022 (Free)
- [Solved]How to Transfer Office 365 to New Computer
If you're trying to transfer Office 365 to a new computer, this article is for you. It provides two methods to help you transfer Office 365 to a new computer using the product key, making the process easy and straightforward. - How Do I Transfer Office from Windows 10 to Windows 11 with Product Key - Qiling
Follow this guide to transfer Office from Windows 10 to Windows 11 easily. Also, know how to find and save your Product Keys.