Can I Install Windows from Windows To Go USB?
You can't install Windows from a Windows To Go USB drive, but you can use the Windows Media Creation Tool to create a bootable USB drive for installing Windows instead.
How to Create a Bootable USB with Windows Media Creation Tool?
The Windows Media Creation Tool is a utility developed by Microsoft that allows users to create a bootable USB drive from a Windows ISO file, making the USB drive an installation media that can be used for various situations such as bootup failures, system reinstallation, and more. To use this tool, users must first arrange certain things, including downloading the tool, selecting the correct Windows version, choosing the USB drive, and preparing the USB drive for booting.
- Blank USB Drive: The Windows Media Creation Tool does not need a certified USB drive, and a blank USB drive with at least 8GB of space is sufficient.
- Windows Product Key: Users need a valid Windows product key to access and copy the OS onto a USB drive, which they would have received at the time of purchase.
- Internet Access: For the entire process, make sure you have a stable internet connection.
Once you are ready, follow the steps below to create a bootable USB drive:
Step 1. Visit the Microsoft site to download and install the Windows Media Creation Tool.
Step 2. Once the software is downloaded, open the tool and read the terms. Click on Accept and proceed forward.
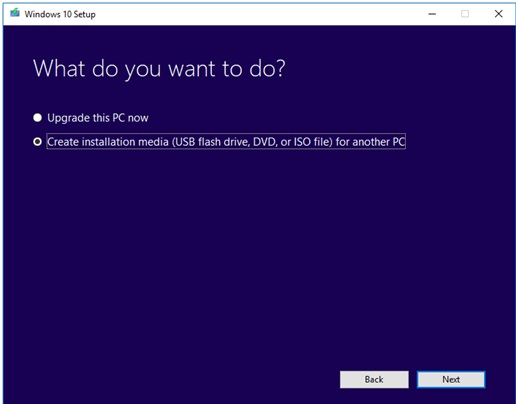
Step 3. Under the second window, you will see two options, click on the "Create Installation Media (USB flash drive, DVD, or ISO file)" option and click next.
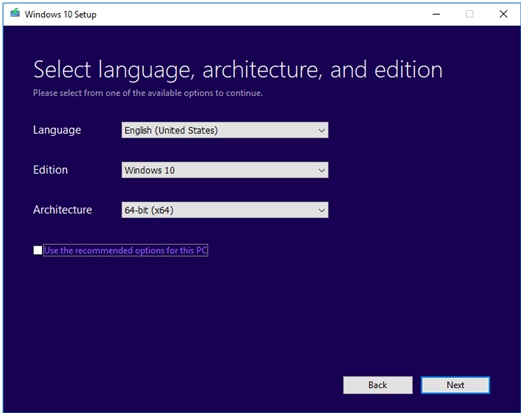
Step 4. Select the language, Windows Edition, and Architecture in the next Window. You can also use the recommended options for this PC option.
Step 5. Select the USB flash drive for the installation process.
Step 6. Once the external USB drive is read, the utility tool will start the process.
Step 7. Once you've finished formatting the USB drive, click on the Finish button, and it will be ready to use as a bootable drive to install an operating system.
How To Create a Windows To Go USB?
Windows To Go, another Microsoft feature, allows users to create a portable Windows system USB drive, but it has limitations, such as only being available on Windows 8/10 Enterprise and Education versions and requiring certificated USB drives. An alternative is Qiling OS2Go, which enables users to create a portable USB drive.
Step 1. To use Qiling OS2Go, install it on your Windows computer, which will show you how much space is being used on your system drive. Then, plug in a USB drive that is larger than the used space on your system drive. Choose the target USB drive and click Next to proceed.
Step 2. The notification from Qiling OS2Go warns that the operation will delete all data on your drive, so it's essential to back up any important data before proceeding. To continue, click the Continue button.
Step 3. Adjust the disk layout to match the resource drive, or customize it according to your needs. If using a Solid State Drive as the Windows bootable drive, select the corresponding option and click Proceed.
Step 4. Qiling OS2Go will create a portable USB drive, which may take a while depending on the operating system and network conditions. Once the progress reaches 100%, the USB drive will be bootable.
Step 5. Insert the portable Windows USB into your computer, start it up, and press the required key (F2, DEL, F10...) to access BIOS. From there, select the option to boot from the USB disk.
Note: To ensure a successful boot, it's crucial that the boot mode of the portable USB drive and the target computer match, specifically whether they are set to UEFI or Legacy mode. If they don't match, you might encounter issues with booting.
Conclusion
Using the Windows Media Creation Tool is a straightforward process to create a bootable USB drive. Alternatively, you can use a third-party tool like Qiling OS2Go to create a portable Windows USB drive, allowing you to use your system anywhere and anytime. This includes being able to use Windows 11 on an unsupported computer if you create a portable Windows 11 drive.
Related Articles
- Rufus vs. Windows Media Creation Tool: Everything You Need to Know
- Windows 11 to Go | How to Create Windows 11 Portable USB Drive
- 2 Ways - How to Run Windows Apps on Mac
- How to Effectively Create Bootable Windows 7 USB Drive
- Top Three Backup Tools for Windows Servers (2012, 2016, 2019)
You can find three backup tools for Servers in this page. With Windows Server backups, many businesses can reduce a lot of losses and troubles. Want to know the detailed operations? Read on! - Best Way to Backup Laptop to External Hard Drive
In this article, you are going to learn how to back up Dell, Lenovo, HP, Toshiba, Sony, Acer, Samsung, or ASUS laptop with the best way.