How to Effectively Create Bootable Windows 7 USB Drive
CDs and DVDs have become outdated, with many modern computers and laptops no longer supporting CD or DVD installation, making disk-based installation methods obsolete.
While you can still install movies or video games using CDs or DVDs, a clean install of Windows 7 requires a bootable USB drive.
A bootable USB is a USB drive with an ISO image of an operating system, containing all the OS information found on an optical disk.
Having a bootable Windows 7 USB can be extremely helpful in various situations. It allows you to install Windows 7 on a new computer, repair or reinstall the operating system on an existing one, or even create a portable installation of Windows 7 that can be used on multiple machines.
- To reinstall Windows 7, you'll need to back up your important files, purchase a Windows 7 installation disc or download the ISO file, and then follow the installation process. Insert the disc, restart your computer, press a key to enter the BIOS settings, set the boot order to USB or CD/DVD, save changes and exit, and the computer will restart and boot from the disc.
- If your hard drive gets damaged or corrupted
- If you already have the necessary installation files on your system, you can simply reinstall them without needing to download them again.
- To run Windows 7 on your Mac, you can use a virtualization software such as Boot Camp or a third-party virtualization tool like Parallels or VMware Fusion. This allows you to install Windows 7 as a separate operating system on your Mac, giving you the ability to run Windows applications alongside your Mac's native operating system. Alternatively, you can also use cloud-based services like Microsoft's Remote Desktop or Amazon's WorkSpaces to access Windows 7 from your Mac, without the need to install it locally.
To create a bootable Windows 7 USB drive, you can use it to clean install the OS. This drive can be a helpful tool, so let's check out how to create it.
How to Create a Bootable Windows 7 USB Using Rufus
Microsoft's Media Creation Tool can no longer be used to create a bootable Windows 7 USB drive because Microsoft has ended support for Windows 7.
Microsoft no longer allows direct downloads of Windows 7 ISO files to computers, making it impossible to install Windows 7 from scratch without a CD or DVD. Additionally, if you don't have a Windows 7 installation disc, you won't be able to downgrade to Windows 7 without a bootable USB.
One free alternative to create a bootable USB drive for the Microsoft Windows Installation Media Creation Tool is Rufus.
Rufus is a free and open-source application for Windows that allows users to format and create bootable USB flash drives, making it a reliable utility with source code.
This software allows you to create bootable USB drives with various operating systems such as Windows installation and Linux distributions, as well as MS-DOS, FreeDOS, and Windows To Go. It also supports formatting USB drives with multiple file systems, including FAT, NTFS, and UDF.
To create a bootable Windows 7 USB using Rufus, you have to follow these steps:
Step 1. You can download the latest version of Rufus from the official website at https://rufus.ie.
Step 2. To create a bootable USB drive using Rufus, insert a clean USB drive with at least 8 GB of free space into your device. Then, open up Rufus, which is a free software that can create bootable USB drives from various operating systems. Follow the on-screen instructions in Rufus to select the correct settings for your USB drive and the operating system you want to install.
Step 3. Rufus will automatically detect your flash drive. To proceed, tap on the Device and select your USB from the dropdown menu.
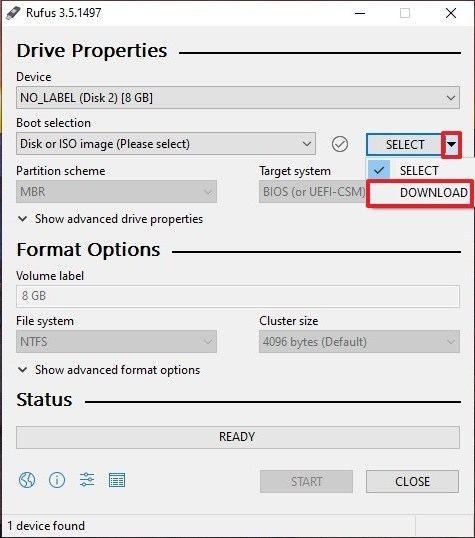
Step 4. To proceed, ensure that the Boot Selection option is set to "Disk or ISO image" and click "Select". Rufus will then open a file explorer where you need to select the location of your Windows 7 ISO image and choose it.
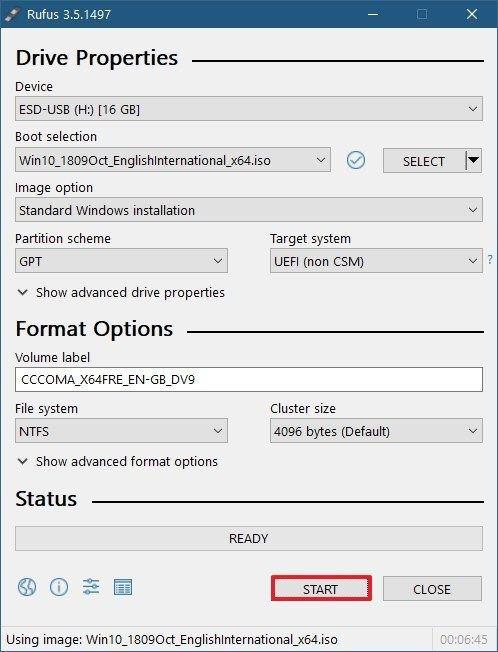
Step 5. If you want to create a Standard Windows installation, Rufus will automatically detect the suitable partition scheme for your computer, but you can also manually change these settings if needed.
Step 6. Provide the Volume label a name of your desire or leave it. Also, leave the File system and Cluster size to default settings. Lastly, hit the Start button.
Step 7. You'll receive a warning that your USB drive's data will be damaged, but click OK to proceed. Rufus will then create a bootable Windows 7 USB drive for you.
How to Create an Exact Copy of Your Windows 7 on the USB Drive?
Using Rufus, you can create a bootable Windows 7 USB for a clean install, but it won't copy your exact Windows 7 setup, including apps, games, and files, to the USB.
In situations where Rufus isn't sufficient, Qiling Disk Master is a more powerful and robust tool that can handle the task.
Qiling OS2Go is a software that allows Windows and Mac users to create a bootable Windows 7 USB, and it is compatible with Windows versions 7, 8, 10, and 11.
This software allows you to create an exact copy of your Windows 7 environment, which can be a huge help in case your system fails and you need to access your vital data. It can also assist you in other ways.
- Access the same USB on multiple devices
- Helps to run Windows on Mac
- Easy to carry around your Windows 7
- Easy to create a bootable Windows USB and more.
To create a bootable USB drive using the Qiling OS2Go, you can follow these steps: First, download the Qiling OS2Go software and install it on your computer. Next, plug in the USB drive you want to use as the bootable drive.
Step 1. To install Qiling OS2Go, plug in a USB drive larger than your system drive's used space and follow the prompts. The tool will display your system drive's used space, and you can then choose the target USB drive and click Next to continue.
Step 2. Qiling OS2Go will notify you that the following operation would delete all data on your drive. Make sure you have backed up all important data, then click Continue to proceed.
Step 3.The default disk layout on the target drive will be exactly the same as the resource drive, but you can also edit it according to your needs. If you're using a Solid State Drive as the Windows bootable drive, you can tick the option and then click Proceed.
Step 4.Qiling OS2Go will start to create the portable USB drive, which may take a while depending on your OS and network condition. Once the progress reaches 100%, the USB drive should be bootable and ready to use.
Step 5. Insert the portable Windows USB and start your computer. Press the required key (F2, DEL, F10...) to access BIOS. Choose to boot from the USB disk.
Note: To ensure a smooth boot process, it's essential to match the boot mode of your portable USB and the target computer. If they're not the same (UEFI or Legacy), you might encounter issues with booting.
Sum Up
Creating a bootable Windows 7 USB drive can be a game-changer, allowing you to clean install, run Windows on Mac, and more. By selecting the right method to create a bootable Windows USB, you can bypass the hassle of reinstalling operating software on your computer.
If you just want to create a portable Windows 7 installation on a USB drive for future reinstalls, Rufus is a suitable choice. However, if you're aiming to create a dual-bootable Windows 7 replica on a USB drive that can run on both Mac and Windows devices, Qiling OS2Go is the better option.
To create a bootable Windows 7 USB, you can use the built-in Windows 7 USB/DVD Download Tool or third-party software like Rufus. This will allow you to boot from the USB drive and install Windows 7 on a PC. Simply download the tool, select the Windows 7 ISO file, choose the USB drive, and follow the prompts to create the bootable USB.
Related Articles
- Rufus vs. Qiling OS2Go: Should I Create a Bootable or Portable USB?
- How Can You Put Windows 10 on A USB
- How to Create Windows 11 to Go
- Windows 11 to Go | How to Create Windows 11 Portable USB Drive
- What Is the Easiest Way to Shred Files in Windows 10?
Are you concerned about data security? You can easily protect your sensitive information by securely shredding files on your Windows 10 computer. This simple method ensures that your confidential data is completely erased, leaving no chance of unauthorized access. - Solved: SSD Not Showing Up in Disk Management on Windows 10/11/8/7
Is SSD not showing up in Disk Management? this article provides four effective fixes and some quick fixes for this issue. Dive into this article now.