Rufus vs. Qiling OS2Go: Should I Create a Bootable or Portable USB?
Bootable USB vs. Portable USB: What's the Difference?
Many people get confused between bootable and portable USB drives, thinking they're the same thing. However, they're not. A bootable USB drive is a device that can be used to boot up a computer, allowing you to install an operating system or access a computer's BIOS settings. On the other hand, a portable USB drive is a device that can store and transfer files between computers, but it cannot be used to boot up a computer. In other words, a bootable USB drive is a specialized device that can be used to install or repair a computer, while a portable USB drive is a general-purpose storage device.
Both bootable and portable USB drives are useful in different situations.
A bootable USB or external device contains a program that can take control of a computer, often used to initiate a clean Windows install from an ISO file stored on the drive. This can be useful for recovering a failed system, allowing users to start fresh with a new operating system.
Portable USB drives can carry operating system frameworks, but it's not necessary to install them on the computer. By simply plugging in the USB drive, you can run the OS stored on it on any device.
Portable USB drives are helpful for running Windows-specific games or applications on Mac devices, allowing you to clone the entire system and make it bootable on other devices.
Now that we've clarified what a bootable and portable USB drive is, let's move on to creating one. To make a bootable and portable USB drive, you'll need a USB drive with enough storage space, a computer with a working operating system, and a tool like Rufus or a similar software. You'll also need to download the operating system you want to make portable, such as Windows or Linux.
The topic of the hour is a comparison between Rufus and Qiling OS2Go, two tools used to create bootable USB drives. Rufus is a robust tool for this purpose, while Qiling OS2Go is a powerful program that can create portable and bootable USB drives.
Rufus vs. Qiling OS2Go: What's Rufus?
Rufus is a free software utility that allows users to create a bootable USB drive, specifically by creating ISO disk images on USB drives.
Rufus is a free download available online that supports Windows 10, 8, and 7 operating systems. With this tool, you can enjoy various features, including compatibility with Windows 10, 8, and 7.

- 100% free for both personal and commercial use
- Allows to operate legacy tools with MBR and FreeDOS
- You can use a tool to format a USB drive into various file formats, including NTFS, UDF, FAT, ReFS, exFAT, and others. This allows you to use the drive with different operating systems and devices.
- It helps compute MD5, SHA-256, and SHA-1 hashes to any selected images
- The user interface is quite simple and modern
- The program is lightweight and can be run on laptops.
- Auto-update takes away all the manual updates trouble
- Supports different regional languages
- This tool enables users to adjust the cluster size without any hassle, making it easier to manage and optimize their data storage and retrieval processes.
Pros
- Superfast.
- Offers different partition and formatting options.
- Extremely lightweight tool.
- Free to use.
Cons
- Allows only 1 ISO at a time.
How to Use Rufus to Create a Bootable USB Drive
Step 1. Download Rufus from https://rufus.ie and attach at least 8 GB clean USB to the computer.
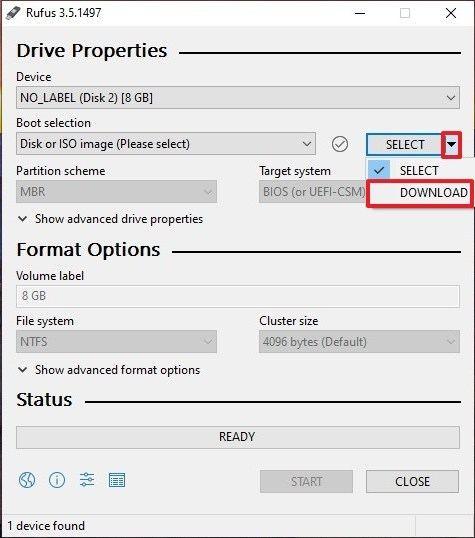
Step 2. To use Rufus, simply open the program on your computer and it will automatically detect the USB drive. From there, click on the "Device" tab and select the USB drive you want to boot from the drop-down menu. That's it!
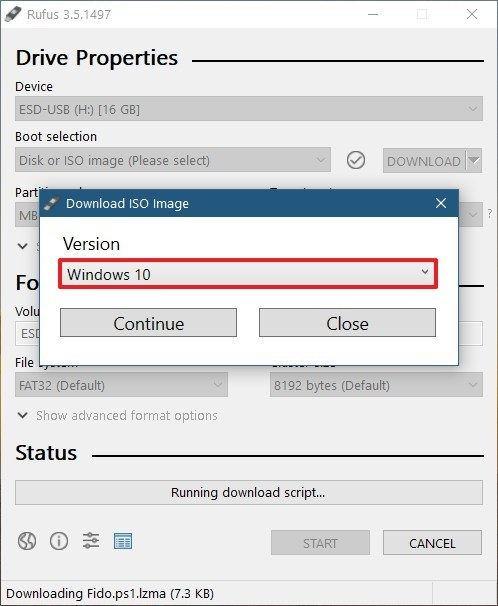
Step 3. To proceed, keep the Boot Selection option set to Disk for the ISO image and click on the Select button. This will open a file explorer browser window where you can locate and select the ISO image you want to burn onto the USB.
Step 4. In most cases, Rufus can automatically detect the Standard Windows installation on a device, so it's not necessary to make any changes to the default settings unless needed.
Step 5. To create a new volume, provide a name to the Volume label, or leave it as it is, and keep the File system and Cluster size settings as they are, then click on the Start.
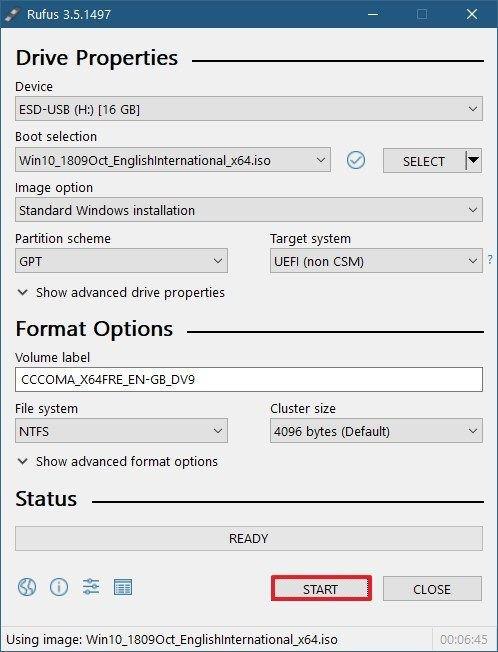
Step 6. Rufus might display a warning message saying that data on the USB will be destroyed, but this is normal. Simply click on the OK button and Rufus will begin creating the bootable USB.
Rufus vs. Qiling OS2Go: What's Qiling OS2Go?
Qiling OS2Go is a tool that allows you to create a portable and bootable Windows USB drive, enabling you to run a Windows environment on Windows or Mac devices by copying the Windows environment onto the USB flash drive.
This program allows you to create a portable Windows To Go USB or bootable Windows USB for Mac, making it a versatile tool. Importantly, it is compatible with the latest Windows 11, a feature that Rufus, a similar program, lacks.
Qiling OS2Go offers a range of features, including following features.
- Accessible from various computers, including Mac and Windows
- Allows to run Windows-specific programs on Mac
- With the advancement of technology, it's now possible to carry an entire operating system in the palm of your hand, making bulky laptops a thing of the past.
- Portable USB drives are most cost-effective than hard drives
- Qiling supports all the USB brands
- Provides 24*7 premium email support, etc.
Pros
- Seamless integration.
- It can create both bootable and portable USB drives.
- Simple to use.
- Intuitive interface.
- One-click solution.
- 7 days free trial.
Cons
- Not 100% free.
How to Use Qiling OS2Go
Step 1. To install Qiling OS2Go on your Windows computer, you'll first see the used space on your system drive. Then, plug in a USB drive that's larger than the system drive's used space. Next, choose the target USB drive and click Next to proceed.
Step 2. Be aware that Qiling OS2Go will notify you that deleting all data on your drive is imminent, and you should have backed up all important data before proceeding. Click Continue to proceed with the deletion.
Step 3. The disk layout on the target drive will be adjusted to match the resource drive's layout. You can also customize the layout as needed. If using a Solid State Drive as the Windows bootable drive, select that option and click Proceed.
Step 4. Qiling OS2Go will create a portable USB drive, which can take some time depending on the operating system and network conditions. Once the progress reaches 100%, the USB drive will be bootable.
Step 5. Insert the portable Windows USB into your computer and start it up. Press the required key (F2, DEL, F10...) to access the BIOS settings, and then select the option to boot from the USB disk.
Note: To ensure a smooth boot-up, it's crucial that the boot mode of both the portable USB drive and the target computer are identical, whether it's UEFI or Legacy. If they differ, you might encounter issues with booting.
Choose Your Own Bootable Creation Solution Wisely
Bootable and portable USB drives have distinct uses. A bootable USB drive enables a clean installation of an operating system, allowing you to start from scratch. On the other hand, a portable USB drive allows you to run ISO files without having to download them on another device, providing a convenient way to access and utilize software without the need for a physical installation.
Both USB drives have their own uses. A bootable USB drive is ideal for recovering a failed system, while a portable USB drive is useful for running Windows on any device, including a Mac.
In summary, getting the Qiling OS2Go tool is a good idea because it enables the creation of bootable and portable USB drives, although it comes at a cost and offers more features than Rufus.
We have shared a complete Rufus vs. Qiling OS2Go guide here and now leave the final choice in your hands. Make your decision wisely.
Related Articles
- How to Create Bootable Windows 11/10 USB for Mac | Use Windows Everywhere
- Download and Create Windows 10 To Go
- How to Install Windows 11 on An Old PC
- Windows To Go vs. Standard Installation: Which Option Is Better For You
- How to Schedule A Weekly Backup to Microsoft OneDrive[3 Tips]
Learn how to schedule a weekly backup to Microsoft OneDrive and keep selected files protected in cloud storage. - SD Card Keeps Disconnecting or Disappearing
If your SD card keeps disconnecting from your camera, mobile phone, or Windows PC, and it often disconnects when copying files, try the following 7 fixes to resolve the issue. These solutions are divided into two parts to help you troubleshoot the problem on multiple devices.