How to Install Windows 11 on An Old PC
Windows 11 is the focus of attention this year, with users planning to upgrade their devices to meet the minimum requirements. According to Microsoft, computers should have a TPM 2.0 chip and boot in UEFI mode to support Windows 11. While changing the boot mode from BIOS to UEFI is relatively easy, requiring a disk partition style conversion from MBR to GPT and a BIOS setting change, the TPM 2.0 chip limitation is more difficult to bypass.
The Trusted Platform Module (TPM) is a chip that protects sensitive data, such as encryption keys and user credentials, from being accessed or tampered with by malware and attackers. Typically integrated into a PC's motherboard or added to the CPU, the TPM chip ensures the secure storage of this information. However, since the TPM 2.0 chip was only promoted in 2016, many older PCs do not have this feature.
How to Check If Your Computer Has a TPM 2.0 Chip
To determine if your computer has a TPM 2.0 chip, you can use Windows's PC Health Check toolkit or the free Windows 11 Update Checker tool, which will indicate if your computer is capable of upgrading to Windows 11.
How to Install Windows 11 on An Old Computer
Installing Windows 11 on old PCs can be a challenge due to the requirement of a TPM 2.0 chip, which many older computers lack. Fortunately, there are two workarounds to bypass this issue: editing the Registry Editor or creating a portable Windows 11 USB drive, which can be used to run the operating system on an old computer. We will explore these options in more detail in the next part.
Method 1. How to Bypass the TPM 2.0 Limitation
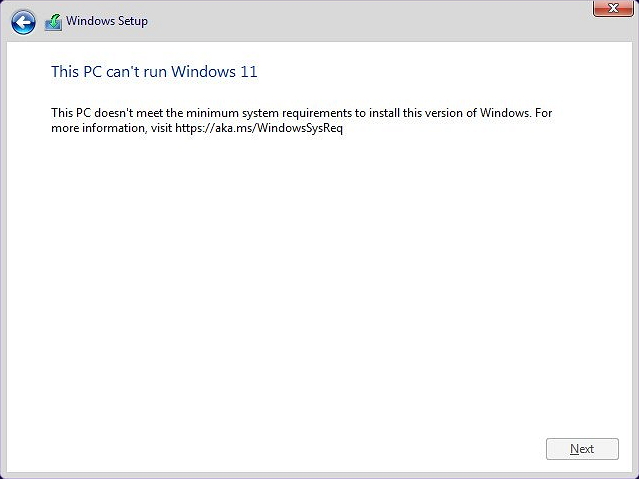
Step 1. When the installation error "This PC can't run Windows 11" appears, click on the Back button in the Windows Setup dialog.
Step 2. Press Shift+F10 to open Command Prompt.
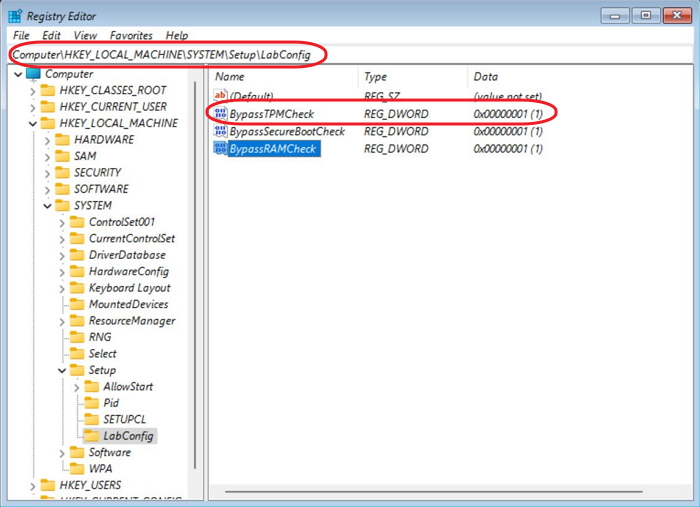
Step 3. To open the Windows registry, type `regedit` in the Command Prompt window and press Enter.
Step 3. To create a new key named LabConfig in the path HKEY_LOCAL_MACHINE\SYSTEM\Setup, navigate to that path, click on Edit, then New, then Key, and name the new key LabConfig.
Step 4. Inside the LabConfig, right-click in a blank space and click New > DWORD (32-bit) Value.
Step 5. Then name it BypassTPMCheck.
Step 6. Right-click on the selected DWORD Value and select the "Modify" option to edit it.
Step 7. Now give it a value of 00000001 and click OK.
Step 8. Now you have two DWORD values inside the LabConfig Key.
Step 9. To complete the installation, close both the registry and command prompt windows, then follow the installation wizard to finish installing Windows 11.
After changing the Registry Editor, if you don't know where to download Windows 11 ISO files, apply Win11 Builder to download and install the latest Windows 11 for FREE.
Step 1. The Windows11 builder is integrated with the Qiling OS2Go software. After installing the program, click the download button to launch it.
Step 2. The tool, now renamed to Windows Install Drive Creator, provides system information on its home screen, which updates in real-time. It supports not only Windows 11 but also Windows 10 and 8.1, allowing users to download and create installation drives for these operating systems.
Step 3. To create a Windows 11 installation media, connect your USB flash drive to the computer. The Windows 11 builder will automatically detect your USB device, and you can then click the "Create" button.
Step 4. If you have a used USB drive, the software will erase its data. Once the download process starts, wait until it finishes before leaving or doing something else.
Step 5. After successfully downloading the Windows 11 iso image file onto a USB drive, you can proceed to install Windows 11 on your computer by booting from the USB drive and following the installation wizard step by step.
Method 2. Create Portable Windows 11 USB Drive
To create a portable Windows USB drive, you need a set-up Windows 11 computer and clone the whole system drive to a USB drive using a third-party tool like Qiling OS2Go. This allows you to carry the USB drive and use it on any computer, including Windows PCs and Mac computers.
Preparation:
- A set-up Windows 11 computer.
- A portable storage device with a large storage capacity, allowing users to store and transfer a significant amount of data.
- Qiling OS2Go is a portable operating system that can be downloaded and installed on a Windows 11 computer, allowing users to run a separate OS environment without affecting the host system.
You can download and install Qiling OS2Go, then follow a guide to create a portable Windows 11 USB.
Step 1. To use Qiling OS2Go, first install it on your Windows computer, which will display the used space on your system drive. Then, plug in a USB drive that is larger than the used space on your system drive. Next, choose the target USB drive and click Next to continue with the process.
Step 2. Qiling OS2Go will notify you that the following operation would delete all data on your drive. Make sure you have backed up all important data. Click the Continue button to proceed with the operation.
Step 3. The default disk layout on the target drive will be the same as the resource drive, but you can also edit it to your needs. If you're using a Solid State Drive as the Windows bootable drive, select the corresponding option and click Proceed.
Step 4. Qiling OS2Go will create a portable USB drive, which may take a while depending on your OS and network condition. Once the progress reaches 100%, the USB drive will be bootable.
Step 5. To start, insert the portable Windows USB into your computer and turn it on. Press the specific key (usually F2, DEL, or F10) to access the BIOS settings. From there, select the option to boot from the USB drive. This will initiate the Windows installation process.
Note: To ensure successful booting, it's crucial that the boot mode of both the portable USB drive and the target computer match, whether it's UEFI or Legacy. If they don't match, booting might not be possible.
Sum Up
The main barrier to upgrading an old computer to Windows 11 is the TPM 2.0 chip requirement. However, there are two workarounds: manually changing the Registry Editor or creating a portable Windows 11 USB drive. Both methods can bypass Windows limitations, with the Registry Editor change allowing a one-time installation of Windows 11, and the portable drive enabling Windows 11 use on any computer with the drive.
Hope you can solve your problem after reading this post. Feel free to contact our support team if you have any problems: support@idiskhome.com.
Related Articles
- [Solution] Install Windows 11 on An Unsupported Computer
- How to Effectively Create Bootable Windows 7 USB Drive
- How Can You Put Windows 10 on A USB
- How to Play Windows Games on Chromebook [Latest Guide]
- How to Choose One Key Recovery Software
Want to know what is one key recovery software and how to use it? See below and I'll answer for you. - How to Do Onekey Recovery Initial Backup
You can easily create onekey recovery initial backup with Lenovo OneKey Recovery and a third party software – Qiling Disk Master.