How to Create Bootable Windows 11/10 USB for Mac | Use Windows Everywhere
It's exciting to run Windows on a Mac from an external USB drive without installing it on a separate SSD, allowing for dual-booting different operating systems on a single device, such as a PC or Mac, without the need for a clean install on the same hard drive or a second drive, saving disk space and making customized Windows available everywhere.
If you're used to working with both Windows and Mac computers, you may want to run Windows on your Mac. Fortunately, you can follow our step-by-step guide to create a bootable Windows 11 or Windows 10 USB for your Mac, allowing you to easily switch between operating systems.
Download Windows USB Bootable Creator for Free
Having a Windows bootable USB drive on hand can be a huge convenience. Imagine needing to work on a Windows-based project at home with your Mac, but not having the necessary toolkit installed on your macOS computer. Having a portable Windows system on a tiny USB drive can make it easy to access the necessary tools and software, making it a great solution for managing two different operating systems and machines. This can be especially useful in a variety of scenarios, such as working on a project that requires specific Windows software, or needing to access company-specific tools that can't be installed on a Mac. With a Windows bootable USB drive, you can easily switch between operating systems and have access to all the necessary tools and software you need.
To create a portable Windows USB drive that can be used on various devices, a reliable third-party tool is Qiling OS2Go. This tool allows you to create a bootable USB drive for Windows 11/10/8.1/8/7, enabling you to work and play in an identical OS environment without having to set it up again on a different device.
Step-by-Step Guide on How to Create a Windows 10 Bootable USB Drive
Follow an elaborate step-by-step guide here so you can effortlessly create a Windows bootable USB drive and boot Windows from a Mac machine.
Step 1. To use Qiling OS2Go, install it on your Windows computer, which will show the used space on your system drive. Then, plug in a USB drive that is larger than the system drive's used space. Next, select the target USB drive and click Next to proceed.
Step 2. Qiling OS2Go will notify you that the following operation would delete all data on your drive. Make sure you have backed up all important data before clicking the Continue button to proceed.
Step 3. Adjust the disk layout to match the resource drive, or customize it to your needs. If using a Solid State Drive as the Windows boot drive, select the corresponding option and click Proceed.
Step 4. Qiling OS2Go will start creating a portable USB drive for you, which may take a while depending on your operating system and network conditions. Once the progress reaches 100%, the USB drive will be bootable and ready to use.
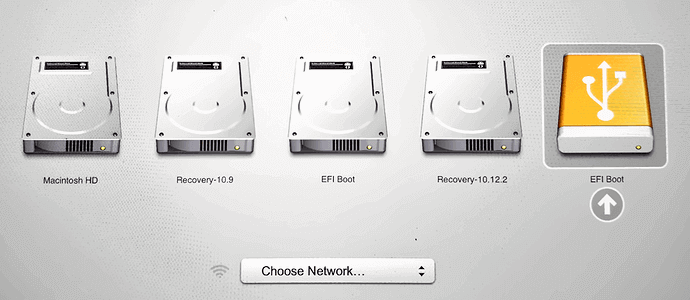
Step 5. To boot your Mac from a portable Windows USB, start your Mac, press the Option/Alt key, choose the yellow EFI Boot icon to boot from the USB drive, and follow the onscreen instructions.
Related Articles
- How to Create a Windows 10/11 Bootable USB
- How to Create Windows Bootable USB with Rufus, and Another Easier Way
- [2022 Download] Windows to USB Software Download for Windows 11/10/7
- Download and Install Windows 11 with Media Creation Tool
- How to Create Recovery Partition in Windows 10 | 2 Ways
You will learn how to create a recovery partition in Windows 10 easily and quickly using a built-in tool or a third-party tool. The procedure of using the recovery partition is also included. - How to Restore Lenovo G50 to Factory Settings?
Restore Lenovo g50 to factory settings with recovery partition under the help of Lenovo OneKey Recovery or Qiling Disk Master.