How to Create a Windows 10/11 Bootable USB
| Workable Solutions | Step-by-step Troubleshooting |
|---|---|
| 1. Why You Need A Bootable USB | A bootable USB helps you to install Windows on your computer. Let's see below what things...Full steps |
| 2. Download and Burn ISO Files to USB | You can follow the information below to learn more about how to create a Windows installation...Full steps |
| 3. Create Windows Installation Media | In this section, you will see how to create Windows installation media on your USB using the method...Full steps |
Installing a fresh copy of Windows 10 can be a hassle, but creating a Windows bootable USB media makes the process much easier. If you're not familiar with the need for a Windows 10 bootable USB or how to create one, our article covers both aspects, making the job a breeze.
Windows 10 USB bootable is a straightforward process that creates a Windows installation media, allowing you to install the operating system even with a CD/DVD. However, using a bootable USB offers several advantages, making it a preferred method for many users.
Why You Need A Bootable USB
A bootable USB drive allows you to install Windows on your computer, among other things. It can be used to install Windows, repair or reset Windows, and even reinstall Windows. Additionally, a bootable USB can also be used to create a Windows installation media, which can be used to install Windows on multiple computers.
- Installation of Windows: The primary advantage of using a bootable USB drive is that it allows you to install a fresh copy of Windows on your computer. This is the most important benefit.
- System Recovery: A bootable USB can help you perform a system recovery if your computer is not working properly, allowing you to troubleshoot and fix issues.
- Boot Windows Image: You can create a Windows bootable USB that will allow you to boot the complete operating system.
- Upgrade Windows: A bootable USB is useful for upgrading your Windows version, allowing you to easily install a new version of Windows on your computer.
There are more use-cases of a bootable USB, but those mentioned above are the most common ones.
Download and Burn ISO Files to USB? No, You Can Do It at One Step!
To create a Windows installation USB media, you can follow different methods. One way is to use the Media Creation Tool provided by Microsoft, which allows you to download the Windows installation media and create a bootable USB drive.
Traditional Method to Create Windows Installation Media
You can create a Windows installation USB media with a few simple steps.
To start, download the Windows ISO setup file from the Microsoft website. Next, use a media creation tool to burn the ISO setup onto a USB drive, which will serve as your bootable installation media.
The process of creating Windows installation media can be time-consuming and requires some computer knowledge, making it challenging for novice users.
Qiling OS2Go
Qiling OS2Go is a simple and recommended tool for all types of computer users, allowing you to create Windows installation media with just a few clicks, eliminating the need to visit any websites or perform any additional actions.
The software makes it easy to turn a USB drive into a bootable device, requiring only a USB drive connected to a computer and the Qiling OS2Go software to get started.
More Features
- Make your Windows Portable: You can create a portable Windows for Windows 10/11 with Qiling OS2Go.
- Run Windows on macOS: Qiling OS2Go can manufacture bootable Windows USB drives for macOS.
- Easy-to-use User Interface: It offers a simple and intuitive user interface to create portable Windows To Go USB sticks in seconds.
- Excellent Technical Support: Qiling's team is dedicated and trustworthy, allowing users to contact them at any time for assistance with their OS2Go software.
Steps to use Qiling OS2Go
Step 1. Install Qiling OS2Go on your Windows computer. Plug in a USB drive or external hard drive that is large enough.
Step 2. To create a Windows installation drive using Qiling OS2Go, select the "Windows Install Drive Creator" tab, choose the desired Windows versions (Windows 11, 10, or 8.1) or a local ISO file, and then click "Create" to proceed.
Step 3. You will see a safety warning message, telling you that all data on the selected disk will be deleted. Click "Continue" to proceed.
Step 4. Qiling OS2Go will create the Windows Installation media, which may take some time to download depending on your OS and network condition. Once the progress reaches 100%, the USB drive will be bootable.
Step 5. To install Windows, you'll need to insert the installation media, which is typically a USB drive or CD/DVD, into your computer. Once inserted, follow the on-screen instructions to start the installation process.
Create Windows Installation Media
To create Windows installation media on your USB using the method provided by Microsoft, follow the steps outlined in this section. This will guide you through the process of creating a Windows installation USB on your USB drive.
Here, you will use Media Creation Tool provided by Microsoft that will help you to burn the Windows setup ISO file on your USB media. To do this, first, download the Media Creation Tool from the official Microsoft website, then run the tool, select the language and architecture of Windows you want to install, choose the USB drive you want to use, and finally, confirm that you want to download the Windows ISO. Once the download is complete, the tool will create a bootable Windows installation USB drive.
Steps to create Windows Installation Media
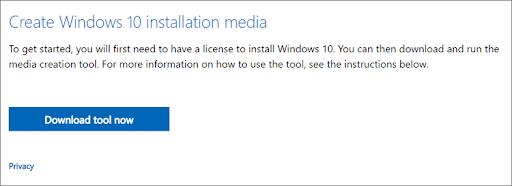
Step 1. Download the setup ISO file from Microsoft's official website.
To get started, visit the Microsoft website and download the ISO file. This is the first step in the process.
Click here to download Windows 10
Step 2. Download the Windows 10 installation media tool.
After visiting the Microsoft website, you'll be asked to select the Windows version you want. Following this, you'll need to choose your preferred language, agree to Microsoft's terms, and enter the license key to proceed with the download.
Step 3. To start the Windows 10 installation process, download the Media Creation Tool from the official Microsoft website. Once the download is complete, save the executable file on your computer's storage. After that, simply launch the executable file to begin the installation process.
Accept the license and agreement to proceed further on the next step.
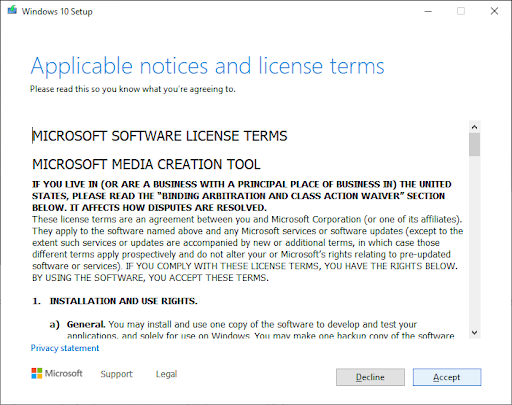
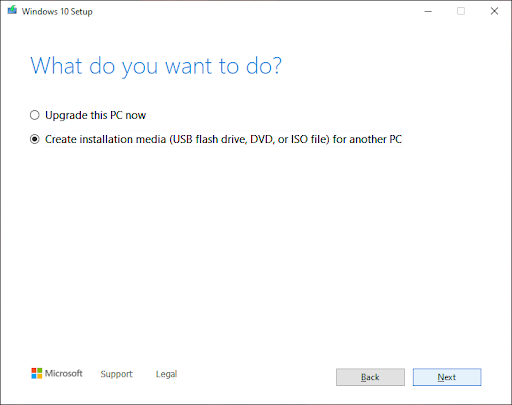
Step 4. To accept the license requirements, click "Accept" and then select the second option that says "Create installation media" from the subsequent menu.
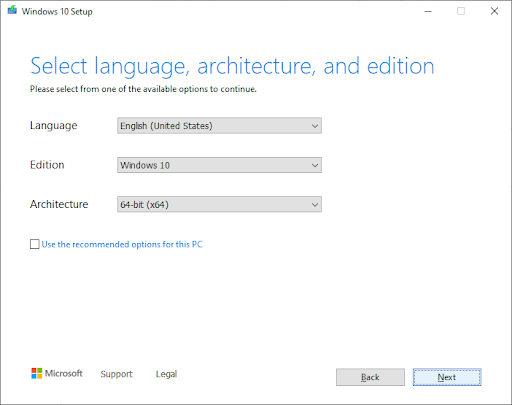
Step 5. You can specify a different language, edition, and architecture settings, and tick the "Use recommended options for this PC" option if you're unsure.
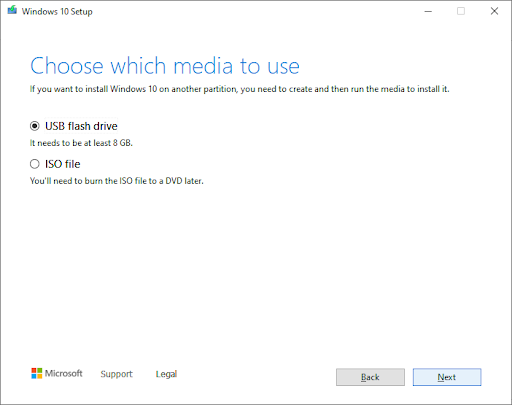
Step 6. Select the USB flash drive and click Next.
Step 7. Wait for the process to complete.
The process of creating a Windows installation USB drive will take some time, depending on your internet connection. Once initiated, the process will automatically download the necessary ISO file and burn it onto the USB drive. Once complete, you can use the USB drive to install Windows on your computer.
Conclusion
Having a bootable USB drive offers several advantages, including the ability to create a Windows 10 bootable USB to install, recover, and repair your computer through it. This can be particularly useful for troubleshooting and fixing issues with your computer.
To create a Windows bootable USB, you typically follow Microsoft's guide, which involves downloading the ISO image from the media creation tool and burning the ISO file onto the USB drive to make it bootable.
The first process can be time-consuming and complicated for beginners, but a simpler alternative is available that's easier to use for all users.
Qiling OS2Go is an easy-With this tool, you can easily create a Windows bootable USB without having to visit any websites or download extra software. Just a few clicks and you're all set to make your Windows bootable USB.
Related Articles
- Download and Create Windows 10 To Go
- How to Clone Windows 11 to An External Hard Drive
- How to Play Car Mechanic Simulator on Mac?
- For Mac Game Lover - How to Play Fortnite on Mac 2021
- Set Task Schedule Log Off and Backup Windows on Log Off
You can learn how to easily log off user with or without task scheduler. Also, with the help of a professional backup software, a user logoff schedule backup is supported. - Top 10 Fixes to The System Cannot Find the File Specified
Meet the error message "The system cannot find the file specifed" in Windows 11/10/8/7? This article collects its causes and 10 effective solutions to help you fix it.