How to Create Windows Bootable USB with Rufus, and Another Easier Way
What's Rufus?
Rufus is a free and open-source portable application for Microsoft Windows that provides users with essential tools. It allows users to low-level format a USB flash drive or memory stick, and also enables them to create USB installation media from bootable ISO files of Windows, Linux, and UEFI, among others.
About Rufus Bootable USB
The Rufus bootable USB feature allows you to create a bootable USB drive to install Windows on a non-bootable computer, enabling you to clean install Windows on a computer in need of repair or upgrading to a newer OS like Windows 11.
To create a Windows USB drive using Rufus, you'll need an empty USB flash drive with a capacity of at least 8GB and a downloaded ISO file of Windows 11 or Windows 10. The USB drive's capacity should be equal to or larger than the ISO file. If the USB drive is used, make sure to transfer any data to another drive as creating a bootable USB will erase all data on the drive.
How to Create A Bootable USB Using Rufus
When your case is involved in a situation where the Rufus bootable USB option is necessary, you can start using it. This option is typically used when you need to boot a computer from a USB drive, such as when you're trying to install an operating system or troubleshoot a problem.
- To burn a Windows 11 or Windows 10 ISO file to a USB drive, you'll need a USB drive with at least 8GB of free space, a blank USB drive, and the ISO file you want to burn. You can use the built-in Windows tool, Rufus, or a third-party tool like PowerISO or Win32DiskImager to create a bootable USB drive.
- To create a USB installation media for Windows 11 or Windows 10, you'll need a blank USB drive with at least 4GB of free space and a PC with an internet connection. Go to the official Microsoft website, select your Windows version, and download the Media Creation Tool.
- You need to work with a computer with the startup issue
- You can't boot a computer without an operating system (OS) installed, as the OS is what allows the computer to boot up and run. However, you can try booting from a USB drive or CD/DVD with a live OS or a rescue disk, which can allow you to access and potentially repair or reinstall the OS.
Creating a bootable USB drive is useful for various scenarios, such as repairing a computer, reinstalling the operating system, or manually upgrading Windows. This can be particularly helpful for supported Windows operating systems, including Windows 7 and later versions (both 32-bit and 64-bit), allowing you to install any of these on a computer.
Microsoft has announced that Windows 11 will be available as a free upgrade for eligible Windows 10 users, starting on October 5th, 2021.
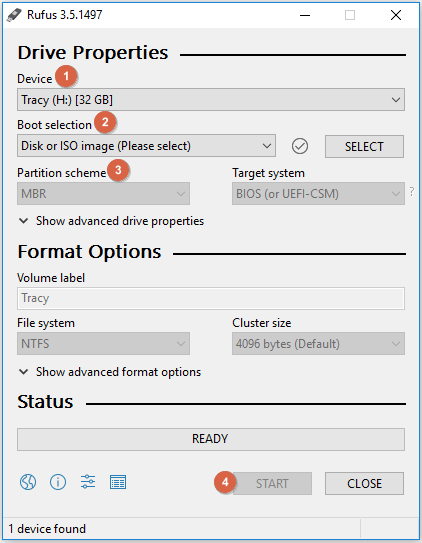
To create a bootable Windows USB drive, refer to the Rufus interface and follow the 4-step guide. The interface will guide you through the process of selecting the correct device, choosing the desired Windows version, and formatting the USB drive.
Step 1. Insert a USB drive (>8GB) into your PC and Launch Rufus.
Step 2. Insert your USB drive into your computer, open the Windows Media Creation Tool, select the USB drive as the destination, and click NEXT. Then, select the language, edition, and architecture of Windows 11/10/8.1/8/7 you want to install, and click NEXT.
Step 3. To format a drive, set the Volume label to a desired name, and leave the File system and Cluster size to their default settings.
Step 4. Rufus is a free, open-source USB creation software that can be used to create a bootable USB drive for various operating systems, including Windows. To use Rufus, simply click the "START" button and follow the prompts to select the desired Windows installation media and the USB drive you want to use.
Bonus Tip: Bootable Windows USB vs. Portable Windows USB
A Windows bootable USB drive not only enables you to install a fresh, working, and stable new Windows OS on your PC and laptop, but it can also serve as a portable version of the operating system for simple demands.
If your request for a bootable Windows USB drive is related to the following cases, you should try Qiling OS2Go instead of Rufus:
- You can use the Windows 10 in-place upgrade feature to achieve this. This feature allows you to upgrade the OS on one computer to the customized version on another computer. This method preserves all the changes, settings, and installed applications on the original computer.
- You can use a virtual machine software like Parallels or VMware to run Windows games on your Mac without installing Windows OS. These software allow you to create a virtual machine that runs Windows, and you can install your games directly on it.
- You want to run the Windows OS in the office on your personal computer at home. Is that correct?
Want to create a portable copy of your Windows computer on a USB drive that can be used on any Windows computer or Mac machine without installing? Qiling portable USB creator can make this happen seamlessly, allowing you to have a copy of your Windows computer on a USB drive that can be easily transferred and used on other devices.
To create a portable Windows OS on a USB drive, you need to migrate the entire Windows installation, including programs, data, preferences, and user accounts, to the USB drive. The required capacity of the USB drive depends on the used space of the system drive, so first check the disk space on your Windows system drive (C:). Then, find a suitable USB drive and follow the guide to create a portable Windows 11 or Windows 10 USB drive using Qiling OS2Go.
Step 1. To use Qiling OS2Go, install it on your Windows computer, which will show the used space on your system drive. Then, plug in a USB drive that is larger than the system drive's used space. Next, choose the target USB drive and click Next to continue.
Step 2. Qiling OS2Go will notify you that the following operation would delete all data on your drive. Make sure you have backed up all important data before clicking the Continue button to proceed.
Step 3. The default disk layout on the target drive will be the same as the resource drive, but you can also customize it according to your needs. If you're using a Solid State Drive as the Windows bootable drive, select the option to adjust the disk layout. Then, click Proceed.
Step 4. Qiling OS2Go will create a portable USB drive, which may take a while depending on your operating system and network conditions. Once the progress reaches 100%, the USB drive will be bootable.
Step 5. To boot from a portable Windows USB, start your computer, press the required key (F2, DEL, F10...) to access BIOS, and select the USB disk as the boot device.
Note: Ensure the boot mode of the portable USB and target computer match (UEFI or Legacy), or booting may not be possible.
Related Articles
- 3 Ways to Run EXE Files on Mac Computers
- (Two Usefuls Ways) How to Create Windows 10 Installation USB Drive
- Windows 10 Boot Drive Size & How to Create a Windows 10/11 Bootable Drive
- How to Play Windows Games on Chromebook [Latest Guide]
- The Solution to Lenovo One Key Recovery Error
Many people may encounter one key Recovery error prompt when they use Lenovo one key recovery to restore system, Qiling Disk Master and its programmers will tell you how to solve such problem. - Fixed: Lenovo Onekey Recovery Current System Cannot Support Backup
Facing Lenovo onekey recovery current system cannot support backup? Learn its possible causes and how to fix it easily.