For Mac Game Lover - How to Play Fortnite on Mac 2021
Fortnite: Save the World is a shooting tower defense survival video game developed by Epic Games. Despite its loyal fan base, the game's developer was involved in a lawsuit with Apple in 2020, as Epic Games challenged Apple's restrictions on in-app purchases, refusing to comply with their payment terms.
Apple and Epic Games are in a lawsuit, which has resulted in Apple preventing Epic from signing games and patches for distribution on Mac. This has led to Epic announcing that there will be no updates for Fortnite: Save the World on iOS and macOS, leaving Mac users unable to play Fortnite and with no need to switch to a Windows computer for gaming purposes.
Mac users can continue playing Fortnite by creating a portable Windows USB, effectively turning their Mac into a dual-OS device.

Easiest Solution: Create A Portable Windows USB for Mac
You can play Windows-only games like Fortnite on a Mac by creating a portable version of Windows OS on a USB drive using a tool like Qiling. This allows you to run any Windows game on your Mac.
To play PC games on your Mac, you can try to access them from an external source. To do this, you'll need to create a portable version of Windows OS on a USB drive, and Qiling OS2Go is a tool that can help you achieve this.
The working principle of this method is as follows:
- To move Fortnite from a Windows PC to a bootable USB drive, follow these steps: First, create a bootable USB drive using a tool like Rufus or Etcher. Then, download the Fortnite installer from the Epic Games website.
- To clone a game with all program files on a Windows PC to a large USB drive, you can use a tool like Clonezilla or Qiling backup. Clonezilla is a free, open-source disk imaging and cloning program that can create a bit-for-bit copy of a hard drive or partition, including all files, folders, and system settings.
- Boot the Mac from the portable Windows USB drive
How to Create A Portable Windows USB Drive
Things You Need:
- You can play Fortnite on your friend's Windows computer if it has the game installed on the system drive.
- A large-capacity external storage device, such as a USB drive or external hard drive, with a size larger than the combined used disk space of the Windows operating system and games.
- Download Qiling OS2Go on your Windows PC where the Fortnite is.
Now you can follow the step-by-step guide to create a portable Windows USB.
Step 1. To use Qiling OS2Go, first install it on your Windows computer, which will show the used space on your system drive. Then, plug in a USB drive that is larger than the used space on your system drive. Next, choose the target USB drive and click Next to proceed.
Step 2. Qiling OS2Go will notify you that the following operation would delete all data on your drive. Make sure you have backed up all important data, then click the "Continue" button to proceed.
Step 3. The disk layout on the target drive will be the same as the resource drive, but you can also customize it to your needs. If you're using a Solid State Drive as the Windows bootable drive, select the corresponding option and click Proceed.
Step 4. Qiling OS2Go will create a portable USB drive, which may take some time depending on the OS and network condition, and once complete, the USB drive will be bootable.
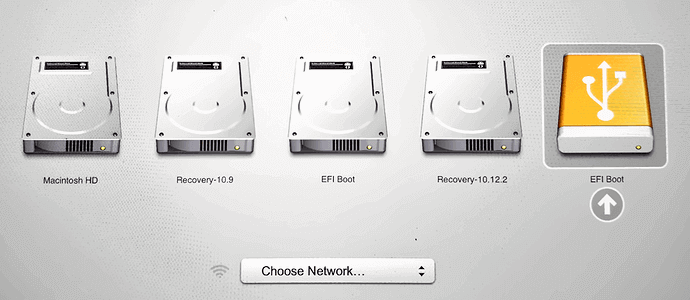
Step 5. To start, insert the portable Windows USB into your Mac and start the computer. Press the Option/Alt key while it's booting up, then select the yellow EFI Boot icon to boot from the USB drive. From there, simply follow the on-screen instructions to complete the process.
Final Thoughts
Qiling OS2Go is a recommended tool for Mac users who want to run Windows without sacrificing their Mac's disk space. Unlike Apple's Boot Camp, which can be cumbersome and takes up valuable hard drive space, Qiling OS2Go allows users to create a portable Windows USB, enabling them to run Windows on their Mac without the need for a separate installation. This makes it an ideal solution for those who want to use Windows on their Mac without compromising their Mac's storage capacity.
Related Articles
- Windows 7 Portable Download: How to Create Windows 7 Portable USB Drive
- Download and Create Windows 10 To Go
- How to Use Rufus to Install Windows 11 (with Pictures)
- Windows To Go for Mac: How to Install and Use
- Fix: Boot Configuration Data file is Missing in Windows 10
This article introduces how to fix Boot Configuration Data file is missing in Windows 10, and solutions to protect computer from system files damage or loss. - How to Create Bootable Backup in Windows 10 (2 Ways)
Bootable backup for Windows can help you restore computer to its last working state or factory reset it to default settings when it fails. Let's do it now!