How to Use Rufus to Install Windows 11 (with Pictures)
What is Rufus?
If you're looking for a clean install of Windows 11 on your PC and want to use Rufus to install it, you can create a bootable USB drive to do so. Rufus is a utility that helps you create a bootable USB drive on your PC.
Rufus is a utility software that creates or formats bootable USB drives, allowing users to install operating systems like Linux, UEFI, and Windows on a PC without an existing OS.
* Do you know how to create a Windows bootable USB with Rufus?
How to use Rufus to install Windows 11
To avoid getting stuck in the process of creating a bootable USB with Rufus, familiarize yourself with the four basic requirements and prepare in advance. These essentials include having Rufus installed on your computer, a USB drive with sufficient storage capacity, a Windows installation media, and the Windows operating system itself.
1. An empty USB stick, flash drive
Once the Rufus installation is complete, users need an empty flash drive to burn the ISO image. Ensure the USB device is empty and formatted before proceeding.
2. Download Windows 11 ISO image
Downloading Windows 11 is a straightforward process, as multiple ISO images are available online. To get started, simply open the internet and search for Windows 11 ISO images. For added assurance, be sure to download the file from a reputable website to avoid any potential corruption issues.
*This guide tells you how to download Windows 11 automatically without searching iso around.
3. Download and install Rufus on your PC
To download and install Windows 11 using Rufus, first download and install the Rufus utility on your PC. If prompted to download an update for Rufus, ensure you do so as well.
4. Burn ISO image to the USB drive in Rufus
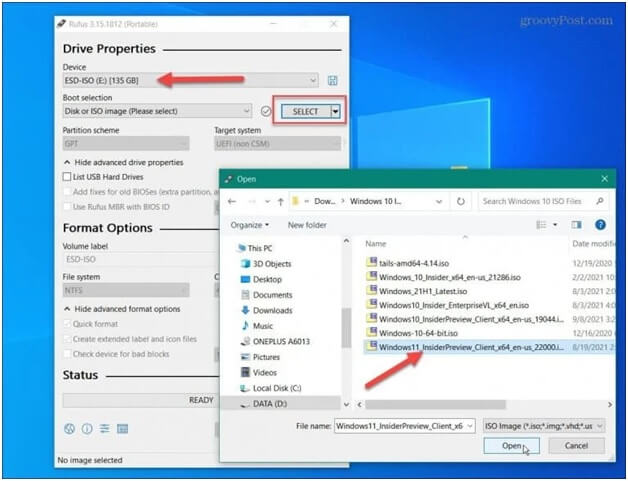
Launch the Rufus application, select the USB flash drive you want to use under devices, and click the Select button on the right-hand side to open a new window where you can select the Windows 11 ISO file you have downloaded from the internet.
Full guide for how to create and install Windows 11 with Rufus
Step 1. To create a bootable USB drive using Rufus, select the third option called "Image Option", then choose "Standard Windows Installation" from the dropdown. Next, select "GPT" from the partition option and give the USB drive a name by typing it in the Volume Label field.
Step 2. To prepare the USB drive, click on the Start button and select the "This PC" option. Then, click on the "Manage" option. In the Computer Management window, click on the "Disk Management" option.
Step 3. Wait for the USB drive to be created. You can check the status to stay updated on how much the installation has been completed.
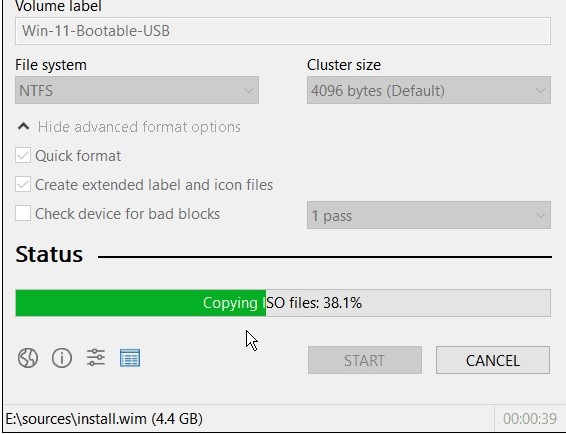
Once the process is complete, you would get to see the following media bar.
Step 4. Insert the completed USB drive into the computer you want to install the OS on, then reboot the system. This will initiate the installation process, which should complete quickly.
How to run Windows 11 from a bootable USB drive
With Qiling Disk Master, you can create a bootable Windows 11 USB drive from another computer, allowing you to install the operating system on any device, including PCs and Macs.
What's Qiling OS2Go?
Qiling OS2GO is a tool that creates a portable Windows bootable USB drive from an already installed Microsoft Windows operating system, effectively cloning the OS into a USB drive.
A simple comparison between OS2Go and Rufus
Rufus and Qiling OS2Go are utility software that create bootable USB drives, but they serve different purposes. Rufus is used when you have an ISO file of an operating system and need to create a bootable USB drive, whereas Qiling OS2Go directly clones and makes a USB bootable drive from a previously installed operating system. Both tools have their uses and cater to different needs.
Guide for how to create a bootable Windows 11 bootable drive with OS2Go
Step 1. To use Qiling OS2Go, install it on your Windows computer, which will show the used space on your system drive. Then, plug in a USB drive that is larger than the system drive's used space. Next, choose the target USB drive and click Next to continue the process.
Step 2. Qiling OS2Go will notify you that the following operation would delete all data on your drive. Make sure to back up all important data before proceeding, then click the Continue button to proceed.
Step 3.Adjust the disk layout to match the resource drive or customize it to your needs, and if using a Solid State Drive, select the option to enable it as the Windows bootable drive, then click Proceed.
Step 4.Qiling OS2Go will start to create the portable USB drive, which may take a while depending on the operating system and network condition. Once the progress reaches 100%, the USB drive should be bootable.
Step 5. To install Windows on a new computer, start by inserting the portable Windows USB into your computer. Then, restart your computer and press the key required to access the BIOS, which is usually F2, DEL, or F10, depending on your computer model. Once in the BIOS, select the option to boot from the USB disk. This will allow you to install Windows from the USB drive.
Note: To ensure a successful boot, it's crucial that the portable USB and the target computer have matching boot modes, either both in UEFI or Legacy mode, to avoid any booting issues.
Both Rufus and Qiling OS2GO are popular tools for creating a bootable USB drive, but they serve different purposes. You can choose the process that suits your needs depending on how and where you're creating the drive.
Related Articles
- Without Boot Camp | How to Play Valorant on Mac
- How to Play Windows Games on Chromebook [Latest Guide]
- How to Create Windows To Go USB Without Enterprise Edition
- How to Play Windows Games on Mac via A Portable Windows USB
- FAT Recovery | Recover Data from FAT Hard Drive
To perform FAT recovery, you cannot miss the professional FAT recovery software - Qiling Partition Recovery. With the software, you cannot only recover deleted, formatted or lost partition from FAT disks but also retrieve files from hard drives with the exFAT, NTFS, ext2, ext3, and other supported file systems. - NTFS or exFAT for External Hard Drive: Which Format is Better for External Hard Drive
Choosing the right format for your external hard drive can be a challenge. To help you decide, we'll compare exFAT and NTFS formats. If you need help with formatting your external hard drive, consider using a professional software like Qiling Partition Master, which offers disk management and can easily format your drive to either NTFS or exFAT.