How to Install Windows 10 on Mac with USB Drive
For users who have switched from a Windows PC to a Mac computer, a common issue is that many Windows files and programs are incompatible with macOS. However, users often don't want to give up their old Windows files, making them wonder if they can install Windows on their Mac computer to continue using their familiar files and programs with their new Mac setup.
To solve the problem of needing Windows-only applications on a Mac, consider creating a portable Windows USB drive that can be used to boot your Mac when needed. This way, you can access Windows-only applications without having to switch between operating systems. When you don't need Windows, you can use your Mac to explore macOS-exclusive apps. This approach provides a flexible solution for users who need to access both Windows and macOS applications.
Instant Solution: Create Portable Windows 10 USB with Qiling OS2Go
To create a portable Windows USB, you can use Qiling OS2Go, a third-party tool designed for creating portable USB drives and Windows installation drives. This tool allows you to create a Windows system on external hard drives, USB flash drives, and Thunderbolt drives using a functional Windows computer. Once created, the portable USB drive can be used on any computer, making it a convenient option for those who need a portable Windows system.
If you've upgraded to a new Mac computer but still want to use your old Windows computer, you can create a portable USB drive with your Windows system and use it on your new Mac. This way, you can keep your old computer's functionality without having to give it up entirely.
To try Qiling OS2Go, download it from the provided button and follow the step-by-step guide to create a portable Windows USB.
Step 1. To use Qiling OS2Go, install it on your Windows computer, which will show the used space on your system drive. Then, plug in a USB drive that's larger than the system drive's used space and select it as the target drive. Click Next to proceed.
Step 2. Qiling OS2Go will notify you that deleting all data on your drive would be a permanent operation. It will ask you to confirm if you want to proceed. Make sure to back up all important data before clicking the Continue button.
Step 3. The default disk layout on the target drive will be the same as the resource drive, but you can also edit it to suit your needs. If you're using a Solid State Drive as the Windows bootable drive, you can select the corresponding option and then click Proceed.
Step 4. Qiling OS2Go will create a portable USB drive, which may take a while depending on the OS and network condition. Once the progress reaches 100%, the USB drive will be bootable.
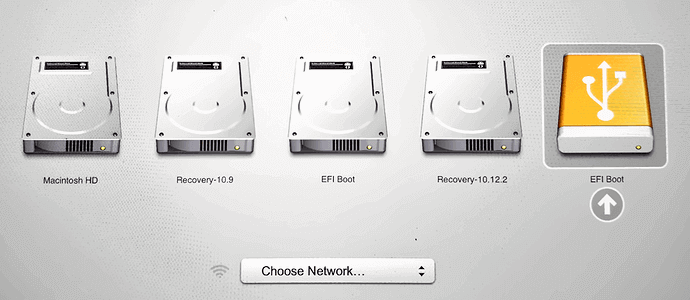
Step 5. To boot your Mac from a portable Windows USB, insert the USB drive, start your Mac, and press the Option/Alt key. Next, choose the yellow EFI Boot icon to boot from the USB drive, and follow the on-screen instructions.
How to Install Windows on Mac without Boot Camp
For Mac users who want to run Windows OS, the challenge often lies in installing it. Fortunately, there's a simple solution: a tool that makes it easy to install Windows 10 on a Mac computer.
Why Can I Boot Windows System on Mac?
Some users might be curious about the principle behind portable USB drives, and how they can run a different system on a Mac computer. The key is to understand that the computer itself doesn't dictate the operating system - it's the operating system (Windows or macOS) that you're using that matters, not the computer brand. This allows you to use a completely different system on a Mac computer.
Sum Up
If you need to use the Windows system on a Mac computer, we have introduced the easiest method using Qiling OS2Go. Alternatively, you can try Apple's Boot Camp to install Windows OS on your Mac or create an installation USB.
Related Articles
- Can You Run Windows from a USB Without Installing? 2 Ways Available
- How to Create Windows Bootable USB with Rufus, and Another Easier Way
- How to Create Windows 11 Bootable USB with/Without ISO
- How to Copy Installed Windows 11 to USB as Portable
- One Click Recovery System with Qiling Disk Master
You will learn 2 useful one click recovery system methods whether you want to factory reset a computer or restore to previous status. - Troubleshoot | Lenovo One Key Recovery Partition Has Damaged
I cannot access Lenovo OneKey Recovery after resizing my partition, saying "onekey recovery partition has damaged so do not launch the main application". Be relax and see this article.