For Mac Users - How to Install Windows on Mac without Boot Camp
Generally, a computer can only run one operating system, but in some cases, users may need to run two operating systems on one Mac computer.
On Mac computers, the built-Many users are seeking alternative ways to install Windows 10 on Mac without Boot Camp due to its tedious and error-prone nature, which can slow down installation productivity.
Mac users can install Windows without Boot Camp using third-party tools, such as Qiling Disk Master, which allows them to install Windows on their Macs. Alternatively, virtual machines like VMware and VirtualBox are also great options for running Windows on a macOS system.
Preparations
Before installing Windows 10 on your Mac, you'll need to prepare a few things first. This includes making sure your Mac meets the system requirements for Windows 10, creating a bootable USB drive or CD/DVD with the Windows installation media, and having a valid product key for Windows 10.
- A USB stick with at least 64 GB or larger.
- A copy of a Windows 10 ISO image file or a Windows computer.
- You're looking for a legitimate Windows 10 license that can activate Windows properly and legally.
- Download the Boot Camp Drivers.
If you don't want to use Boot Camp, creating a portable Windows USB is a convenient alternative. You can use third-party tools like Qiling OS2Go to create a portable Windows USB, which can be used on a Mac computer. To do this, simply prepare a larger enough USB drive and let Qiling OS2Go handle the rest.
Procedure 1. Create Windows Portable USB
To create a Windows portable USB, first download and install Qiling OS2Go on your computer, and then follow the detailed guide provided to create a Windows portable USB.
Step 1. To use Qiling OS2Go, install it on your Windows computer, which will show you the used space on your system drive. Then, plug in a USB drive that is larger than the system drive's used space. Next, choose the target USB drive and click Next to continue.
Step 2. Qiling OS2Go will notify you that the following operation would delete all data on your drive. Make sure you have backed up all important data. Click the Continue button to proceed.
Step 3.To adjust the disk layout, the default layout on the target drive will be the same as the resource drive, but you can also customize it to your needs. If you're using a Solid State Drive as the Windows bootable drive, select that option and then click Proceed.
Step 4.Qiling OS2Go will create a portable USB drive, which may take some time depending on your operating system and network conditions. Once the progress reaches 100%, the USB drive will be bootable.
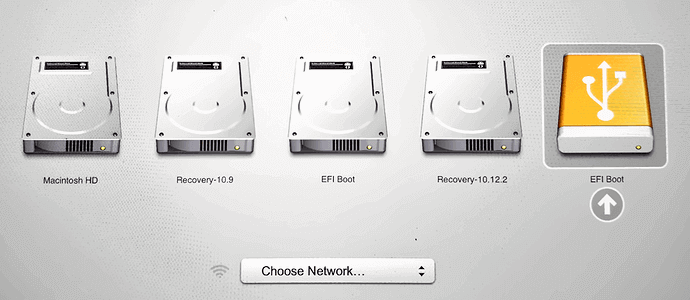
Step 5. To boot your Mac from a portable Windows USB, start by inserting the USB drive and pressing the Option/Alt key while your Mac starts up. This provides the option to choose how to boot, and you can select the yellow EFI Boot icon to boot from the USB drive. From there, simply follow the onscreen instructions to complete the boot process.
Procedure 2. Partition Mac Drives
If you still want to install Windows on your Mac, you can create a bootable Windows USB with ISO files, then partition the Mac drive and boot the Mac from the USB, using the Disk Utility on Mac computers.
Step 1. Open Disk Utility, select your local drive (SSD or HDD) on the left and click Partition in one sentence.
Step 2. To create a new partition, click on the small "+" icon, select a size of at least 30 GB, choose a name and set the format to MS-DOS (FAT), then click Apply. This will create a separate partition.
Procedure 3. Boot Your Mac from Bootable USB Drive
Finally, boot your Mac from the created bootable USB drive. This is the last step in the process.
Step 1. Insert the USB drive into your Mac.
Step 2. To restart your Mac and access the installation page, simply restart your computer and hold down the Option (⌥) key while it boots up. This will take you to the boot menu, where you can select the installation page to proceed with the installation process.
Step 3. Choose EFI Boot, and the Mac should boot from the USB properly. Follow the Windows setup wizard to install the Windows OS on the created partition, which may take some time. The Mac will automatically restart several times during the process, so be patient and wait for the installation to complete.
Step 4.If you've created a portable USB with an activated Windows computer, just wait until the booting process finishes. If you created the portable USB with Windows ISO files, you'll need to activate the Windows system by entering your product key - or click "do it later" if you've lost it.
Step 5. The keyboard and mouse may not work under Windows because the bootable USB drive only contains basic drivers, so you need to download and install Windows support drivers.
Step 6. To install Windows on your Mac using Boot Camp, download and launch Boot Camp, then navigate to the USB drive in File Explorer and go to WindowsSupport > BootCamp, where you'll double-click the setup.exe file to begin the installation process.
Step 7. Follow the setup wizard until it instructs you to reboot your Mac to complete the installation. Once you've done so, your Mac will have dual systems.
To switch from Windows to macOS or vice versa, simply restart your Mac and hold the Option key to enter the booting page. From there, you can choose the corresponding drive to switch between the two operating systems.
How to Create Bootable Windows 11/10 USB for Mac?
Download Qiling OS2Go to make Windows 11 or Windows 10 portable and run it on a Mac.
Conclusion
Installing Windows OS on a Mac computer can be a bit complicated, but with Qiling OS2GO, you've already completed the most challenging part - creating a bootable USB. From there, simply follow our step-by-step guide to complete the process.
Related Articles
- Best Rufus Alternative For Windows Compatible with Windows 11/10
- How to Play Windows Games on Chromebook [Latest Guide]
- For Mac Game Lover - How to Play Fortnite on Mac 2021
- Download and Install Windows 11 with Media Creation Tool
- How to Free Up Disk Space for Gaming?
Is your PC feeling sluggish and your gaming experience suffering? It might be time to give your computer a boost by learning how to free up disc space for gaming! By freeing up space, you'll be able to run games smoothly and enjoy a more enjoyable experience. - 6 Tips to Fix Recovery Drive Full in Windows 10/8/7
In Windows 10, 8.1, 8, and 7, the recovery drive can become full, causing a low space error to pop up. This issue can be resolved by implementing six useful solutions, which include freeing up space on the recovery drive. By following these steps, you can resolve the recovery drive full error and ensure that your system runs smoothly.