What Is Bootable USB Drive? All You Should Know About Bootable USB Drive
The humble USB drive has long been used for storing data, but its capabilities extend far beyond that. With bootability, a feature that allows a USB drive to run operating systems and perform secure tasks, it can be used for much more than just storing information. In fact, a bootable USB drive can be seen as a modern replacement for CDs, offering a compact and user-friendly way to install operating systems and perform other tasks, making it a versatile tool with a wide range of uses.
What is a Bootable USB Drive?
A bootable USB drive allows you to boot a computer using the file system stored in the flash drive, rather than the computer's hardware, offering several benefits.
Install an Operating system
CDs and DVDs were once used to install operating systems, but now bootable USB drives make it easier to install and run operating systems, such as Windows and macOS, on a computer, whether it's new or corrupted.
Troubleshooting
When your computer has a severe issue, you may need to reinstall the system to fix it. A bootable USB drive allows you to do this yourself by creating a portable installation media that can boot your computer and guide you through the reinstallation process. This can be a convenient and effective solution for resolving system problems.
Computer Deployment
If you're in charge of setting up new computers in your company, you can save time and effort by using a bootable USB drive. This allows you to set up a new computer without having to download ISO files multiple times, making the process more efficient.
How to Create a Windows 11 Bootable USB Drive?
Microsoft released the official version of Windows 11 on October 5th, and here's a detailed guide on how to create a bootable USB drive for the operating system.
Step 1. Download Windows 11 ISO Files
1. You can download the Windows 11 ISO file from the provided link, but you will need to sign in with your Microsoft account to access it.
https://www.microsoft.com/en-us/software-download/windows11
2. Select the edition you want from a drop-down menu.
3. Set your language and region, confirm and click on the Download button.
Step 2. Create Windows 11 Bootable USB Drive
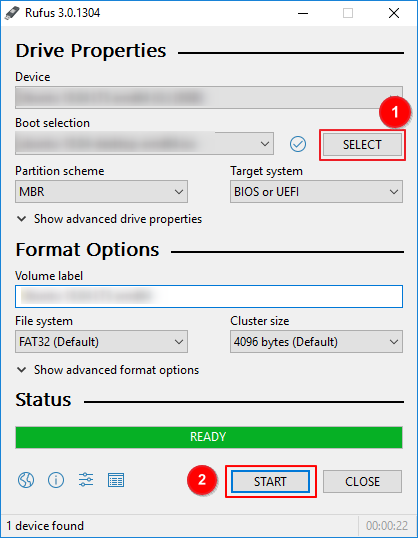
Here are the steps to create a Windows 11 bootable USB drive using Rufus in one paragraph:
1. Download and run Rufus on your PC.
2. Click on the Select button on the right side.
3. Select the downloaded Windows 11 ISO file, and the other options will be filled in automatically.
4. I've checked the status at the bottom of the page, and it says "Ready".
5. To start the process, tap on the start button located at the bottom of the page. This will initiate the process, which may take some time depending on the speed of your USB drive and the port it's connected to.
6. Then Windows 11 Bootable USB drive will be created.
Once you've created a Windows 11 Bootable USB drive, you can use it to install the operating system on any device you want, whether it's a laptop, desktop, or tablet.
Bonus Tip: How to Create a Portable USB Drive?
A portable USB drive is different from a bootable USB drive. While a bootable USB drive requires a Windows ISO file and a minimum 8GB USB drive, a portable USB drive is created from a well-setted Windows computer and its size depends on the used space of the computer's system drive.
With a portable USB drive, you can take your own system and files anywhere, without being limited by the model and brand of computer. This flexibility allows you to use your portable Windows 11 USB drive on an unsupported PC or a Mac computer, and since it's started from two devices, there's no risk of data loss when switching between the two systems.
Qiling OS2Go is a user-friendly tool designed for novice users, allowing them to handle everything themselves.
Step 1. To use Qiling OS2Go, install it on your Windows computer, which will display the used space on your system drive. Then, plug in a USB drive that is larger than the system drive's used space. Next, choose the target USB drive and click Next to continue.
Step 2. Qiling OS2Go will notify you that the following operation would delete all data on your drive, so make sure to back up important data before proceeding. Click Continue to proceed.
Step 3. Adjust the disk layout to match the resource drive exactly, or edit it to suit your needs. If using a Solid State Drive as the Windows bootable drive, tick the option. Then, click Proceed.
Step 4. Qiling OS2Go will create a portable USB drive that's bootable, taking a while depending on the OS and network condition, and when it reaches 100%, the USB drive should be ready for use.
Step 5. To boot from a portable Windows USB, start your computer, press the required key (F2, DEL, F10...) to access BIOS, and choose to boot from the USB disk.
Note: Ensure that the boot mode of the portable USB and the target computer are the same, whether it's UEFI or Legacy, to avoid booting issues.
To create a Windows 11 to Go USB drive, you'll need a 64-bit Windows 11 installation media, a USB drive with at least 8GB of free space, and a computer with a 64-bit processor. You'll also need to download the Windows 11 Media Creation Tool and follow the on-screen instructions to create a bootable USB drive.
Qiling disk master is a popular tool for creating Windows to go drives that is fully compatible with Windows 11, making it easy and fast to create a bootable USB drive.
Conclusion
This is the complete step-by-step guide that you can use anytime when you want to create a bootable USB drive. Return to this page whenever you feel confused about creating it.
Related Articles
- Windows 10 Bootable USB Tool: Auto-Download Windows 10 ISO to USB
- Best Rufus Alternative For Windows Compatible with Windows 11/10
- (Two Usefuls Ways) How to Create Windows 10 Installation USB Drive
- How to Effectively Create Bootable Windows 7 USB Drive
- How to Convert System Boot Disk to GPT without Losing Data?
Need to convert system disk to GPT, but not want to reinstall the OS? Here, you can learn how to convert MBR system disk to GPT without losing data or Windows operating system in Windows step by step. - Windows Convert to GPT Grayed Out? Solve it Easily!
If you're unable to convert a disk to GPT in Disk Management, ! There are ways to successfully convert a disk to GPT. You can try using other tools or methods to achieve this.