2022 Easier Solutions to Change Location of Desktop Folders on Windows 11/10
Get Everything About Change Location of Desktop Folder:
| Workable Solutions | Step-by-step Troubleshooting |
|---|---|
| Where Is the Desktop Location in Windows 11/10 | Default path: C:\Users\Public\Desktop or C:\Users\admin\Desktop...Full steps |
| Change Location of Desktop folders Windows 11/10 |
Option 1: Using PC Data Migration Software to Move Desktop Folder...Full steps Option 2: Manually Change Desktop Folder...Full steps Can't Change Desktop Folder...Full steps |
| More Useful Tips: Change User Folder Location Mac | Open Finder >Go to the Users folder...Full steps |
This article provides two solutions for changing desktop folders on Windows 11/10: using PC data migration software and the File Explorer. Additionally, it offers tips for moving user folders on Mac devices.
Where Is the Desktop Location in Windows 11/10
On Windows 11 or 10, the Desktop displays a mix of default software, downloaded apps, files, folders, shortcuts, images, and more, which can be freely managed. The default location for these desktop files is typically on drive C.
Default path: C:\Users\Public\Desktop or C:\Users\admin\Desktop
How Do I Change Location of Desktop Folders Windows 11/10
To move your desktop folder to a new location, follow these simple steps. First, right-click on the desktop and select "Properties" or "Properties" in the context menu. In the Properties window, click on the "Location" or "Target" tab and enter the new path where you want to move the desktop folder.
Option 1. Using PC Data Migration Software to Move Desktop Folder
Qiling Disk Master allows users to move user folders from the C drive to another location without data loss, enabling one-click migration of large amounts of data and saving time.
Download software to enjoy quick migration:
How to Move Desktop Folder:
Step 1. Click on the "Large File Cleanup" option on the left panel and then click the "Start" button.
Step 2. Select the "Folder" tab, choose the folders you want to move, select the target drive, and then click the "Move" button.
Step 3. Wait for moving process completes. Click "Finish".
Note: Click the "Restore" button to restore the current folder to its default location.
Related articles:
Option 2. Manually Change Desktop Folder on Windows 11/10
Windows 11 and Windows OS allow users to customize their device by moving the desktop folder to another location using the built-in File Explorer tool.
With File Explorer, the Desktop folder can be quickly relocated. However, some users may encounter issues with the "Change location" feature not showing up for the Desktop folder. To resolve this, you can click on the "Move" button, which should allow you to change the location of the Desktop folder. This should fix the issue and enable you to move the folder to a new location.
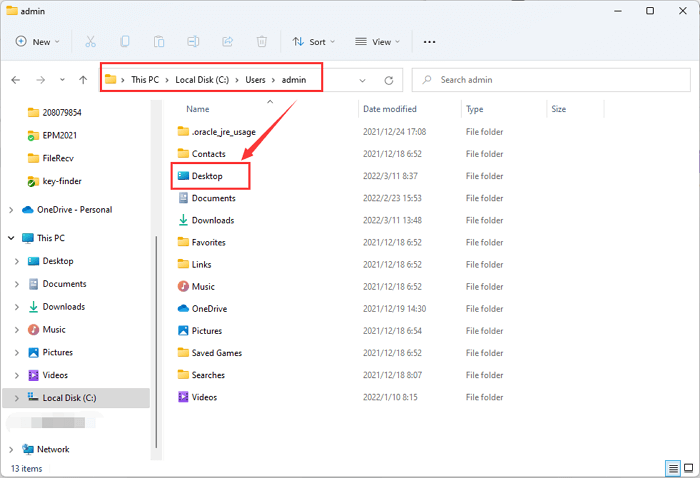
Step 1. Locate your Desktop folder's location in these two ways below:
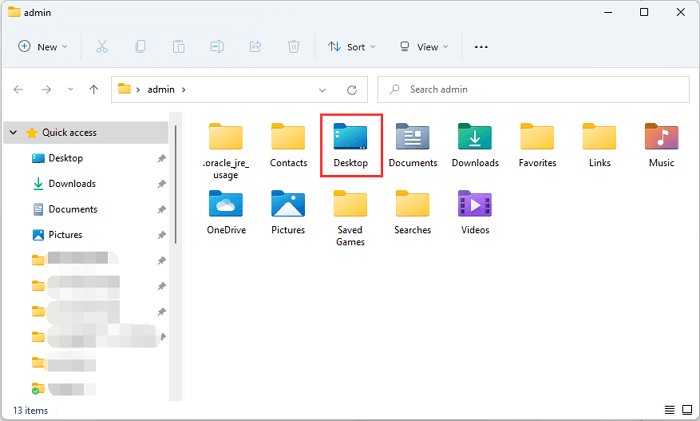
1. To access the desktop folder, open File Explorer from the taskbar, navigate to the "This PC" section, click on the C drive, then go to "Users", and finally select the "Admin" folder, where you will find the "Desktop" folder.
2. Press Windows + R to evoke the Run box, type a period (.) and then click OK.
Step 2. Right-click the Desktop folder and choose "Properties" from the menu.
Step 3. Select the Location tab of the Desktop window, then click the "Move..." button under the current location.
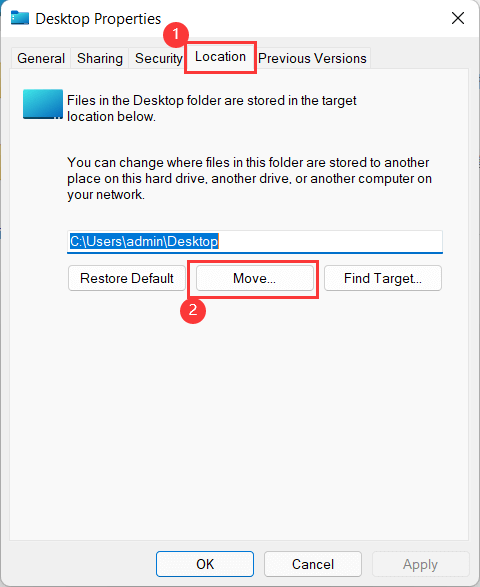
Step 4. To change the destination of the Desktop folder, you can click on the window to select a destination where you can choose to keep the Desktop folder. If there are limited options, you can create a new folder and move the targeted folder to it.
Can't Change Desktop Folder Windows 11/10? What Can We Do?
When the "Location tab" doesn't show up, it might be due to changing the default location of the personal folder. To resolve this, you can restore the default location by modifying the Registry.
Step 1. Open Registry Editor (2 options).
1. Click on the Search icon and type "registry editor."
2. To open the Registry Editor, press the Windows key + R to open the Run dialog box, type "Regedit" and press Enter. This will open the Registry Editor where you can make changes to your computer's registry.
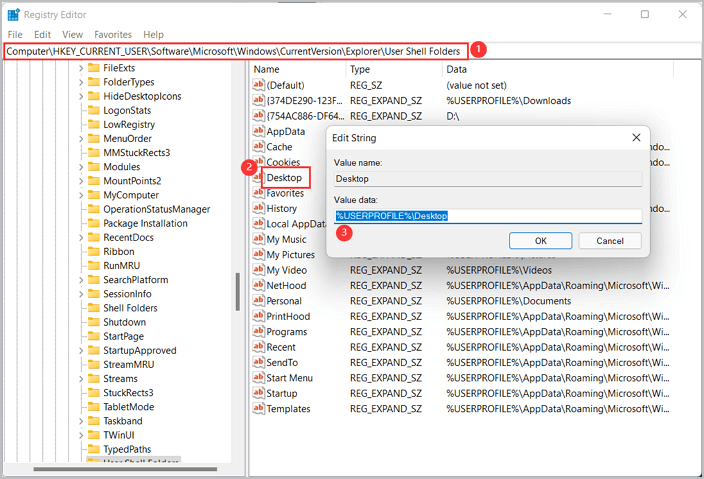
Step 2. Navigate this path: HKEY_CURRENT_USER\SOFTWARE\Microsoft\Windows\CurrentVersion\Explorer\User Shell Folders
Step 3. On the right side, locate the Desktop and double-click it, or right-click it and select "Modify."
Step 4. To change the value, copy and paste the text into the "Value data" field, replacing the existing value. The correct value is %USERPROFILE%\Desktop. Save the change and close the Registry Editor.
Step 5. Restart Windows 11 or Windows 10 PC.
Now, go to the C drive and click on the Desktop folder. The location tab from Properties will show up again. If this advice is not helpful, you can go back to using the PC data migration software.
More Useful Tips: Change User Folder Location Mac
Before making any changes, back up your Home folder on Mac to ensure your files and data are safe. Once you've done that, you can start the process of moving your Home folder to a new location.
Step 1. Open Finder.
1. To open a "Searching This Mac" window, press the keys Option, Command, and Space simultaneously.
2. Press Command + N to open a Finder window.
Step 2. Go to the Users folder.
Follow the path like: /Macintosh HD/Users.
Step 3. Move your home folder to a new drive by selecting the home folder and dragging it directly to the new drive.
Step 4. To access System Preferences, click the Apple icon located at the top left corner of the screen and select System Preferences from the menu.
Step 5. Click the Users & Groups.
Step 6. Click the yellow lock icon and enter the administrator password.
Step 7. Right-click on the account you just moved the Home folder to, then select Advanced Options.
Step 8. To move a folder, click the "Choose" button on the menu, then navigate to the target location where your folder is located, select the new folder, and finally click the "Open" button at the bottom right.
Step 9. To turn off the sheet on the Advanced Options panel, click OK and then close the System Preferences.
Step 10. To access the folder in the new destination, you need to restart your Mac device. Once you've done that, you should be able to see the folder in its new location.
Conclusion
There are two options to set up your folder on a Windows PC:
- Quick migration - Qiling Disk Master (Recommend)
- Manual - File Explorer
Related Articles
- How to Transfer iTunes to a New Computer [Windows & Mac]
- Free PC Mover to Transfer Programs to New Computer Free Windows 11/10/8/7
- How to Move Games from HDD to SSD Without Reinstalling
- 3 Ways to Share/Transfer Files Between Two PCs in Windows 11/10
- Best Free SSD Backup Software for Windows 11, 10, 8, 7
This article explains the best free SSD backup software - Qiling Disk Master Standard and how to use it to protect your data. - Best Strategy for Gateway Laptop Hard Drive Failure Problem
Encounter Gateway laptop hard drive failure unexpectedly? This tutorial will show you how to back up data from the hard drive and move to new drive without booting Windows.