The Cloud File Provider Is Not Running: Causes and Solutions
Handling extensive data is not easy, but cloud service providers ease accessibility to storage services, allowing businesses to store data anywhere, anytime. This unlimited storage is a must-have for businesses, regardless of whether it's infrastructure, software applications, hospitals, or hotels, as it provides ideal storage solutions.
In recent years, access to cloud computing has become more widespread, with the majority of businesses transitioning to various cloud services. This guide aims to provide an in-depth understanding of cloud file providers and offer solutions to common issues related to these services.
What Is a Cloud File Provider
A cloud service provider offers various components of cloud computing, providing infrastructure as a service that stores data efficiently. It operates on a pay-per-use model, allowing users to only pay for the resources they consume. This approach offers numerous benefits, and customers can rest assured that their data is stored in a reliable environment with multiple redundancies, evaluated for security considerations.
The cloud file provider utilizes software and middleware to offer seamless connectivity between devices/computers through cloud computing. It maintains multiple data copies, working to prevent security threats, breaches, and data losses.
What Are the Benefits of Cloud File Provider
Cloud storage solutions are a cost-effective way to store data without the need for physical tools. They offer numerous benefits, including the elimination of the need for physical storage, and provide users with a convenient and accessible way to store and manage their files.
- The cloud file provider offers flexibility and convenience, allowing users to access their files from anywhere without the need to carry a physical storage device.
- Cloud services can quickly scale up and scale down conveniently.
- The cloud file provider offers convenient and easily accessible resources and services from various locations.
- The cloud services provide a quick and reliable way to recover from disasters without any failures.
Why the Cloud File Provider Is Not Running
If your cloud file provider stops working, it might be due to the error 0x8007016a. This error can be caused by several reasons, but one of the most common ones is a problem with your internet connection. Make sure your internet connection is stable and working properly to resolve the issue.
- Windows is not updated: Older Windows versions can sometimes lead to more significant issues, restricting access to Windows and cloud services. To avoid this, it's essential to look for windows updates immediately.
- Limited power plan of the system: A conservative power plan can make your computer's data inaccessible. To resolve this, switch to a balanced or high-performance power plan.
- The system deletes files: If you've deleted files from your system and didn't have a backup, the chances of recovering them are low. You can try using data recovery software, but it's not guaranteed to work.
- Installation of the wrong Windows updation: Installing incorrect Windows updates can sometimes cause issues with accessing data in cloud providers.
- The users have enabled the file on-demand feature: Enabling the file on-demand feature can also limit your ability to access your data conveniently.
- Presence of corrupted files in the cloud: Any glitched or corrupted file on the cloud can also be a reason for your blockage on the cloud providers.
6 Fixes to Make Cloud File Providers Work Again
Here are a few methods to resolve issues with cloud file providers in one paragraph:
- Solution 1. Check for Windows Updates
- Solution 2. Modify the Power Plan
- Solution 3. Reinstall the Cloud File Provider
- Solution 4. Disable the Files on Demand
- Solution 5. Delete Glitched Folder Using PowerShell
- Solution 6. Repair Install Your PC
Solution 1. Check for Windows Updates
Step 1. Launch your PC and then go to the "Windows" option.
Step 2. To access the settings on your device, go to the "Start" menu option and select the "Settings" option.
Step 3. To open the "Update and Security" page, select the "Update and Security" option from the list. This will open the "Update and Security" page, where you can check for updates, manage updates, and configure Windows Update settings.
Step 4. Tap on the "Check For Updates" option, then manage the updates option afterwards.
Step 5. After completing the above process, restart your system to ensure your cloud provider is functioning properly.
Solution 2. Modify the Power Plan
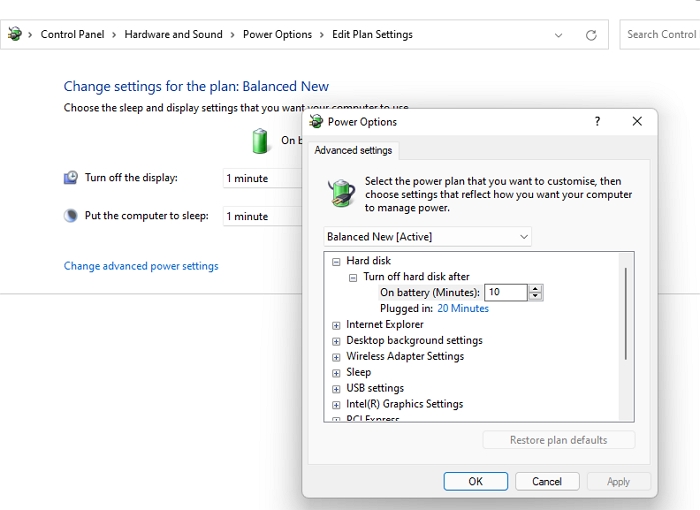
Restrictive battery-saving plans may lead to the syncing of the cloud file provider. Here are a few steps to modify this power plan at your convenience.
Step 1. To launch the Run command on Windows, press the "Windows and R" buttons together on your keyboard. This will open the Run dialog box, where you can type a command or executable file name to run it.
Step 2. To open the Power Options window in Windows, you can enter the command `powercfg.cpl` in the Run dialog box. This will directly open the Power Options window, where you can adjust settings such as the screen timeout, turn off the display, and put the computer to sleep.
Step 3. You currently have to turn the powerplay to "High-Performance" mode.
Step 4. Once done, you can start the PC to check whether the problem is still there or not.
Solution 3. Reinstall the Cloud File Provider
Step 1. Tap on the "Start" button and then type programs here.
Step 2. Select "Add" or remove the program from the given list.
Step 3. Once you've completed the task, go to the "Apps & Features" option and search for your Cloud File Provider.
Step 4. Once you've completed the process, select the "Uninstall" option to completely remove the software.
Step 5. To upload files, go to the official website of your preferred cloud file provider and follow the on-screen instructions.
Step 6. Download and install your cloud file provider on your PC, then attempt to run it.
Solution 4. Disable the Files on Demand
Sometimes enabling on-If you're experiencing issues accessing your Cloud File Provider, features like demand may be the culprit. Disabling this feature can quickly resolve the issue, and to do so successfully, you'll need to follow a few steps.
Step 1. Make a right-click on your cloud file provider present on the taskbar.
Step 2. Select the "More option" to go further with the process.
Step 3. To access the settings, a new window will open, from which you must select the Settings tab. Once in the settings, uncheck the box labeled "Files on-demand option".
Step 4. To resolve the issue, go to the Windows Services manager, find the OneDrive service, and stop it. Then, delete the OneDrive folder in your user directory.
Solution 5. Delete Glitched Folder Using PowerShell
If a single folder is causing an issue while enabling access over the cloud provider, you can use the PowerShell option to delete it. This method allows you to remove the problematic folder, resolving the access issue.
Step 1. To launch the Run command, press the "Windows" key on your keyboard and the "R" key at the same time. This will open the Run dialog box, where you can type a command or program name to execute it.
Step 2. To use PowerShell in the text bar, type "powershell" and press enter, then press Ctrl + Shift + Enter altogether.
Step 3. Once you've completed the installation process, the PowerShell window will launch on your device.
Step 4. To remove the glitched folder or file, enter the keyword "Remove item" using your Cloud File Provider's name followed by "Recurse" and "Force" to complete the removal.
Step 5. Replace Cloud File Provider's name with the name you are preferring on.
Step 6. Resume your system again to save the changes you just have made.
Solution 6. Repair Install Your PC
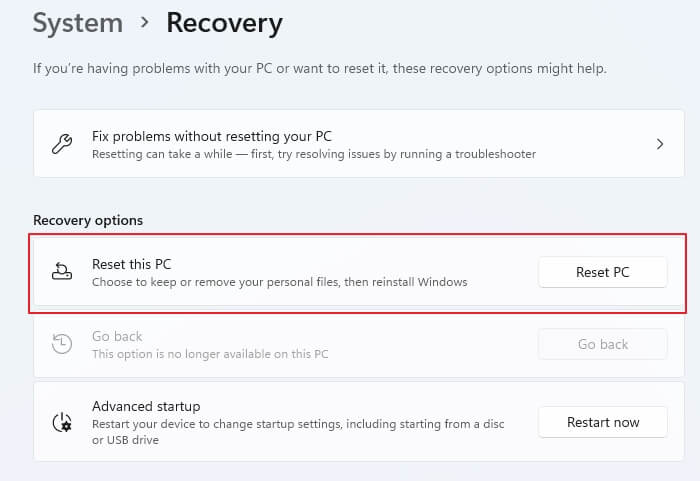
If you have tried all the solutions above and haven't found the perfect solution yet, you can try the repair install option. The steps you have to follow here are:
Step 1. To reset your Windows, start by launching your Windows and then type "Reset This PC" in the search bar. This will open the Settings app, where you can select the option to reset your PC.
Step 2. Press the "Enter" button to move further with the process.
Step 3. Now tap on the "Reset PC" option.
Step 4. You can select the options as per your preferences here.
Step 5. Tap on the second option, then tap on the Reset button.
Additional Guide: Install the Most Efficient Cloud File Provider
Cloud file providers are a great assistance to all who are looking forward to completing storage solutions. They keep data safe and make it easily accessible, offering features such as secure data storage, automatic backup, and file sharing capabilities, making them a convenient option for individuals and businesses alike.
- These are one of the most cost-effective solutions for the backup of your data.
- Cloud providers secure your confidential and sensitive data.
- Cloud storage services are easily scalable, allowing users to quickly acquire a storage space as needed.
- It is an easy-Having a cloud storage option that is easily accessible through various platforms is incredibly convenient, allowing users to quickly access their stored data from anywhere, at any time they want.
- The cloud service allows for easy syncing, making data accessible across various platforms.
- Having a storage system with a backup plan is crucial for disaster recovery. It ensures that essential files are safely copied and stored, allowing for a quick recovery in case of an emergency. This way, you can minimize the impact of a disaster and get back to normal operations as soon as possible.
- Cloud file providers enable multiple users to collaborate on a single file in real-time, allowing them to edit and work on it simultaneously.
- It ensures easy backup of data through easy automation.
- Cloud service providers guarantee high performance and reliability, minimizing the risk of failure.
Qiling Backup is a one-click solution that provides complete backup and instant recovery, ensuring absolute data security and has been used by millions of users globally.
Features:
- One-click backup solution
- Ensured instant recovery
- High-end performance and efficiency
- Perform disk imaging and saving backup conveniently
- Ensured free backup to the users
- Restores data conveniently
To backup essential files using Qiling Backup, follow these steps. First, log in to your Qiling Backup account and select the files you want to back up, then choose the backup method and storage location. Next, set a schedule for automatic backups and configure any additional settings as needed.
Step 1. To begin the backup process, click the File backup button.

Step 2. The left-hand side of the screen displays lists of both local and network files, allowing you to expand the directory and select the files to be backed up.

Step 3. You should choose the place where you want to store the backup.

Step 4. Set the backup schedule by clicking Options in Backup Options and ensure the backup is encrypted.

To start the backup at a certain time, go to Backup Scheme and click on Options, where you can find various customizable settings.

Step 5. You can store the backup file on your computer, in Qiling's cloud service, or on a network-attached storage device (NAS).

Step 6. Qiling Backup allows customers to store backup copies of their files on either a third-party cloud drive or the company's own cloud storage.
To back up your data on a third-party cloud drive, select Local Drive and scroll down to add Cloud Device, then fill in your account information.
Step 7. To start a backup, click on "Proceed" which will initiate the backup process. Once completed, the backup will be displayed as a card on the screen's list view, and clicking on it will provide further details on how to manage the backup job.

Conclusion
The cloud is a complete data storage solution that has made tasks easier for millions of users. It provides a service that makes things easily accessible to anyone, reducing security concerns and offering excellent ease of accessibility.
Related Articles
- How to Install Windows 11 on VirtualBox (Never Forget BACKUP!)
- Top 10 Reasons to Choose Qiling Backup and Recovery Software for Windows 11/10
- Windows Backup Problem: Windows Backup Stuck at 97%
- How to Create A Bootable USB in Linux | All You Want Is Here
- Migrate OS to Crucial SSD via Free Qiling Disk Master
Want to migrate OS to Crucial SSD for free quickly and safely? This post will save you from installation CD and all the complicated operation. - Mount System Image Backup on Virtual Drive to Restore Single File in Windows 10/8/7
You will find the perfect solution to mount backup image to restore individual files while Windows Backup and Restore does not support to restore single file from system image file.