Windows Backup Problem: Windows Backup Stuck at 97%
The Windows backup tool is a useful built-in feature, but it can sometimes freeze for hours without resolving the issue, making it inconvenient for users who need to know how to back up their computer to an external hard drive in Windows 11 or 10.
If your Windows backup is stuck at a certain percentage, it may be due to an error with the file being backed up, causing Windows to become unable to back up and resulting in the process appearing stuck at a specific percentage.
To resolve the issue of a stuck Windows backup, it is recommended to check the system logs for any errors, run the built-in Check Disk tool to identify any disk issues, and ensure that the backup destination has sufficient space. If the issue persists, consider running a System File Checker to scan for corrupted system files. Additionally, verifying the backup settings and ensuring that the backup is not running in the background can also help resolve the issue.
Cause of Windows Backup Stuck
There are several reasons why a Windows backup may get stuck at a certain percentage, such as 97%, 57%, 12%, or 8%. These include issues with the backup destination, disk space problems, corrupted files, or software glitches.
Windows initiates a backup of your PC by backing up each file individually. However, the backup process can freeze at 97% due to various reasons, such as corrupted files, files being locked by other programs, low storage space on the destination drive, or bad sectors on the system disk that prevent Windows from accessing the file.
How to Troubleshoot Windows Backup Stuck at 97%
1. Disable all of the startup programs
Step 1. Click on the Start menu, click on the Search icon, and type "System Configuration" to open it.
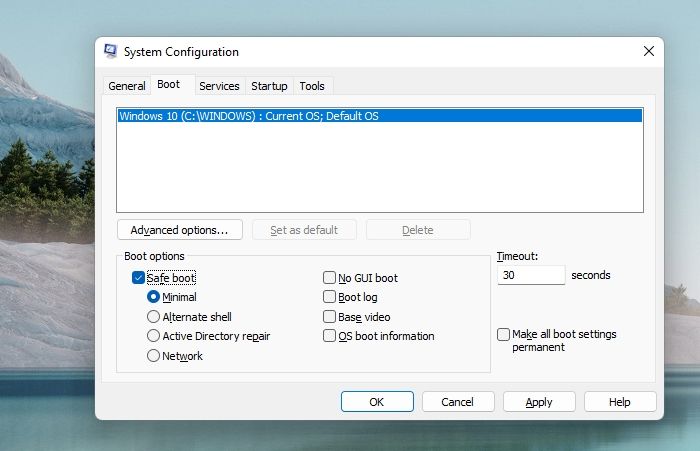
Step 2. In the System Configuration window, click on the "Startup" tab and select "Open Task Manager".

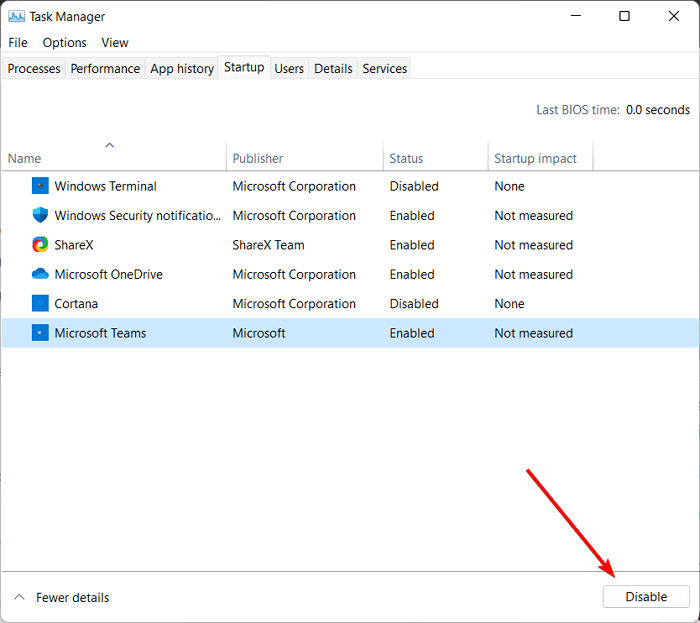
Step 3. To disable all startup applications, open the Task Manager window and navigate to the Startup tab. Click on the "Disable" button for each application listed in this tab to prevent them from launching automatically when your computer starts up.
Step 4. Click on "OK," restart your computer and run the backup of your PC again.
Once your PC backup is complete, enable your startup programs by opening System Configuration, navigating to the Task Manager, and then enabling each startup application in the Startup tab.
2. Disable Windows Backup
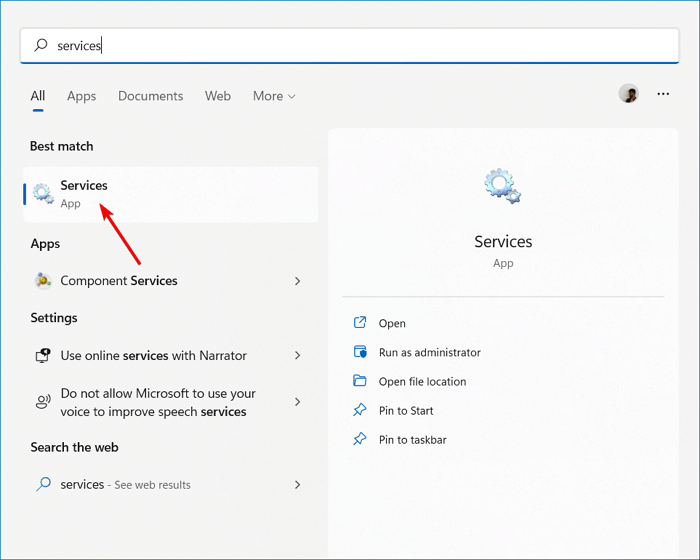
Step 1. To open the Services page, click on the search button and enter "Services" in the search bar. This will display the Services page.
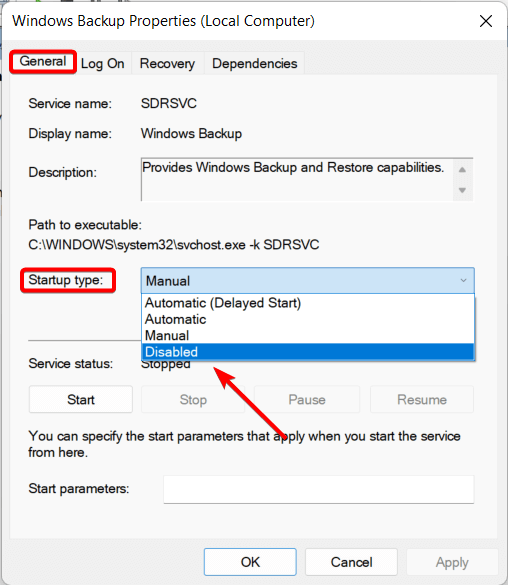
Step 2. Right-click on "Windows Backup" and select "Properties".
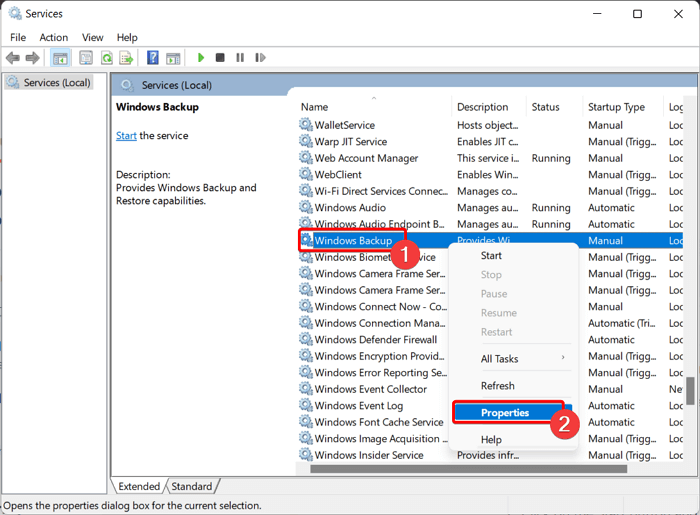
Step 3. To disable the service, go to the "General" tab, change the Startup type to "Disabled", and click the "OK" button.
Step 4. Now restart your computer and try creating the backup once again. See if it works now.
3. Check for disk errors
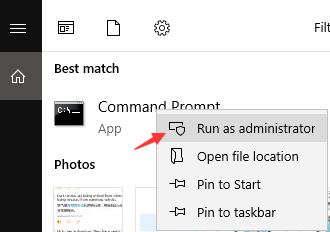
Step 1. To open the Command Prompt, click on the Start button and type "cmd" in the search bar. This will bring up the Command Prompt application.
Step 2. Now select "Run as administrator."
Step 3. To check for disk errors on your computer, open the command prompt window, type "chkdsk C: /f /r /x" (replacing "C" with the actual drive letter you want to check), and press Enter. This command will scan the drive for errors and attempt to fix them. The "/f" option forces a check of the drive, the "/r" option scans for bad sectors, and the "/x" option allows the system to be shut down if necessary.
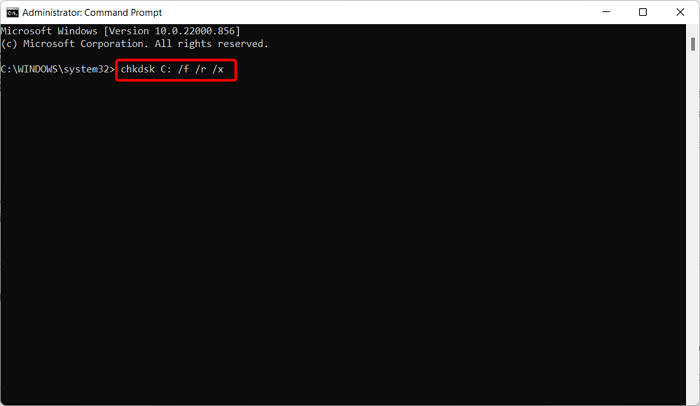
Step 4. Once done, type "Exit" and press the "Enter" button to exit the command prompt.
You may be interested in: What Does Check Disk Do and How to Run CHKDSK
4. Temporarily disable firewall and Antivirus programs
A firewall or antivirus software on your Windows PC can sometimes interfere with certain actions, potentially causing errors with your backup task.
To temporarily disable your firewall and antivirus programs, follow these steps:
Disable Antivirus:
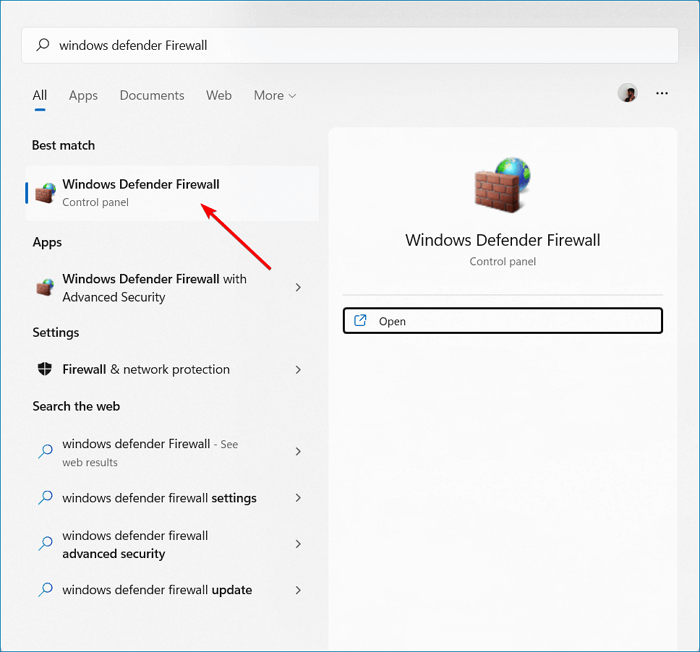
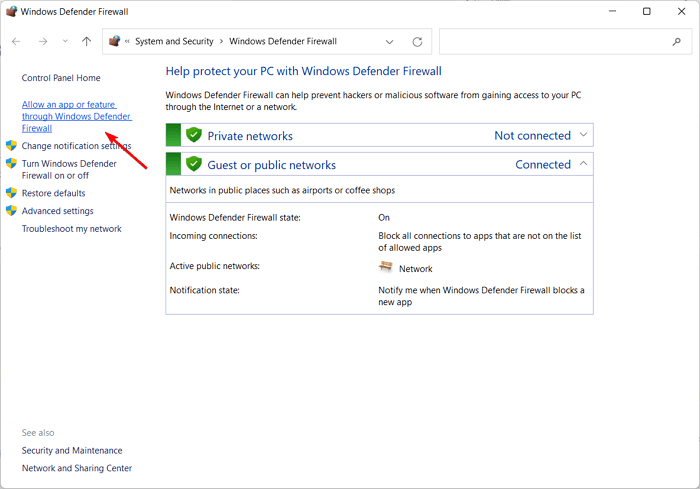
Step 1. To access the Windows Defender Firewall settings, click on the Windows button, and search for "Windows Defender Firewall".
Step 2. On the left window pane, select "Allow an app or feature through Windows Defender Firewall."
Step 3. Now untick the antivirus application to disable your antivirus program.
Disable Firewall:
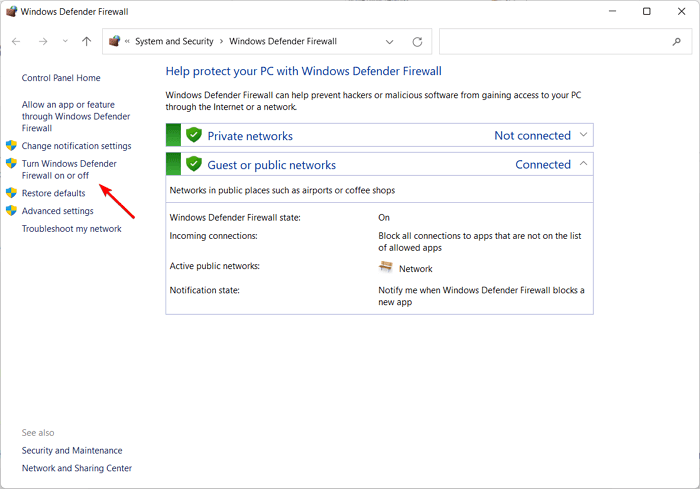
Step 1. In the Windows Defender Firewall window, click on "Turn Windows Defender Firewall on or off" on the left window pane.
Step 2. In the Private network settings and public network settings options, choose "Turn off Windows Defender Firewall" (not recommended).
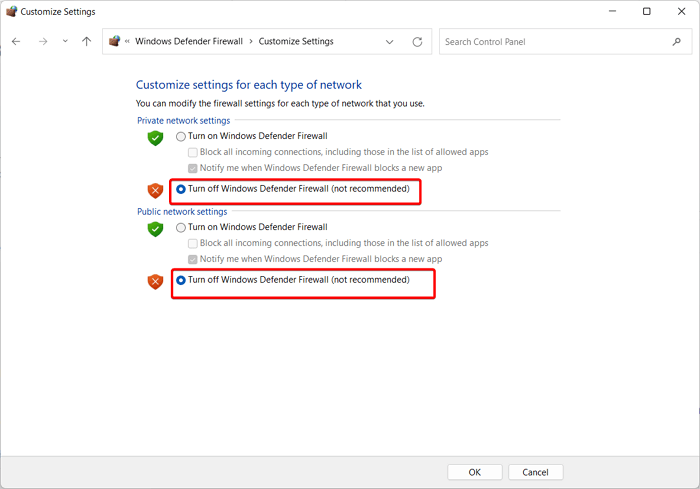
Step 3. Click on "OK" to confirm your changes.
Alternative to Try If Your Backup Can't Finish
Qiling Backup is award-winning backup software that allows you to create backups, system images, clone your drive, and restore your computer to a virtual machine or different hardware, among other features.
With Qiling Backup, your backups will complete properly, unlike the frustrating experience of Windows backup freezing at 97% or 58%. You can now download this software from the button below and start a backup with Qiling Backup.
Step 1. To start a backup, click the "File backup" button on the "Backup and recovery" page.

Step 2. On the left-hand side, you'll see a list of local and network files. Selecting the files to be backed up by expanding the directory.

Step 3. Follow the on-screen instructions to choose the location where you want to store the backup.

Step 4. To encrypt your backup with a password, go to Backup Options and click Options. This will allow you to customize various features to suit your needs and tailor the backup operation to meet your specific requirements.

To specify the backup schedule and choose whether or not to start the backup at a certain event, go to the Backup Scheme section. Here, you can set the frequency and timing of backups, such as daily, weekly, or monthly, and choose whether to start the backup at a specific event, like a certain time of day or a specific date.

Step 5. Backups can be stored on a local disk, Qiling's cloud service, or a network attached storage device (NAS).

Step 6. Qiling Backup enables customers to securely back up their data to a third-party cloud drive or Qiling's own cloud storage, providing a safe and convenient way to protect their digital files.
To back up your data to a third-party cloud drive, select Local Drive, scroll down to add Cloud Device, and enter your account information.
Step 7. To start a backup, click on Proceed. Once initiated, the backup will appear as a card on the panel, indicating its completion. For more detailed information about the backup job, simply click on it.

The free version of Qiling Backup has many tools for various backup needs, and the paid version offers even more tools.
Top 10 Reasons to Choose Qiling Backup and Recovery Software
To create a reliable backup and perform a worry-free recovery, you'll need a software tool to assist you. Windows backup and recovery software is designed to handle this task.
Tips to Prevent the Problem from Happening Again
To prevent your Windows PC from getting stuck when backing up, consider creating a restore point or a system image, which can help you recover your PC in case of any issues during the backup process.
A restore point is a snapshot of driver files, the Windows registry, and system files that can be used to revert to a previous state in case of an error. It does not include user files like audio, video, or pictures. Users can use a restore point to restore Windows registry, driver files, and system files to a previous state.
A system image is a copy of the entire hard disk or partition, which can also help prevent issues like Windows Backup getting stuck. This is in contrast to a file backup, which only saves specific files and folders.
The system image, often stored on a USB flash drive or CD/DVD, is a better option than creating restore points as it backs up the whole drive, not just important files, making it a more comprehensive backup solution.
FAQs
1. How long should a Windows 10 backup take?
It depends on your hard disk size, which can take anywhere from a few minutes to several hours to back up, with anything over 2-3 hours being considered less than ideal.
2. Why does Windows backup take so long?
Windows is taking longer than usual to back up files due to a large drive or an error in the file, causing it to take more time than expected.
3. How long does it take to do a system image backup?
It should take no more than 10–20 minutes.
Final Thought
Microsoft's built-in Windows backup tool can sometimes get stuck at a certain percentage, such as 12%, 58%, or 97%, when trying to back up files that are corrupted or have been modified, causing the process to fail.
To avoid similar issues in the future, consider creating regular restore points or system images to ensure a quick recovery in case of a system failure. Alternatively, you can utilize third-party backup software, such as Qiling Backup, to streamline the backup process and safeguard your system.
Related Articles
- The Settings You Should Change in Windows 11
- Fix Windows 11 Won't Shut Down with 10 Easy Solutions
- What Is M.2 and NVMe? This Article Will Tell You the Differences
- How to Migrate Windows 11 to SSD
- How to Transfer Active Directory to a New Windows Server 2022/2019/2016 [Complete Guide]
To keep your Server system secure and up to date, transfer Active Directory to a new Server computer by following these steps: create a backup of the current Active Directory, install a new Server with the same operating system, join the new Server to the domain, transfer the Active Directory database to the new Server, and then remove the old Server from the domain. This process ensures a seamless transition and maintains system security and up-to-date status. - How to Transfer Adobe AIR to Another Computer
If you want to transfer your Adobe AIR files from one computer to another, this article will guide you on how to do it easily.