How to Transfer Active Directory to a New Windows Server 2022/2019/2016 [Complete Guide]
Target: Help all Windows Server users successfully migrate and transfer Active Directory (AD) to a new Server machine.
Supported OS: Windows Server 2022/2019/2016/2021 r2/2002/2008 r2/2008/2003, etc.
How Do I Migrate or Transfer Active Directory (AD) to Another Server
To transfer Active Directory from your old Windows Server 2016 to your new Windows Server 2022, you can use the built-in tool called `dcpromo`. However, since you're upgrading from an older version of Windows Server, the process is a bit more complex. You'll need to first promote the new server to a domain controller, then transfer the roles, and finally demote the old server. Alternatively, you can use the `adjoin` command to join the new server to the domain, and then transfer the roles using the `adprep` tool. It's recommended to consult Microsoft's official documentation or seek professional help to ensure a smooth and secure transfer process.
If you're looking to migrate the Active Directory database from a Windows Server computer to a new Server machine, don't worry, it's a straightforward process. To successfully migrate AD from Server to Server, start by following the detailed procedure outlined on this page, which includes the steps to achieve a smooth and reliable migration.
In this article, you'll learn:
- Active Directory is a directory service that allows users to access and manage network resources, such as files, printers, and applications, across a network. It stores information about users, groups, and computers, and provides a centralized way to manage user authentication, access control, and other security-related tasks.
- To backup and restore Active Directory, you can use the built-in Windows feature called "Active Directory Backup" or third-party tools like Windows Server Backup. Here's a step-by-step guide:
- Method 2. Use Active Directory Migration Tool
Active Directory is a directory service that allows users to manage and store information about users, groups, and computers on a network. It's a crucial component of Windows Server, enabling features like user authentication, authorization, and resource access control.
What Is Active Directory and Why Need to Move It to a New Server
- By Microsoft Active Directory Overview
Active Directory includes a database called AD, which connects users to network resources to accomplish their tasks. It contains information about users, groups, computers, and other network resources, and provides a way for users to access and manage these resources.
- Information objects - Shared resources are tools and systems that are shared among multiple users in a network, including servers, volumes, printers, network users, and computer accounts.
- A set of rules - The schema defines the classes of objects and attributes contained in the Directory.
- A global catalog - information about every object in the Directory.
- A query and index mechanism - make sure objects, and their properties can be published and found by network users or applications.
- A replication service - distribute directory data across a network.
Switching Server computers often involves transferring Active Directory to a new server. To successfully migrate the AD database, you can follow two methods. First, you can use the built-in tools in Windows to transfer the AD database to a new server.
Both methods work to transfer Active Directory from one server to another on Windows Server operating systems, including 2022/2019/2016/2012 R2/2012/2008 R2/2008/2003, and so on.
Method 1. Backup Active Directory and Restore It to Another Server
- Tool: PowerShell
- Difficulty Level: high
To transfer the active directory database from one Windows Server to another, follow these steps: Stop the Active Directory Domain Services (AD DS) service on the source server, then run the ntds.dmp file on the source server to export the database to a file. Next, copy the exported database file to the destination server, and then run the ntds.
Step 1. Introduce a new domain controller with the target Server to be the new Flexible Single Master of Operations (FSMO) role holder for the domain, taking over the roles currently held by the existing FSMO role holder.
To migrate the FSMO role, you can refer to the Microsoft community post for help on transferring FSMO roles in Active Directory.
Step 2. To add new domain controllers to a forest root and domain tree levels, you would first need to promote a server to a domain controller within the existing domain. This involves installing the Active Directory Domain Services (AD DS) role, configuring the DNS settings, and running the `dcpromo` command to promote the server.
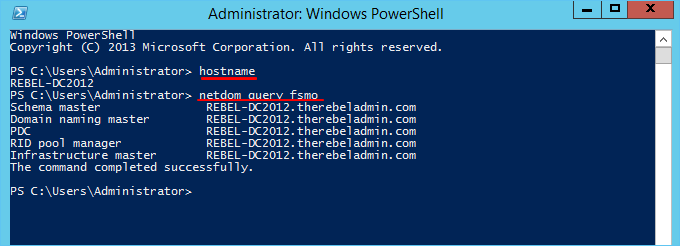
Open PowerShell and type the following two command lines and hit Enter each time:
- hostname
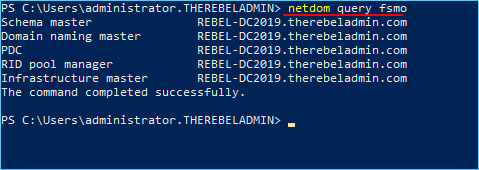
- netdom query fsmo
Step 3. Log in to the target server as an administrator and add it to the existing domain.
Step 4. Restart Windows Server and logo into the Server as Enterprise Administrator.
And assign the static IP address to the Server.
Step 5. Right-click the Windows icon and select "Windows PowerShell (Admin)".
Step 6. Type Install-WindowsFeature –Name AD-Domain-Services -IncludeManagementTools in PowerShell and hit enter.
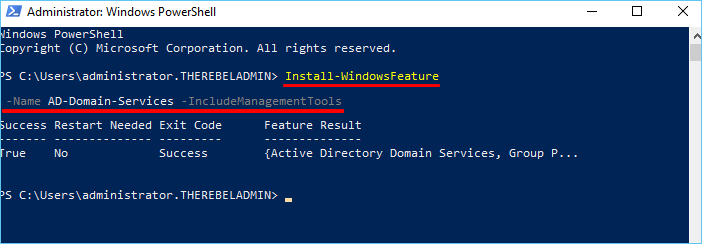
The command will install the Active Directory Domain Service Role in the given Server.
Step 7. Here is the syntax for configuring a new Server as an additional domain controller in PowerShell:
- Install-ADDSDomainController
- -CreateDnsDelegation:$false
- -InstallDns:$true
- -DomainName "rebeladmin.net"
- -SiteName "Default-First-Site-Name"
- -ReplicationSourceDC "DC08.rebeladmin.net"
- -DatabasePath "C:\Windows\NTDS"
- -LogPath "C:\Windows\NTDS"
- -SysvolPath "C:\Windows\SYSVOL"
- -Force:$true
There are no line breaks for the command listed above. So what are the meanings of these syntax? Check this out:
| Syntax Content | Description |
|---|---|
| Install-ADDSDomainController | The cmdlet will install the domain controller in the active directory infrastructure. |
| -CreateDnsDelegation | This parameter determines whether to create DNS delegation that references Active Directory integrated DNS. |
| -InstallDns | This setting specifies whether the DNS role needs to be installed with the Active Directory domain controller. For a new forest, it is a default requirement to set this to $true. |
| -DomainName | This parameter defines the FQDN for the active directory domain. |
| -SiteName | This parameter can be used to define the active directory site name, with a default value of "Default-First-Site-Name". |
| -ReplicationSourceDC | Using this parameter allows you to specify the active directory replication source, which will be used by default. However, if needed, you can be specific and choose a particular domain controller to use instead of any available one. |
| -DatabasePath | The parameter will be used to specify the folder path where the Active Directory database file (Ntds.dit) will be stored. |
| -LogPath | The log path can be used to specify the location to save domain log files, allowing for centralized logging and easier management of log files. |
| -SysvolPath | The SYSVOL folder path is defined as C:\Windows by default. |
| -Force | This parameter forces the command to execute, ignoring a warning about best practices and recommendations. |
Step 8. If a command prompts for the Safe Mode Administrator password, enter a new complex password.
After this, restart the Server system and log in as administrator.
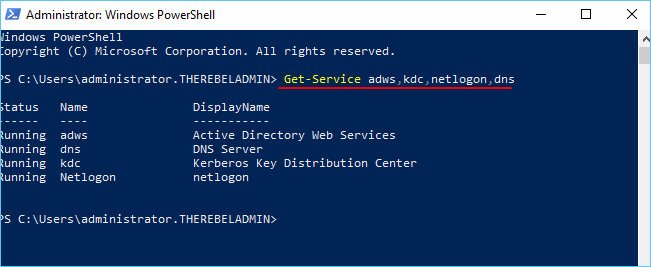
Step 9. Open PowerShell again and type `Get-Service adws,kdc,netlogon,dns` and hit Enter to check the AD DS status.
Step 10. To get a list of all domain controllers in the domain, along with their names, IPv4 addresses, and sites, you can run the PowerShell command `Get-ADDomainController -Filter * | Format-Table Name, IPv4Address, Site` and press Enter.
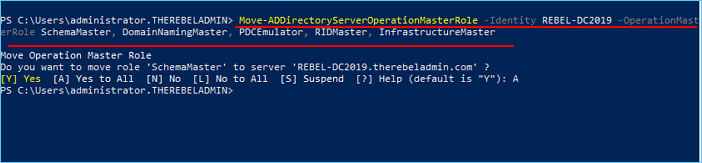
Step 11. To migrate all FSMO roles to the new domain controller, type `Move-ADDirectoryServerOperationMasterRole -Identity REBEL-DC2019 -OperationMasterRole SchemaMaster, DomainNamingMaster, PDCEmulator, RIDMaster, InfrastructureMaster` in PowerShell and hit Enter.
Note: Replace REBEL_DC2019 with your new running Windows Server.
Step 12. To verify that the new FSMO role holder is correct, you can use the PowerShell command `netdom query fsmo` to check the current FSMO role holders. This command will display the current FSMO role holders, including the Domain Administrator, PDC, and Infrastructure Master roles.
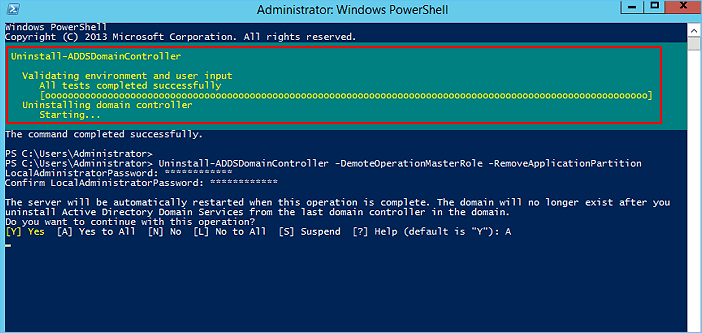
Step 13. Type Uninstall-ADDSDomainController -DemoteOperationMasterRole -RemoveApplicationPartition to decomission the old Windows domain controller.
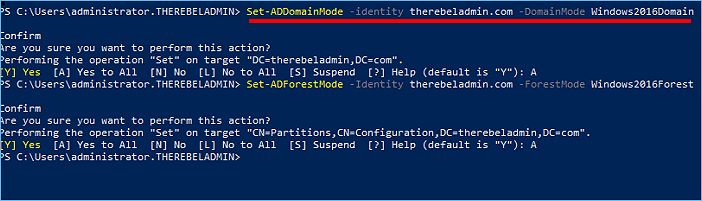
Step 14. To upgrade the functional domain levels, run the command `Set-ADDomainMode –identity therebeladmin.com -DomainMode Windows2016Domain` in PowerShell and press Enter.
Step 15. To upgrade the forest functional levels, run the command `Set-ADForestMode -Identity therebeladmin.com -ForestMode Windows2016Forest` in PowerShell and press Enter.
The Server AD migration process can be completed by running the following command lines in PowerShell: `Remove-ADComputer -Identity "old_server_name" -Confirm:$false` and `Remove-ADComputer -Identity "old_server_name" -Confirm:$false -Recursive`. After running these commands, verify the completion of the process by checking the status of the old server in the Active Directory. If the old server is no longer listed, the migration process has completed successfully. The old server can then be safely removed from the network.
- Get-ADDomain | fl Name,DomainMode
- Get-ADForest | fl Name,ForestMode

The process of transferring Active Directory to a new Server machine was completed successfully, as shown in the result, allowing for a seamless transition to the new server.
Method 2. Use Active Directory Migration Tool
If you're looking to migrate Active Directory, aside from the manual method, you can also try using an Active Directory migration tool. Qiling Disk Master Technician, with its PC to PC File Transfer feature, can help you with this task.
Qiling Disk Master Technician
Your smart Windows Server file transfer software.
- Unlimited file transfer between Servers.
- Transfer programs, apps without reinstallation.
- Transfer account, settings to new Server computer.
- Data rescue, find product key for installed programs.
To migrate and transfer the Active Directory database from one server to another, follow these steps. First, ensure both servers are running the same version of Windows Server and that the Active Directory domain functional level is the same on both servers.
During the procedure, you only need to select the AD database folder for file transferring between Server computers.
Step 1. Open Qiling Disk Master on both of your server computers. Choose "File sync" to proceed.

Step 2. To connect the current PC to the target PC, enter the target computer's account password or its verification code, and optionally turn on "Connection Verification" on the target computer's main screen.

Step 3. To transfer files to another server computer, go to "Files" and select "Transfer". This will allow you to choose the files you want to transfer. Once you've selected the files, click "Proceed" to initiate the transfer of the chosen data.

Step 4. Wait for the process to finish. PCTrans will transfer files at a fast speed. It won't take too long.
Once you've completed the steps, reboot the target Windows Server computer and log in as administrator.
Bonus Tips for Server to Server Migration
Transferring Active Directory from one server to another is just the beginning. You'll also need to move various other content, such as user data, user accounts, domain accounts and settings, as well as applications, to the new server.
To completely transfer server data to another server, you can follow these steps:
#1. Transfer User Data and Accounts to New Server
Qiling Disk Master allows for a seamless transfer of user data and accounts to a new server, making the migration process quick and easy with just a few clicks.
Step 1. Install and launch Qiling Disk Master on both devices. On the source PC, select "File sync" to proceed.
To connect the two PCs, make sure they are on the same local area network (LAN). Then, connect to the target PC via its IP address or by manually adding it. Next, enter the login account and password of the target PC and click "Connect" to link the two PCs.
Step 2. To specify user accounts and settings for transferring, click on the "Accounts" section.
Step 3. The user's original text was a bit lengthy and could be condensed into a simpler format. The assistant's response is a clear and direct summary of the steps involved in transferring user settings.
Step 4. After selecting the option, click "Proceed" to initiate the transfer of user accounts and settings.
#2. Migrate Essential Applications to New Server
In addition to transferring Server data, files, and accounts, consider migrating essential applications to the new Server, such as the Windows Server Manager, SQL installer, Exchange, Quickbooks, Office, and Adobe.
You can easily manage and accomplish the file transfer task on your own using reliable Windows Server file transfer software. This software can help you transfer files efficiently and securely, making the process smooth and hassle-free. With its user-friendly interface and robust features, you can complete the task without any assistance, ensuring that your files are transferred safely and accurately.
Step 1. Run Qiling Disk Master on both PCs
On the source PC, select “File sync” on the main screen of Qiling Disk Master and proceed.
Step 2. Connect two computers
1. Connect to your target PC by selecting it from the list of available devices and clicking "Connect" using either its IP address or device name.
2. To confirm the login password, enter the password of the target PC and click "OK".
If you didn't see the target PC in the listed devices, you can also click "Add PC" to manually connect the target PC by inputting its IP address or device name.
Step 3. Select apps, programs, and software and transfer to the target computer
1. You can select and choose what you want to transfer from the current computer to the target PC, giving you control over what data and files are copied over.
2. After choosing the desired applications and programs, click "Proceed" to initiate the transfer process.
Moving AD from Server to a New Server Is Complex, Be Careful and Patient
Active Directory is a crucial component for server administrators, and migrating it to a new server is essential. This tutorial page provides an overview of what Active Directory is and its significance, highlighting its importance for server administrators to successfully migrate AD to a new server.
We introduced two methods that enable successful migration of Active Directory to a new Server on various Windows Server versions, including 2022/2019/2016/2012/2008/2003.
The procedure is a bit complex, so be sure to be careful and patient while typing the command lines in PowerShell to execute the task.
Related Articles
- How to Move Overwatch to Another Drive or Another PC Quickly
- How to Move Games to Another Drive Windows 11 [Beginner's Guide]
- Transfer Zoom App for Windows|Moving Zoom to New PC
- How to Reinstall Windows 10 without Losing Files
- How to Back Up Game Data on PS5 in Every Possible Way
Do you know how to back up game data on ps5? If you do not know yet, you are on the right page. This article will offer three ways to help you back up PS5 game data. After reading this post, you can use any method to back up PS5 game data on your own. - How to Back Up Office 365 Emails - Top 2 Methods of 2024
You can easily back up your Office 365 emails using two simple methods. This article will guide you through the process, allowing you to securely store your emails in a safe location. By following the steps outlined here, you'll be able to back up your Office 365 emails with ease.