How to Move Overwatch to Another Drive or Another PC Quickly
Part 1. How toMove Overwatch to Another Drive/SSD
Scenario: To move your Overwatch game from your C: drive to a new hard drive, you can use the Blizzard Battle.net app to move the game files. Here's a brief step-by-step guide: Open the Battle.
If your C drive is running out of space or you've got a new HDD or SSD, you might want to move your game to the new drive to free up space and potentially enhance computer performance and increase game loading speed. This can be done by following the steps mentioned above.
Unfortunately, it's not possible to move Overwatch to a different location on the same computer without reinstalling, as the game is tied to the installation directory. However, you can consider upgrading your storage to an SSD, which can improve game performance and loading times, or use a cloud storage service to store your game files, allowing you to access them from any device. This way, you can still enjoy Overwatch without the hassle of reinstalling.
To help you move Overwatch to a different drive without launch problems, follow these steps. If you need more assistance, Part 2 covers additional guides for transferring Overwatch from one PC to another.
1.Move Overwatch to SSD Without Re-installation Quickly
To migrate Blizzard games to a different drive, you can use Qiling Disk Master Free, a software that helps transfer data, applications, and account settings from one PC to another in simple clicks.
Qiling Disk Master
- Transfer to a new PC: Steam, Origin, LOL, Blizzard.
- Transfer to a new drive: DIABLO, WORLD OF WARCRAFT,
OVERWATCH, HEARTHSTONE, HEROES OF THE STORM, etc. - To migrate games and apps to a new PC or drive, follow these 3 simple steps. Firstly, back up your existing games and apps by creating a system image or using a third-party backup software, ensuring all files and settings are included.
This tool allows you to transfer applications locally between two disks, which can help speed up your PC by moving large programs off your system drive. With its APP Migration feature, you can easily move applications like Overwatch to another HDD or SSD, making it a useful tool for optimizing your computer's performance.
Step 1. Launch Qiling Disk Master and select transfer mode
To proceed with Qiling Disk Master, navigate to the main screen, then select the "Backup and recovery" section, and click on "File sync" to continue.

Step 2. Select apps and another drive to transfer
1. Select the source partition and tick the applications, programs, and software you'd like to migrate.

2. To initiate the migration process, select a different drive or disk as the target device by clicking on the browser icon, and then click "Proceed" to start the migration.

Step 3. Finish the migration process
When the transferring process finishes, click "OK" to complete.
To keep all the changes and run your migrated apps again, you can simply restart your PC. This will allow you to access your apps on the other drive as usual.
2. Move Overwatch to Another Drive by Re-downloading
To manually transfer Overwatch to a different drive, follow these steps: First, locate the Overwatch folder on your current drive, typically found in the "C:\Program Files (x86)\Overwatch" directory. Next, copy the entire folder and its contents to the new drive, making sure to include all subfolders and files.
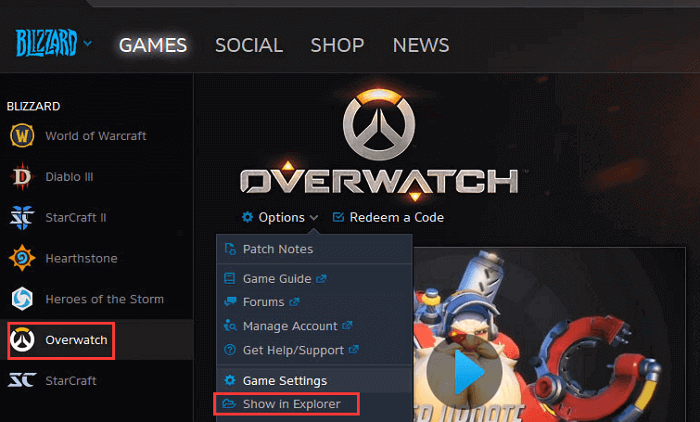
Step 1. To access the Overwatch game files, start the Battle.Net Launcher, navigate to the "Overwatch" section, select "Options", and click "Show in Explorer" to open the game's installation directory in File Explorer.
Step 2. To move Overwatch to the target drive, go to its installation location, copy the folder, and paste it to the target drive. Then, open the launcher, navigate to the game's location, and update the path to match the new location.
Step 3. The Battle.Net Launcher will assume the game has been uninstalled. You need to click the "Install" button, change the installation location, and wait for the process to finish.
Transferring Overwatch from one PC to another can be done manually with the help of an external device, but this method is not recommended due to potential issues with registry data. When an application is installed, a lot of registry-related data is written to different locations on the C drive, and manually moving game folders may not guarantee a smooth run of the copied application due to missing registration data. Instead, we recommend using a PC migration tool for a simpler and more secure transfer process.
Part 2. How toMove Overwatch to Another PC
Scenario: You can transfer the Overwatch files to your friend's computer by copying them to a portable storage device, such as a USB drive, and then transferring the files from the USB drive to his computer. Alternatively, you can upload the files to a cloud storage service like Google Drive or Dropbox and have your friend download them from there. This way, your friend can play Overwatch during the free weekend without having to download the game on his computer.
Users who want to transfer Overwatch from one PC to another without reinstalling can use Qiling Disk Master to transfer files from the old PC to the new PC in Windows 10/8/7.
- PC to PC: To connect two Windows PCs over a local area network, you can transfer files, apps, and accounts from one PC to another. This can be achieved by setting up a network connection between the two PCs, which can be done using an Ethernet cable or through Wi-Fi.
- Image Transfer: When you don't have a network, you can use the feature to make images of files, folders, and programs on the source PC, and transfer to the target device via USB.
To transfer Overwatch from one PC to another, you can follow the guide below, which shows you how to do so via the network. Alternatively, if you prefer migrating games by creating an image and recovering, you can click on the link to see the instructions for file transfer without the internet.
Step 1. Run Qiling Disk Master on both PCs
On the source PC, select "File sync" on the main screen of Qiling Disk Master and proceed.
Step 2.Connect two computers
1. Connect to your target PC via its IP address or device name and click "Connect".
2. Enter the login password of your target PC and click "OK" to confirm.
If the target PC is not listed, you can manually add it by clicking "Add PC" and entering its IP address or device name.
Step 3. Select apps, programs, and software and transfer to the target computer
1. You can choose what you want to transfer from the current computer to the target PC.
2. To initiate the transfer process, select the desired applications and programs, then click "Proceed" to start the transfer.
Conclusion
Qiling Disk Master offers a comprehensive solution to copy installed programs, allowing you to move programs like Overwatch from one drive to another without reinstalling. If you're migrating the game to a new PC, follow the guide in Part 2. If you encounter any issues, contact technical support via live chat or email.
Related Articles
- How to Transfer Files from iCloud to Dropbox [Step-by-step Guide]
- How to Transfer Youtube Data to Another Account [Channels, Subscription, Playlist]
- How to Transfer Files from Baidu to Google Drive
- How to Transfer Matlab to Another Computer with Easy Clicks
- How to Clone Hard Drive for Disk Upgrade, Data Transfer, SSD Migration
Cloning a disk can quickly transfer data, programs, and the system to a new hard drive, making it a good choice for upgrading disks, migrating SSDs, or transferring data. - 5 Best Disk Imaging Software for Windows 10/7 in 2022 | Paid & Free
Do you know what is disk imaging software? What is the difference between disk cloning and disk imaging? And how to select the best disk imaging software to back up everything on your computer disk? Follow us, you'll learn 5 best disk imaging software with paid and free versions for disk imaging and file backup on Windows 10/8/7.