Best Restore Point Creator for Windows & How to Use
What Is a Restore Point & Restore Point Creator?
A restore point is a snapshot of your computer's settings and configurations that helps restore it to a previous state in case of a system failure or malware attack.
Creating a system restore point saves time by allowing you to revert to an earlier working version of your OS and system programs when errors occur, eliminating the need for a full reinstall.
A restore point creator is a tool designed to manage system restore points on Windows 10 computers. It enables users to create new system restore points or delete existing ones, and also allows for checking and controlling the storage space consumed by each restore point.
How to Use Windows 10 Built-in Restore Point Creator
Windows 10 has a built-Windows has a feature called "System Restore" that allows you to recover important settings and programs if your system crashes. This feature, previously automatic in earlier Windows versions, creates restore points that can help you revert to a previous working state.
In Windows 10, System Restore is disabled by default, only creating restore points after significant changes like driver/program updates or system setting adjustments.
To ensure your computer reverts to normal following a system crash, you can enable System Restore and automatically create restore points by following these steps.
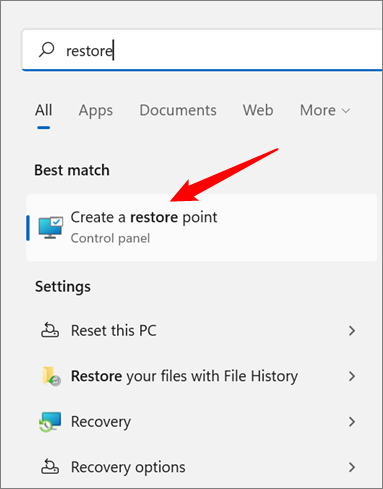
Step 1. Type "System Restore" on the search bar.
Step 2. When the results display, click on "Create a restore point."
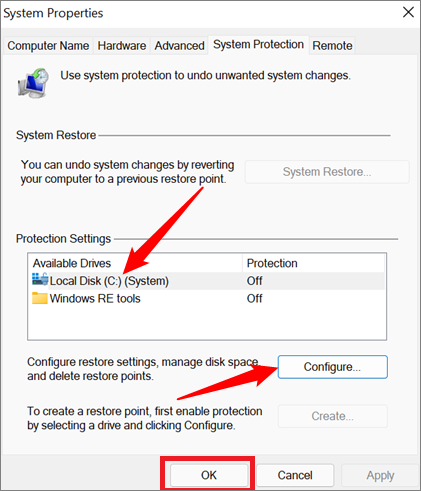
Step 3. Click the "System Protection" tab, select the drive to configure restore settings, and click the "Configure" button.
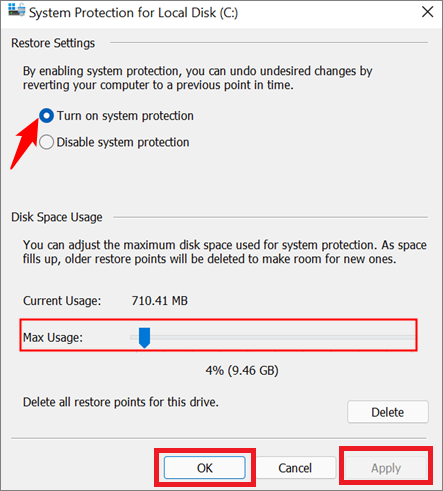
Step 4. To enable system restore, go to the "Restore Settings" section, select the "Turn on system restore" button, and then choose the desired disk space usage for restore points.
Step 5. To activate System Restore, click on the Start menu, then select Settings, followed by Update & Security, and then Troubleshoot. Next, click on the "Additional options" tab, then select "System Restore" from the list of options. Click on "Next" and then "Finish" to start the System Restore process. After that, select the restore point you want to use and click on "Next".
You can repeat steps 3 and 4 above to create restore points for other drives, such as the C drive, in addition to the D drive.
You can manually create a restore point on your Windows 10 device, which is useful if you want to adjust default settings or perform a risky download. To do this, you can follow a set of steps that allow you to manually create a restore point, giving you an added layer of protection and control over your device's restore points.
1. Repeat steps 1 and 2 in the above process.
2. To create a system restore point, open the "System Protection" tab and click on the "Create" button.
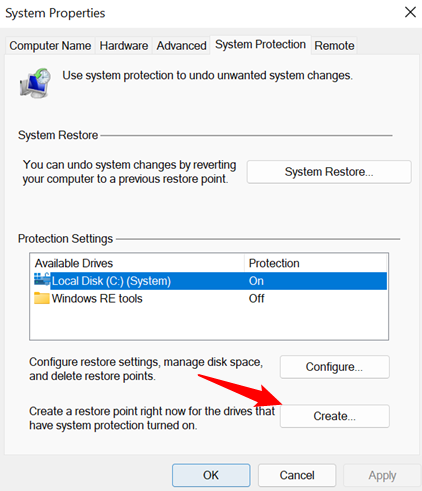
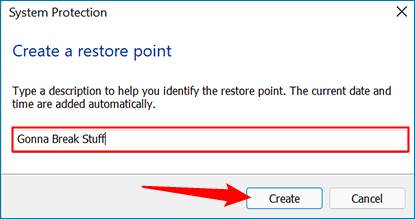
3. Click on the "Create" button to create a restore point with a descriptive name, making it easier to identify in the future.
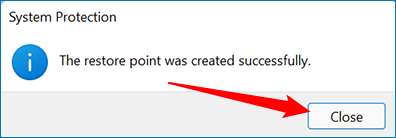
4. System Protection creates a restore point, and once done, a notification appears, and you can close it, which means you've manually created a restore point.
Restore Your Computer to an Earlier State Using Restore Point
If your computer crashes or is affected by malware, the best course of action is to restore it to its previous state. This can be done by reverting to an earlier restore point, which will bring back the programs and settings in place at that time. To do this, you can follow the steps outlined below, which will guide you through the process of restoring your computer to a previous version using a restore point.
Step 1. Type "System Restore" on the search bar.
Step 2. When the results display, click on "Create a restore point."
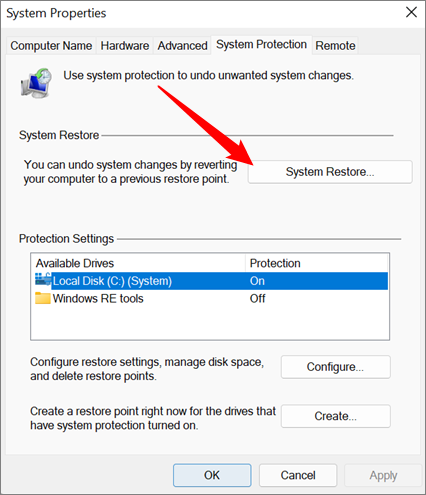
Step 3. To access System Restore from the System Protection tab, click on System Restore. If the button is grayed out, it means you don't have any existing restore points. Otherwise, proceed with the next step.
Step 4. Click Next once the System Restore window opens.

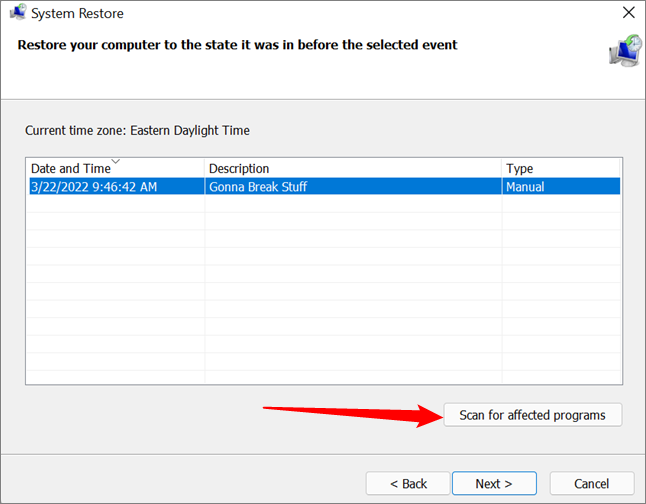
Step 5. Select the restore point you want to go back to, and you can also click "Scan for affected programs" to see which drivers and programs will be lost if you revert your system. Click "Next" after making your selection.
Step 6. Confirm the restore details and click Finish to restore your system to its earlier version, which may require a system restart.

Note: The System Restore process takes time, so it's best to let it run without interruption.
Alternative to Windows Restore Point Creator - Qiling Backup
If you're looking for a better way to back up your system settings and programs without relying on Windows built-in tools, consider using third-party software like Qiling Backup Free. This program functions similarly to a Restore Point Creator, allowing you to save your programs, files, and settings, and then restore them if your computer system crashes.
One great thing about creating a restore point with Qiling Backup is that you can customize the location of it. Apart from local drives and external backup drives, you can also save your restore point to a network drive or a cloud drive, making it accessible and usable from anywhere.
Qiling Backup Free allows users to select drives and programs for backup, schedule backups daily, weekly, or monthly, and create bootable media to boot the computer in case of a malware attack.
Other Features of Qiling Backup Free
- Multi-Path Backup Storage: The tool allows for saving backups on various storage mediums, including local drives, networks, NAS, and cloud services.
- Multi Backup Options: Allows incremental and differential backup, password-enabled backup
- Convenient Restore: This software allows you to restore a backup image to a computer system with different hardware specifications, such as a different processor, motherboard, or storage device, without any compatibility issues.
Download and install Qiling Backup Free on your computer to use it as an alternative to Windows Restore Point Creator, and follow the easy and direct steps for use.
Step 1. On the main page, click "System backup" button to start.

Step 2. Qiling Backup will automatically select your system partition, so you only need to choose where to save the backup.

Step 3. Both Local Drive and NAS are available for you to save the backup file.

Step 4. After completing the backup process, you can check the backup status, recover, open, or delete the backup by right-clicking on the backup task on the left.

Tips: How to Use System Restore Point Safely and Effectively
System Restore Point is a tool in Windows 10 that allows you to recover important settings and programs in case of system malfunction or malware attack. To use it safely and effectively, you should create a restore point before making changes to your system, regularly check for updates, and avoid installing unknown software. This will help you to prevent data loss and ensure a smooth recovery process.
Tip 1. Re-Run Program Installers
System Restore can recover your settings and programs after a computer failure, but you'll need to reinstall and re-run programs to get them working properly, as it only recovers programs and not their installers.
Tip 2. Use the Most Recent Restore Point
When restoring settings and programs on Windows 10, the system will inform you of programs that will remain unchanged and those that will be deleted. To prevent recently installed programs and apps from being affected during the restore process, use the most recent restore points, ensuring your current settings and programs are preserved.
Tip 3. Make Manual Restore Points Before Big Installations
When installing extensive programs on your Windows 10 computer, you may encounter issues. To mitigate this, it's a good idea to create manual restore points before making significant changes or installing large programs. This way, you can easily revert to a previous state if things don't go as planned, allowing you to troubleshoot and resolve any problems that arise.
Tip 4. System Restore Won't Save Personal Files
System Restore is not a file backup, but rather a system settings and program backup. To back up personal files, consider using a third-party tool like Qiling Backup Free, which can help save and recover important files in case of computer failure.
Also read: To fix the issue of "System Restore failed and did not complete successfully", try running System Restore in Safe Mode, check for disk errors, and ensure the System Restore point is not corrupted. You can also try running the System File Checker (SFC) tool to replace any corrupted system files, and then attempt System Restore again.
FAQs
1. Can I Create my Own Restore Point?
System Restore allows you to manually create restore points by clicking on the "Create" button in the "System Protection" tab, giving the point a descriptive name, and System Protection will then create a restore point for you.
2. How Do I Find a Restore Point I Created?
To create a System Restore point, type "restore" in the Windows search bar and click on "Create a restore point" in the results. Then, open the "System Protection" tab, click on "System Restore", and select the restore point you created.
The Bottom Line
The best restore point creator for Windows 10 is the built-in tool called "System Restore," which enables you to automatically create restore points for your system settings and programs to revert to in case of a computer error, as well as manually create a restore point and give it a descriptive name.
In the event of a system failure, you can check for your latest restore point and use it to recover your settings and programs. Alternatively, you can use software like Qiling Backup Free, which allows you to back up your files and settings and recover them whenever you encounter issues. This provides a reliable alternative to System Restore on Windows 10.
To get started with this software, simply download and install it on your computer.
Related Articles
- Stop OneDrive Backup in Windows 11
- 2022 How to Copy Text That Cannot be Copied: Seven Tips 100% Working
- How Windows 11 Prevent You from Malware Attack with New Security Features
- 3-Minute Understanding SSD Cache in Windows 10/11: Is It Worth It?
- [SSD Clone] Download Samsung M.2 SSD Clone Software
Cloning a Samsung M.2 SSD can be done using Samsung's SSD clone software, but it has limitations. However, with the help of Qiling Disk Copy software, you can overcome these limitations and clone your Samsung M.2 SSD in simple steps. Our article provides a guide on how to do this. - Samsung Magician Software Download for Data Backup and OS Migration
Samsung SSD Magician Software is a drive management tool for Samsung SSDs that allows you to optimize your drive and boost its performance with ease. This software enables you to perform various functions using it.