How to Create A Bootable USB in Linux | All You Want Is Here
What Is A Bootable USB and Why You Need One
A bootable USB is a USB drive that contains an operating system and can be used to boot a computer, allowing it to run from the USB drive instead of the computer's internal hard drive.
Using a bootable USB drive offers the convenience of being able to access a computer on any device, without needing to have an operating system installed on that device. This is particularly useful for situations where a laptop or desktop is not readily available, as the USB drive can be easily carried around and used on any computer.
Using a bootable USB drive provides a faster and more convenient way to set up a new computer, as it eliminates the need to install an operating system from scratch. Additionally, it allows for a quicker and easier reinstallation of the operating system if needed, saving time and effort.
📖Windows Installation Tips:
How to Create a Bootable USB in Linux
The process for creating a bootable USB drive in Linux is fairly simple. First, you'll need to download the ISO file for the operating system that you want to install. Next, you'll need to use a third-party tool to copy the ISO file to your USB drive. Finally, you'll need to configure your computer's BIOS to boot from the USB drive. Here are the detailed steps of how to create a bootable USB in Linux.
Step 1. Downloading the ISO File
To download and prepare the ISO file for installation, start by obtaining the ISO file for the desired operating system from its official website. For instance, if you're interested in installing Ubuntu, visit the Ubuntu website to download the ISO file. After downloading, verify the ISO file's integrity using a tool like 'md5sum' to ensure it hasn't been compromised. This step is crucial to prevent any potential issues during the installation process.
Step 2. Copying the ISO File to the USB Drive
Once you've verified the integrity of the ISO file, you're ready to copy it to your USB drive using the 'dd' command-line tool, which creates exact copies of data.
To copy the ISO file to your USB drive, open a terminal window and enter the `dd` command with the correct arguments, such as `dd if=~/Downloads/your_iso_file.iso of=/dev/sdb bs=4M` to copy the ISO file to a USB drive with the device name `/dev/sdb`.
sudo dd if=path/to/iso/file of=/dev/sdb bs=4M

👆To copy an ISO file using the dd command, you can use the following syntax: `dd if=source.iso of=destination.
To copy an ISO file to a USB drive, use the command `dd` in a terminal, specifying the path to the ISO file and the USB drive, for example: `sudo dd if=path/to/iso/file of=/dev/sdb bs=4M status=progress`. This will start the copying process, which may take some time depending on the size of the ISO file and the speed of the USB drive. Make sure to replace `path/to/iso/file` with the actual path to the ISO file you downloaded and `/dev/sdb` with the actual path to your USB drive.
Step3. Configuring the BIOS to Boot From the USB Drive
To use a USB drive as a boot device, first copy the ISO file to the drive. Then, configure your computer's BIOS to boot from the USB drive, a process that varies by computer make and model but is usually straightforward.
To resolve the issue, restart your computer and look for a message that says 'Press F2 to enter BIOS settings', then press the indicated key to enter the BIOS settings.
To change the boot order in the BIOS settings, look for a setting called 'Boot Order' or 'Boot Priority' and adjust it to prioritize the device you want to boot from, such as a USB drive or CD/DVD drive. This will allow your computer to try booting from that device first, instead of the default hard drive.
To make your computer boot from a USB drive, first, ensure the USB drive is listed as the priority boot device. Then, save your changes and restart your computer, which should now boot from the USB drive.
How to Create A Bootable USB in Windows
To create a bootable USB drive in Windows, start by downloading an ISO file for the operating system you want to install. Next, use a tool like Rufus to copy the ISO file to your USB drive. Finally, configure your computer's BIOS to boot from the USB drive, and you'll be ready to go.
On a Windows computer, you can either create a new installation bootable USB drive or a bootable USB drive of your existing system. This guide will walk you through both options step by step.
#1. Create a bootable USB drive using Rufus
Step 1. Download and install Rufus from https://rufus.ie, then prepare a USB drive that is at least 8 GB.
Step 2. To use Rufus, open the program and it will automatically detect the available USB drive. Select the USB drive you want to use from the drop-down menu under Device. This will allow you to proceed with the USB creation process.
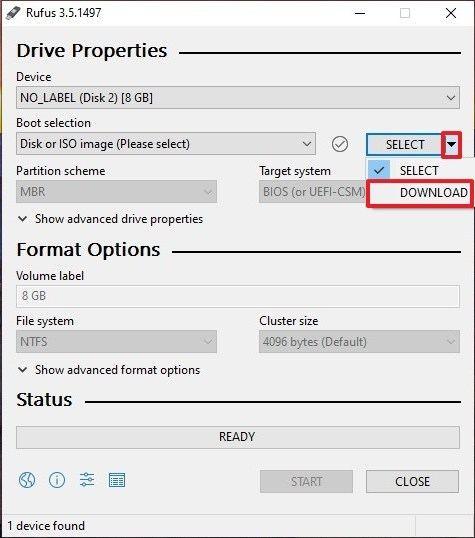
Step 3. Keep the Boot Selection option set to Disk for ISO image. Then click on the Select option, which will open a file explorer browser window for you to locate the ISO image.
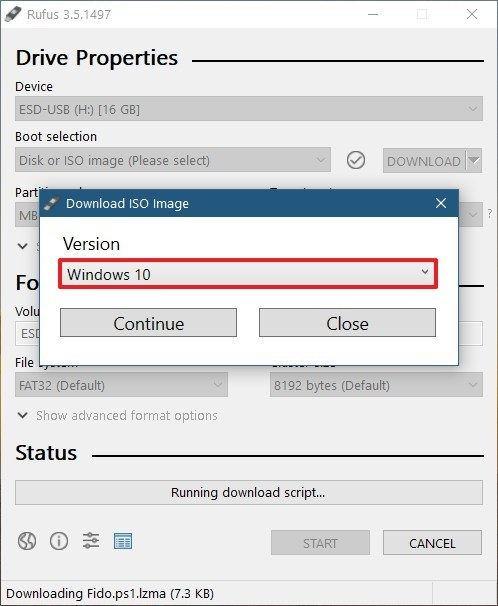
*You can download the ISO file from Microsoft's official page.
Step 4. Normally, standard Windows installations created by Rufus will be automatically detected based on the device, so keep the default settings but you can still change them if needed.
Step 5. You can choose to use the default name for the Volume label, or give it a custom name. Additionally, you can keep the File system and Cluster size settings as they are, without making any changes.
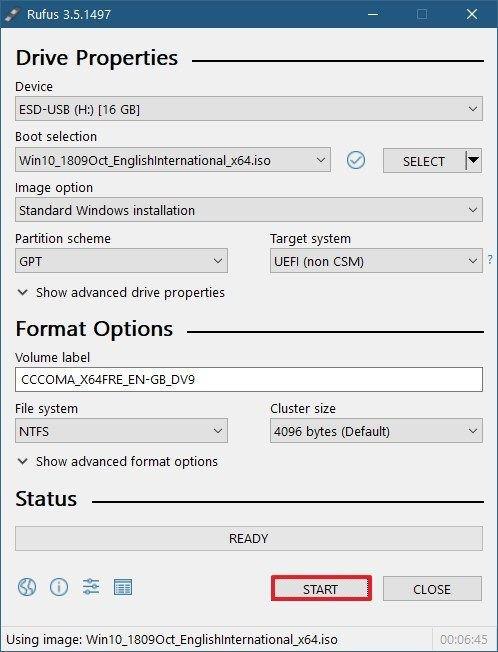
Step 6. After clicking the "Start" button, Rufus may send a warning that the data on the USB will be deleted, which is normal, so click OK, and Rufus will start creating the bootable USB.
#2. Create a bootable USB drive using Qiling Backup
You can create a bootable USB drive using Rufus by copying a downloaded ISO image to the drive. However, you can also use your computer's system file to create a bootable USB by cloning your system, which can be done using a tool like Qiling Backup. This process is different from using Rufus, as it involves copying your entire system onto the USB drive, allowing you to carry your computer system with you.
Why we recommend Qiling Backup:
- To create a bootable USB, simply click on the system you want to use and follow the on-screen instructions to select the USB drive you want to use. This will allow you to boot from the USB drive and access the system's installation process.
- The on-screen wizard guides you to clone the system to a USB drive. It prompts you to select the USB drive and then proceeds to clone the system, including all installed programs and settings, onto the drive.
- Advanced backup and clone software provides additional data protection and hard drive management capabilities, enabling users to create copies of their data and protect it from loss or corruption, as well as manage the health and performance of their hard drives. This can include features such as automatic backups, disk imaging, and disk cloning, which allow users to quickly and easily restore their data in the event of a system failure or other disaster.
To create a bootable USB drive with your own system, download Qiling Backup from the button below and follow the detailed guide provided. This will allow you to create a bootable USB drive with your own system.
Preparation:
- 1. Check the disk usage on the system C drive and prepare a USB drive with more than enough space to back up the system.
- 2. To clone your system, you'll need an empty USB drive. The cloning process will completely overwrite any existing data on the USB, so make sure it's blank before proceeding.
- 3. To connect the USB drive to your machine, simply plug it into a USB port on your computer. Ensure that the USB drive is properly seated in the port and that the computer recognizes it.
To create a portable Windows USB drive and boot from it, follow these steps. First, you'll need to prepare a USB drive with enough storage space to hold the Windows installation files.
Step 1. On the main page, click on the "Tools and utilities" page, then select "System clone" from the options.

Step 2. The boot and system partition will be automatically selected, and you'll only need to choose the target disk and click "Next" to proceed.
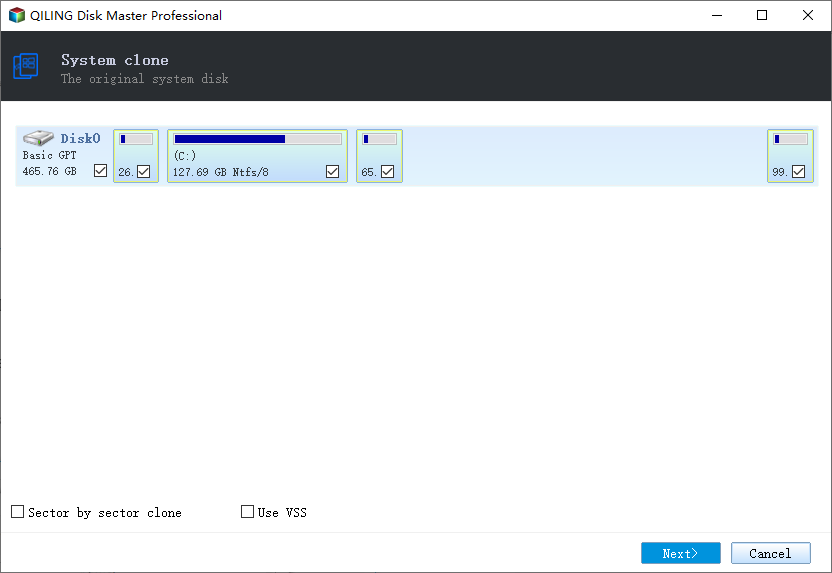
System clone does not support cloning an MBR disk to a GPT disk or vice versa, so ensure the source and target disks have the same partition style.

Step 3. To create a portable Windows USB drive, click "Advanced Options" and select "Create a portable Windows USB drive".

Step 4. Click "Proceed". Qiling Backup will start to create portable USB.
Step 5. How to boot from the portable USB drive.
- Connect your portable USB to the computer
- Restart the computer and press "Del/F2/F12/F10" to enter BIOS
- To boot from a portable USB, set the PC to boot from it by changing the boot order in the BIOS under the "Boot" tab. This involves entering the BIOS settings, navigating to the "Boot" tab, and adjusting the boot order to prioritize the USB device over the internal hard drive.
- Save the changes and you'll see your system booting up from the USB drive.
Things to Keep in Mind When Creating A Bootable USB Drive
With the ability to create a bootable USB drive in both Linux and Windows, it's essential to keep a few things in mind to ensure a smooth process. Now that you know how to create a bootable USB drive in both Linux and Windows, there are a few things you should keep in mind to ensure that everything goes smoothly.
When using a USB drive to transfer data, it's essential to use a high-quality drive to minimize the risk of data loss or corruption. A reliable USB drive will help ensure that your files are transferred safely and securely.
To create a bootable USB drive, first, make sure your computer is set to boot from the USB drive. Then, insert the USB drive and restart your computer. If you're using a Windows computer, you can create a bootable USB drive using the Windows 10 Media Creation Tool.
Be sure to check the compatibility of the operating system you're trying to install with the computer you're using, as not all operating systems are compatible with all computers.
FAQs
1. How do I create a bootable USB drive for Linux?
Step 1. Download the ISO image file and save it on your computer.
Step 2. Download Etcher and install. Connect the USB drive to the computer.
Step 3. Copy the downloaded ISO file to the USB drive with the software you download (Etcher).
Step 4. Click start and wait until the creating process is finished.
2. Is Rufus available for Linux?
Rufus is not available for Linux, but other software like Etcher and UNetbootin can be used to create a bootable USB on Linux.
The Bottom Line
Creating a bootable USB drive is a relatively simple process that can be achieved with the help of third-party tools. By following the steps outlined in this article, you can easily create a bootable USB drive without any issues.
Related Articles
- How to Back Up/Export and Restore Chrome History and Cookies
- Quick Answer: Is Virus Protection Necessary
- Fake Windows Update Virus Removal and Prevention Tips in 2022
- Tech Support Scams Attack? No Worry!
- Fix SMART Failure Predicted on Hard Disk 0, 2 or 4 Error
Learn how to fix SMART failure predicted on hard disk 0, 2 or 4 error in Windows 7, 8 and 10. Although SMART failure predicted is not an actual failure, you have to pay attention to. - How to Do with "SMART Status Bad, Backup and Replace" | Guide
When failed to boot computer with Pri Master Hard Disk SMART Status BAD error, you should back up important data to another location before the hard drive fails completely.