Overall Guide to Learn What Is BIOS [Save Up to 99% of Your Time]
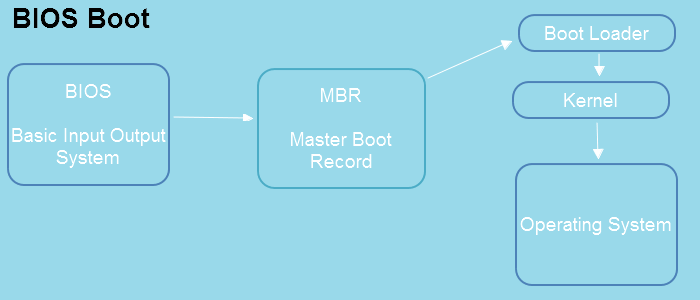
The Basic Input/Output System (BIOS) is a crucial component of a computer's motherboard, often mentioned in articles about tweaking PC settings or troubleshooting issues, but rarely discussed in detail. It's a small, yet powerful, program that controls the interactions between the computer's hardware and software. While it's not something you can easily see or access, you can enter the BIOS settings by pressing specific keys during the boot process, such as F2, F12, or Del, depending on your system. Once in the BIOS, you can configure various settings, including boot order, time and date, and hardware settings. However, updating the BIOS is a more complex process that requires caution, as it can potentially brick your system if not done correctly. This guide aims to provide a comprehensive overview of BIOS, including how to enter and set up the BIOS settings, as well as how to update it safely and correctly.
In this article, you'll learn:
- What Is BIOS in Computer
- How to Enter BIOS on Windows 10 and Windows 11
- BIOS Setup: How to Enable Legacy BIOS on Windows
- How to Update BIOS
- Troubleshooting of Basic Input/Output System Errors
What Is BIOS in Computer
History of Basic Input/Output System
The BIOS code, short for Basic Input/Output System, was created in the early days of computing by Gary Kildall, and first appeared on the CP/M operating system in 1975. Initially designed to be simple and easy to use, the BIOS code has evolved over the years to become more complex and feature-rich, now used to configure hardware devices, enable security features, and support new technologies.
What Does BIOS Use For?
The Basic Input/Output System (BIOS) checks all hardware to ensure it works correctly and loads the operating system, making it essential but not something most users need to worry about, as it is usually set up to work automatically and doesn't need to be changed.
How Does Basic Input/Output System Work?
The BIOS (Basic Input/Output System) is the first software program to run when a computer is turned on. It tests the hardware, initializes and identifies all system components, loads the operating system into memory, and hands control to it. Once the computer is running, the BIOS provides various services to the operating system and applications, such as power management, hardware configuration, and boot management.
Main Functions
The BIOS performs four main tasks: it tests the computer before booting, initializes and identifies system hardware, loads the operating system, and provides runtime services.
BIOS VS. UEFI
BIOS and UEFI are two types of firmware used to boot computers, with BIOS being the older and UEFI being the newer type. Both BIOS and UEFI are responsible for initializing the computer's hardware and booting the operating system, but they have some critical differences.
BIOS and UEFI differ in their underlying concepts and functionality. BIOS is based on the enslaver and slave device model, where the BIOS is the master and devices are the slaves, stored in ROM that cannot be changed or upgraded. In contrast, UEFI is based on the driver concept, where each device has its own drivers that work with UEFI to initialize hardware and boot the operating system, stored in flash memory that can be easily updated.
Booting speed:
UEFI (Unified Extensible Firmware Interface) is faster than traditional BIOS (Basic Input/Output System) because it uses a more modern and efficient architecture, reducing the number of steps required to boot a computer. This results in faster startup times and improved overall performance.
User Interface:
UEFI supports larger storage drives and a graphical user interface, whereas BIOS uses a text-based interface.
Drive Limit:
The main difference between BIOS and UEFI is that BIOS is limited to 2TB drives, while UEFI can handle larger ones.
Get More Info:
How to Enter BIOS on Windows 10 and Windows 11
To access the BIOS, the process varies depending on your computer system or motherboard, but some general tips can help. Typically, you'll need to restart your computer and press a specific key, such as F2, F12, or Del, as soon as it boots up.
How to Access BIOS via Hotkeys
To enter the BIOS, you need to restart your computer and, as it boots up, press the key displayed on the keyboard, usually one of the F keys (F1, F2, etc.), but it can also be the DEL key or another, depending on your computer.
- Asus: F2, DEL key
- Dell: F2, F12
- Lenovo: F2, Fn+F2
- HP: F10, F2, F12, F1, DEL.
- MSI: DEL key
Open BIOS from Settings
Besides the default keys, the Windows start menu allows getting to BIOS. To learn how to enter BIOS on Windows 10, check out the relevant information.
BIOS Setup: How to Enable Legacy BIOS on Windows
Many people still use BIOS-supported PCs despite knowing that UEFI is safer and faster, as a trend of manufacturers launching UEFI-supported PCs is not yet widespread enough to have a significant impact on the market.
If I don't want to replace the latest Windows 11 machine for a while and still use Windows 10 or an older system, BIOS is a better option. Follow the three phrases to set up BIOS.
Phase 1. Check If the system Uses Legacy or UEFI
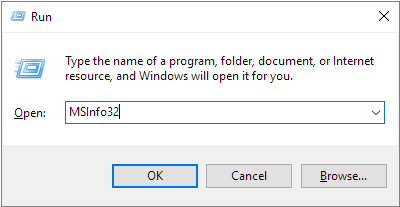
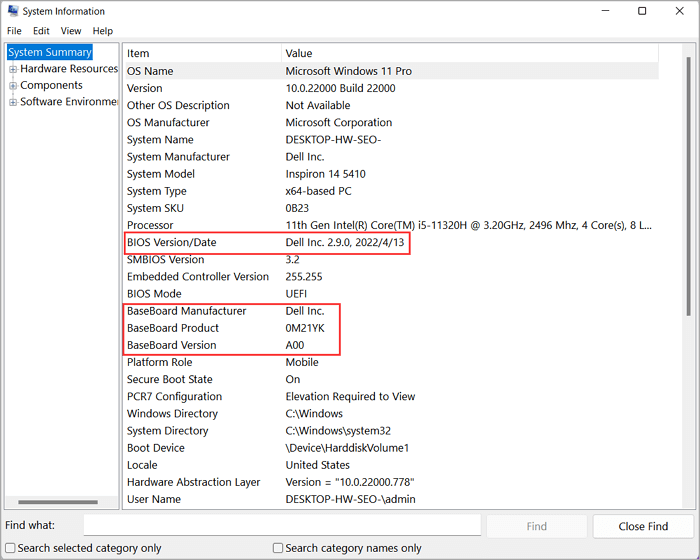
Step 1. Press the "Windows + R" shortcut and type "msinfo32" on the box. Press Enter.
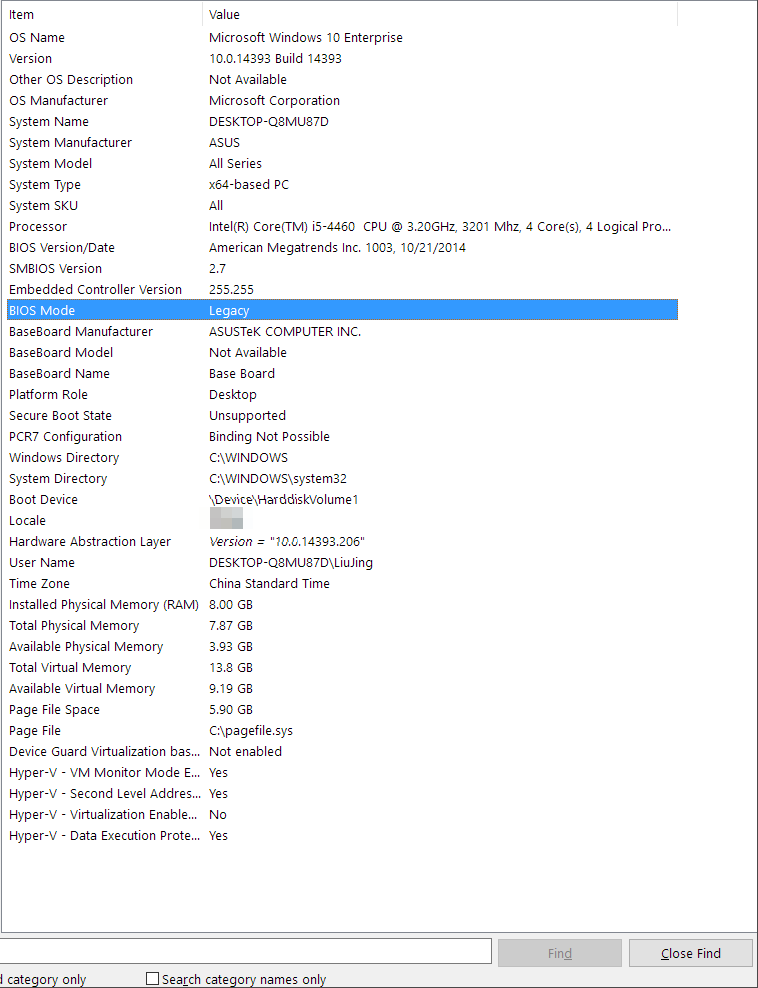
Step 2. On the "System Information" window, go to the right and see the BIOS mode.
Learn More Options
Still curious? Go to see how to check UEFI or Legacy.
Phase 2. MBR for BIOS, Convert OS Disk to MBR
To change your computer's BIOS mode from UEFI to Legacy, you'll need to convert your OS disk to MBR (Master Boot Record) first. This is because UEFI and Legacy BIOS have different disk formatting requirements.
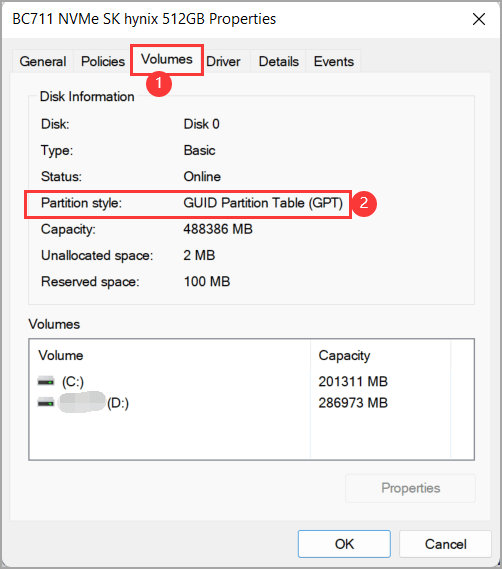
Step 1. Confirm Partition Style is GPT or MBR
Right-To check the partition style of a disk, click the Windows icon, select "Disk Management", right-click the targeted disk, and choose "Properties". Then, check the partition style under the "Volumes" section.
[Further News] How to tell if Windows is GPT or MBR
Step 2. Convert GPT to MBR
To convert a partition from MBR to GPT or vice versa without deleting partitions, you can use third-party software such as Qiling Partition Master. These tools allow you to convert partition styles without deleting partitions, ensuring data safety.
You can quickly finish the process using Windows's fast disk converter, Qiling Partition Master.
This secure disk converter can save up to 80% of time by using it instead of Windows built-in software, and it also supports converting MBR to GPT in BIOS.
Download It in Seconds!
How to Convert GPT to MBR:
- Click the GPT disk that you want to convert and select "Convert to MBR".
- Next, the app begin to convert GPT disk to MBR.
Phase 3. Change BIOS Mode from UEFI to Legacy
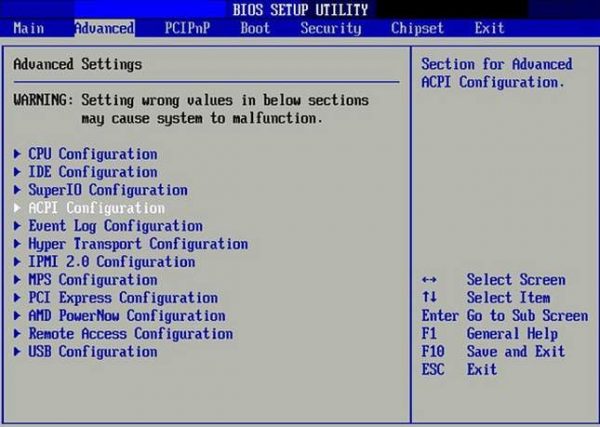
Step 1. Open BIOS setup utility.
Step 2. Select Boot from the BIOS screen.
Step 3.To access the UEFI/BIOS settings, press the F2 key (or F1, F3, F4, or F5 key, depending on the motherboard model) to enter the settings menu. Use the arrow key to navigate to the UEFI/BIOS mode and press Enter to select it.
Step 4.To save changes and exit, press the arrow key to select Legacy, then press Enter. Next, press F10.
[Related Article] How to Change BIOS Mode from Legacy to UEFI
How to Update BIOS
Updating your BIOS can improve your computer's stability and fix bugs, and may also be necessary to support new hardware features.
Preparation -Check BIOS Version and Motherboard Version
- Press the Windows key + R to open the Run dialog box, type "msinfo32" in the box, and then press Enter.
- Check the "BIOS Version/Date" and the Baseboard Manufacturer/Product/Version.
Steps to Update BIOS in Any PC
Updating your BIOS is a simple process that can be completed in a few minutes, ensuring your computer runs at its best.
Step 1.To get the update, you'll need to visit your computer manufacturer's website, such as ASUS, Dell, HP, or Lenovo, and download the update from there.
Step 2.Once the update is downloaded, unzip the file and double-click on the executable, which will launch the update process. Follow the prompts to complete the update and then restart your computer.
To keep your BIOS up-to-date, simply check your computer's manufacturer website for any BIOS updates and follow the instructions to install them. This will help keep your computer running at its best.
LEARN MORE
Get more details about how to update BIOS Windows 10.
Troubleshooting of Basic Input/Output System Errors
Error 1: Hard Drive Recognized in BIOS But Not in Windows
If your hard drive is recognized in BIOS but not in Windows, - it's a relatively common issue with a few potential solutions. This problem can arise due to various reasons, but fortunately, there are some troubleshooting steps you can take to get your hard drive working properly again in Windows.
To Fix: Windows 10 Not Detecting Hard Drive But BIOS Does
Error 2: Hard Drive Not Detected in BIOS
If your hard drive isn't appearing in your BIOS, the issue might be due to loose or improperly connected power and data cables. Check that these cables are securely attached to the drive and the motherboard. If they're not, that's likely the reason the BIOS isn't detecting it. If that's not the issue, there are additional advanced fixes that may resolve the problem.
To Fix: Hard Drive Not Detected
In Closing
The BIOS (Basic Input/Output System) is a crucial component of any computer system, responsible for initializing hardware and booting the operating system. It also manages power settings and provides basic input/output functions. Malfunctions in the BIOS can cause problems like preventing the computer from booting up properly. Understanding how the BIOS works is essential for troubleshooting BIOS errors, allowing you to identify and fix common issues.
Related Articles
- What Does Check Disk Actually Do and How to Run Check Disk (CHKDSK) in Windows [Beginners' Guide]
- Disk Partition: How to Partition A Hard Drive You Must Know in 2022
- One for All Guideline: How to Format/Reformat A Hard Drive
- Ultimate Guide: What Is GPT Disk, How to Use GPT in Windows
- How Can You Convert GPT to MBR without Data Loss Using Command Prompt?
You can convert a GPT disk to MBR without losing data using the command prompt. To do this, you'll need to use the `mbr2gpt` command, which is a built-in Windows utility. - How To Convert Guid Partition Table (GPT) To Master Boot Record (MBR)?
How to convert guid partition table to MBR is a problem that many computer users may be encountered. You can find three ways to solve the problem from here.