Hard Drive Recognized in BIOS But Not in Windows
If your hard drive is recognized in the BIOS but not on Windows, there are several solutions to resolve the issue. First, ensure the hard drive is properly connected to the motherboard and the power cord is securely plugged in.
| Workable Solutions | Step-by-step Troubleshooting |
|---|---|
| Fix 1. Initialize the Hard Drive | Right-click "This PC" (in Windows 10) and choose "Manage". Open "Disk Management", right-click your new hard disk, and choose "Initialize Disk"...Full steps |
| Fix 2. Change the Drive Letter | Open "Disk Management", right-click the disk partition which has no drive letter. Choose "Change Drive Letter and Paths" from the context menu...Full steps |
| Fix 3. Format the Drive to a Compatible File System | The wrong file system can lead to hard drive recognized in BIOS but not in Windows. Format the drive to a compatible file system with a free partition manager...Full steps |
| Fix 4. Enable the Drive in BIOS | Restart PC and press F2 to enter BIOS. Enter Setup and check system documentation to see whether the not detected hard drive is turned Off...Full steps |
HDD Detected by BIOS But Not Windows
You've set up the new internal hard drive in your BIOS, but it's not showing up in Windows, even after checking Device Manager and Disk Management. This suggests that the drive is not being recognized by your system, possibly due to a driver issue or a configuration problem. You may need to check the drive's connections, reboot your system, or reinstall the necessary drivers to get it to work properly.
If a hard drive is recognized in the BIOS but not in Windows, it's likely due to a software or driver issue, rather than a hardware problem. The BIOS recognizes the drive because it's a basic hardware check, but Windows may not be able to detect it due to a corrupted or outdated driver, or a software conflict. To resolve this issue, try updating the disk drivers, checking for disk errors, and running a disk check. If the problem persists, consider reinstalling Windows or seeking professional help.
Why Does My Hard Drive Show Up in BIOS But Not Windows
Most reasons would lead to this error. If it's detected in the BIOS but not in the OS, it's likely that the driver being used by the OS is not compatible with the drive. Another possibility is that one drive is compatible with AHCI and the other with legacy IDE, and when you enable AHCI, Windows ignores the IDE drive. This can cause the error, especially if you're trying to boot from the IDE drive. Other reasons can also result in this error, including the ones listed below.
- Incompatible file system
- Drive letter missing
- Driver issues
- Damaged MBR...
How to Fix BIOS Detects Hard Drive But Windows Does Not
If your computer is frozen, try pressing the power button to force a shutdown. If it won't turn off, unplug it.
Method 1. Initialize the Hard Drive
To initialize a new hard drive, first, ensure it's properly connected to your computer. Then, open the Disk Management tool by searching for it in the Start menu, right-click on the unallocated disk, and select "Initialize". Follow the on-screen instructions to complete the initialization process. This should make the disk visible in File Explorer. If the issue persists, it may be worth checking the disk's compatibility with your system or considering a different drive.
Step 1. Right-click "This PC" (in Windows 10) and choose "Manage".
Step 2. To initialize your new hard disk, open the "Disk Management" tool, right-click on the newly added hard disk, and select the "Initialize Disk" option. This will prepare the disk for use in your computer.
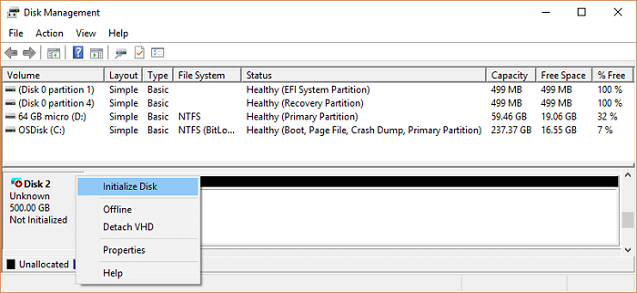
Step 3. To initialize the disk, select the disk and choose MBR or GPT as its partition style, then click "OK" to start the initialization process.
Step 4. Right-click on the unallocated space on your new drive and select "New Simple Volume..." to create a new partition.
Step 5. Set the partition size, drive letter, and file system to the new hard drive.
Step 6. Click "Finish" when the process completes.
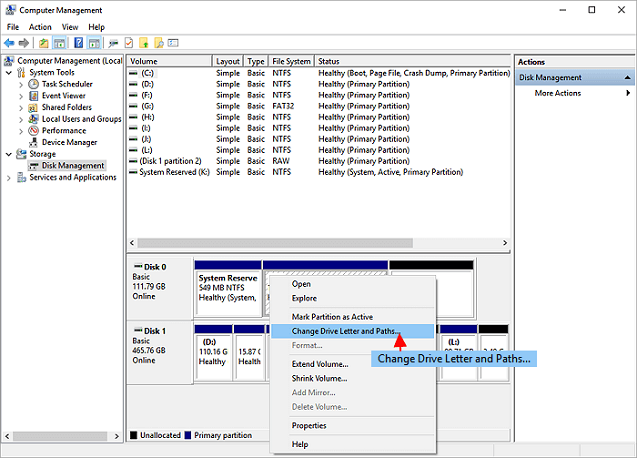
Method 2. Change the Drive Letter
All the drives are assigned with an identifying letter.
If your Windows 10 isn't detecting your hard drive, you might be able to resolve the issue by simply changing the drive's assigned letter. This can often be done by reassigning the drive in your BIOS settings, and if that's not possible, you can try using a third-party tool to change the drive letter. If your BIOS detects the drive, changing the letter might be enough to get Windows 10 to recognize it. However, if the issue persists, you may need to take further steps to troubleshoot the problem.
Step 1. To assign a drive letter to a disk partition that has none, follow these steps: Open the "Disk Management" tool, which is typically found in the Computer Management console, and right-click on the partition without a drive letter. From the context menu, select the option to "Change Drive Letter and Paths.
Step 2. Choose "Change Drive Letter and Paths" from the context menu.
Step 3. Click the "Add" button in the pop-up window.
Step 4. Assign a drive letter to the partition and click "OK" to confirm.
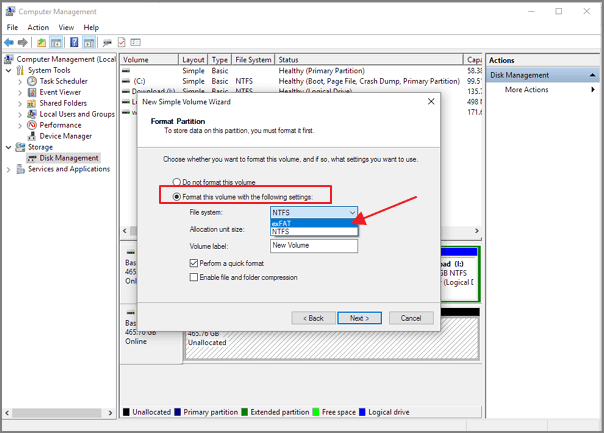
Method 3. Format the Drive to a Compatible File System
Formatting the hard drive to a compatible file system can also resolve the issue of a hard drive being recognized in BIOS but not in Windows. You can use Disk Management to format the disk, but if it's over 32GB, you won't have the option to format it to FAT32. In this case, using a third-party tool like Qiling Partition Master that breaks the FAT32 limit can help format the hard drive to FAT32 or other compatible file systems for the Windows system.
- Right-Click the external drive or USB you intend to format and choose "Format" to initiate the formatting process.
- Set the Partition label, File system (NTFS/FAT32/EXT2/EXT3/EXT4/exFAT), and Cluster size.
- Click the "Proceed" button to format the hard drive partition.
- Click "Yes" to continue.
Method 4. Enable the Drive in BIOS
To resolve the issue where Windows does not detect a disk partition but the BIOS can, you can enable the hard drive in the BIOS settings. This allows the operating system to recognize the disk partition and access its contents.
Step 1. Restart PC and press F2 to enter BIOS.
Step 2. To resolve the issue of a not detected hard drive, enter the system's setup and check the documentation to see if the hard drive is turned off in System Setup. This simple check can often resolve the issue.
Step 3. If it's Off, turn it ON in System Setup.
Step 4. Reboot PC to check out and find your hard drive now.
Bonus Tip - How to Recover Data from a Hard Drive
If you need to format your drive, you risk losing data, so it's a good idea to recover data from your hard drive after fixing the issue. Qiling's hard disk data recovery software makes it easy to recover lost files, pictures, documents, videos, and more, even after formatting, deleting, or system crashes. Download this software to restore your lost data.
Step 1. Run Deep Data Recovery on your computer, selecting file types and clicking "Next" to initiate the process.

Step 2. Select the drive where you lost your data and click the "Scan" button.

Step 3. When the scan is complete, use the "Filter" or "Search" feature to locate the lost files. This will help you narrow down the results and find the specific files you're looking for.

Step 4. Select the desired files and click "Recover". Next, choose a secure location to save the recovered files.
Conclusion
To fix the issue where BIOS detects the hard drive but Windows does not, you can try the solutions provided. Additionally, Qiling data recovery software offers various functions, including RAW recovery, deleted recovery, and formatted recovery, which can be applied at any time.
Related Articles
- Recover Deleted Volume Windows 10/11
- RAID 0 Data Recovery | Recover Data from Corrupted RAID 0 Array
- How to Activate Windows 10/11 with Product Key/Digital License/CMD
- Best Free Windows 10 Data Recovery Software
- Genshin Impact Screenshot Folder Missing? Get It Back Now!
Your Genshin Impact Screenshot folder is missing without any signal. How to fix this error and restore lost Genshin Impact pictures? This post gives you the best solutions to find the missing Genshin Impact screenshot folders and restore lost Genshin Impact screenshots. - Hogwarts Legacy Missing Save | Recover Hogwarts Legacy Lost Save
If Hogwarts Legacy is missing a save on your PC, you can try checking the local game folder to restore the save, or restore from the Steam cloud if available. If no backups exist, you can attempt data recovery using Deep Data Recovery or seek professional data recovery services.