How to Network and File Sharing Between Windows 7 and Windows 10/11 in 2022
Can I Share Files Between Windows 7 and Windows 10/11
File sharing between Windows 7 and Windows 10 computers can be a straightforward issue, but it's often unclear in someone's mind. Fortunately, there are several methods to transfer files between the two operating systems, whether over a network or without one. This page provides useful guidance on how to share files from Windows 7 to Windows 10, covering various approaches to make the process smooth and efficient.
Here, we'll list the applicable methods from easy to difficult so as to save your time and energy. See the key part below:
| Workable Solutions | Step-by-step Troubleshooting |
|---|---|
| Fix 1. (Easiest) Use PC Transfer Software |
Download and install Qiling Disk Master on both PCs...Full steps |
| Fix 2. Use Network Share |
#1. Create Network Shared Link to Share Files...Full steps |
| Fix 3. Use OneDrive Shared Link | Go to Open the OneDrive on the source PC with Windows 7 or Windows 10...Full steps |
| Fix 4. Use Email | Step 1. Sign in with your email accounts on two PCs...Full steps |
| Bonus Tip. File Share without Network | If both Windows 7 and Windows 10 have no network connection, try fixes here...Full steps |
Applies to: Network and file sharing can be enabled on all Windows operating systems, including Windows 11, 10, 8.1, 8, 7, XP, Vista, and Windows Servers.
Method 1. Network and File Sharing Between Windows 7 and Windows 10/11 via Free Transfer Software
Applies to: Share and transfer files, applications, programs, and games across all Windows operating systems with ease.
The sooner you upgrade to Windows 10/11 and apply the solutions, the easier it will be for you to transfer files between the two operating systems.
For Windows computers, a third-party free PC transfer tool like Qiling Disk Master Free is the best solution for network connecting and file sharing. This software enables sharing and transferring files, applications, programs, and games between two Windows computers, including different versions such as Windows 7 and Windows 10/11.
Qiling Disk Master is a tool that allows you to transfer multiple files from one PC to another for free in just 4 steps. It enables you to transfer files from Windows 7 to Windows 10/11 or vice versa, making it a convenient option for those looking to upgrade or downgrade their operating system.
Step 1. Select the transfer mode.
- Download and install Qiling Disk Master on both PCs.
- Launch Qiling Disk Master on the PCs and click "File sync" on one of them.
- To ensure a smooth transfer, make sure your PCs meet the requirements.

Step 2. Connect the PCs.
- To access the target PC, you need to connect to it first, and then enter the account password or verification code that is required for authentication on that PC. This step is crucial to ensure that you have the necessary permissions to access and control the target PC.
- Check the verification code on the target PC.
Step 3. Select the content you want to transfer.
- Hover on the category (Applications, Files, or Accounts) and select.
- Choose the specific items you want to transfer.

Step 4. Transfer selected items from Windows 7 to Windows 10.
- To transfer applications, files, or accounts from Windows 7 to Windows 10, click "Proceed" to start the process. This will initiate the transfer of your chosen items to the new Windows 10 system.
- Wait for the transfer process to finish.
This software can be used to migrate applications and user accounts from one computer to another in various Windows versions, including Windows 11/10/8.1/8/7/Vista/XP, making it easy to "Move Dropbox to Another Computer" and more.
How to Transfer Microsoft Office from One Laptop to Another
This page provides a guide on how to transfer Microsoft Office 2010/2013/2016 applications along with their product keys from one laptop to another using either Qiling PC Transfer software or the method recommended by Microsoft.
Method 2. Share Files Between Windows 7 and Windows 10/11 Via Network Share
Applies to: To share files between Windows PCs, you can use Nearby Share, HomeGroup, or Network Shared Drives. Nearby Share allows you to quickly share files with nearby devices, while HomeGroup enables you to share files and printers within a local network.
Microsoft Windows has offered built-in tools to share files between Windows computers, including Windows 7 and Windows 10/11. Three major tools can be applied for file transfer between these operating systems.
- Tool 1 - Create Network Shared Link via Share/Share With
- Tool 2 - Use Windows HomeGroup
- Tool 3 - Map and Use Network Shared Drive
#1. Create Network Shared Link to Share Files Between Windows 7 & Windows 10/11 via Share/Share With
First, Turn on Network Discovery for File Sharing
Step 1. In the Network and Sharing Center, click on "Change advanced sharing settings" on the source PC to configure the sharing settings for the network. This will allow you to specify which types of network traffic are allowed to pass through the network, such as file and printer sharing, or media streaming.
- 1. To access the Network and Sharing Center, right-click the Windows icon, click Search, and type "network and sharing center" - then click to open it.
- 2. To modify advanced sharing settings, click the "Change advanced sharing settings" button. This will allow you to check the boxes for the desired sharing options and save the changes.
- Turn on network discovery
- Turn on file and printer sharing
- To allow anyone with network access to read and write files in the public folders, turn on sharing. This will enable users to access and modify files in the shared folders, making it easier for collaboration and data sharing within the network.
- Turn off password protected sharing

Step 2. To share files, create a shared link for the files you want to share. This link can be sent to others, allowing them to access and view the shared files without needing to download them.
Next. Create a Network Shared Link on Source PC
From Windows 10 to Windows 7:
Step 1. Open drives in Windows 10 File Explorer and select files that you want to share with Windows 7.
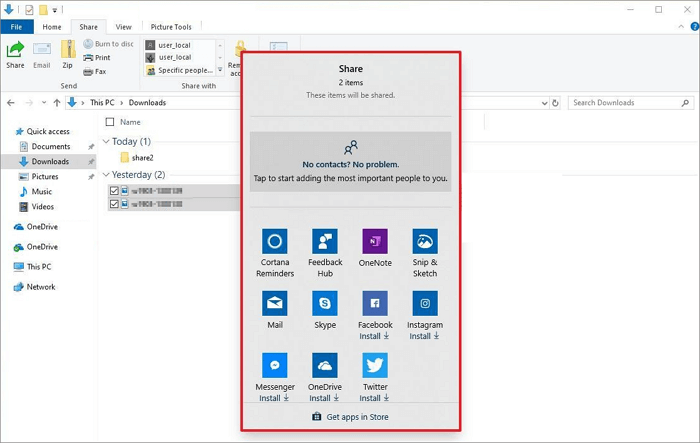
Step 2. To share a file on Windows, go to the File Explorer window, click on the Share tab at the top, select "Share", and then choose "Specific people..." from the dropdown menu.
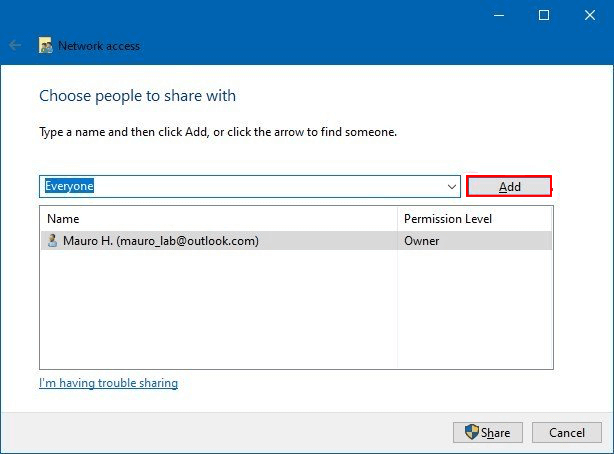
Step 3. Click the expand button and choose "Everyone" as the share mode, then click "Add" to confirm.
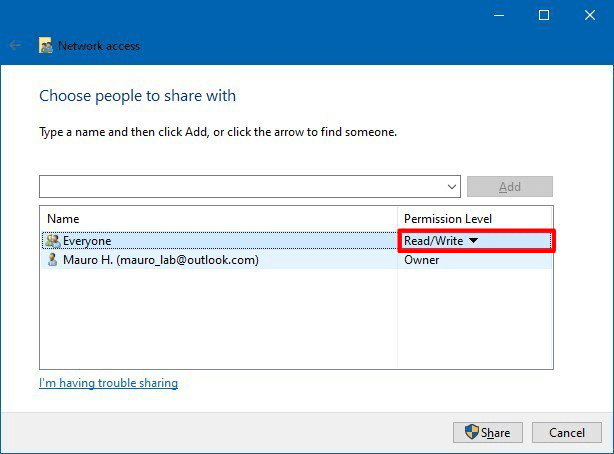
Step 4. To share the Google Drive folder with everyone, select "Everyone" as the share option, and set the permission level to "Read/Write" to allow users to view and edit the contents. Then, click "Share" to finalize the sharing.
Step 5. Right-click the shared folder path and select "Copy Link" as shown below.
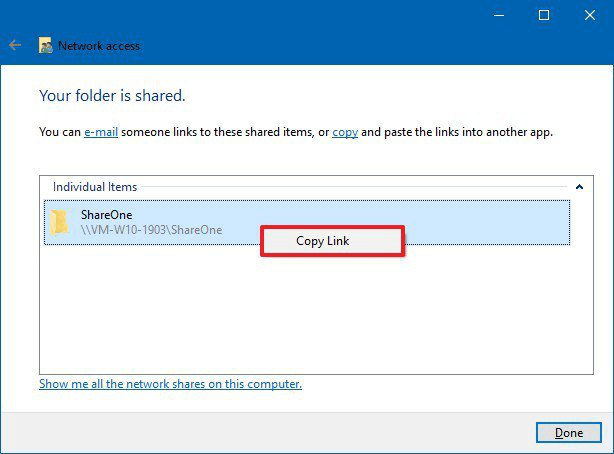
Step 6. Send the shared link to the target PC via email or other methods.
From Windows 7 to Windows 10:
Step 1. To share a folder or files in Windows 7, open the drive or partition in Explorer, right-click on the desired folder or files, and select "Share with" > "Specific people...".
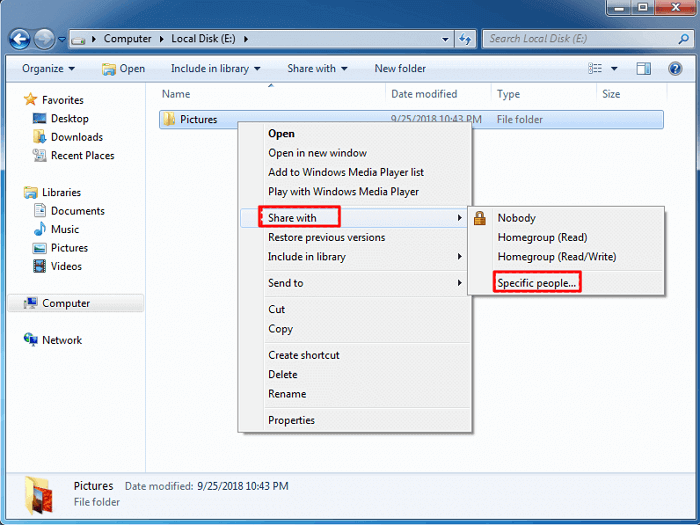
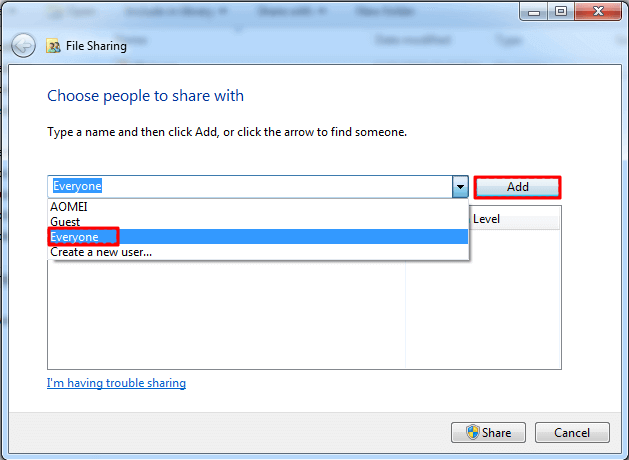
Step 2. To share files with everyone, select "Everyone" from the drop-down menu on File Sharing, then click "Add" to confirm the action.
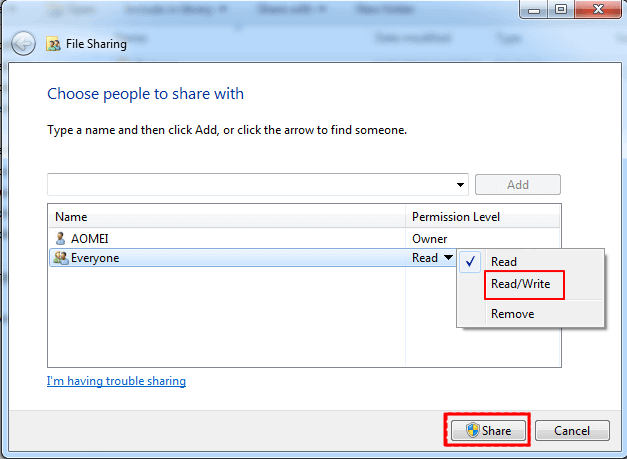
Step 3. To share the document, click the "Share" button, select "Everyone" as the sharing option, and set the permissions to "Read/Write". Then, click "Share" to confirm the sharing settings.
Step 4. Access shared files on target PC
Last. Restore Shared Files via Network Shared Link on Target PC
From Windows 10 to Windows 7:
Step 1. Open Windows 7 File Explorer, click "Network".
Step 2. Paste the shared link and hit enter to access the shared content.
From Windows 7 to Windows 10:
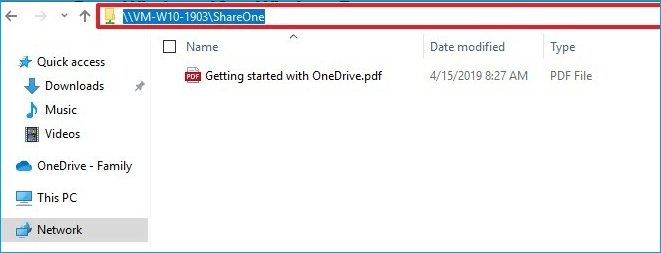
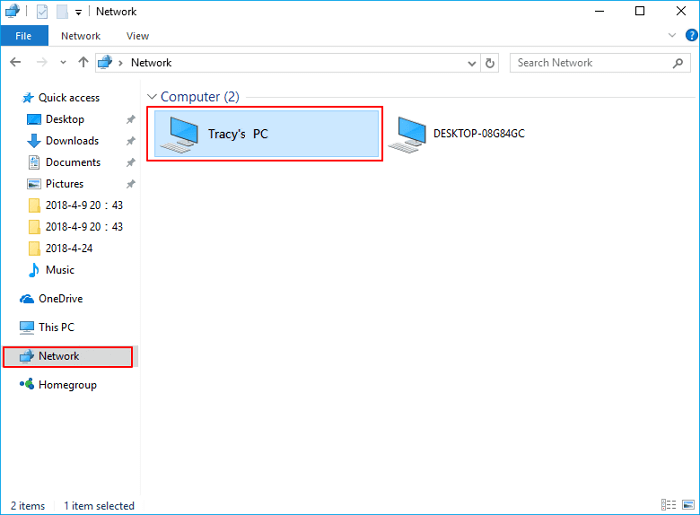
Step 1. Open Windows 10 File Explorer and click "Network".
Step 2. To access shared files on a Windows 7 computer, first find the computer's name, then double-click on it to open it, and finally access the shared files.
P.S. If you're having trouble with Windows 7 to Windows 10 network sharing, you can refer to a guide on Windows 10 file sharing not working for troubleshooting steps.
Tool 2 - Use Windows HomeGroup to Share Files Between Windows 7 and Windows 10/11
HomeGroup is a feature in Windows that allows users to share files or folders between two computers connected to the same network.
If your Windows OS is still on a version before 1803, you can use HomeGroup to share files between Windows 7 and Windows 10. To do this, follow these steps:
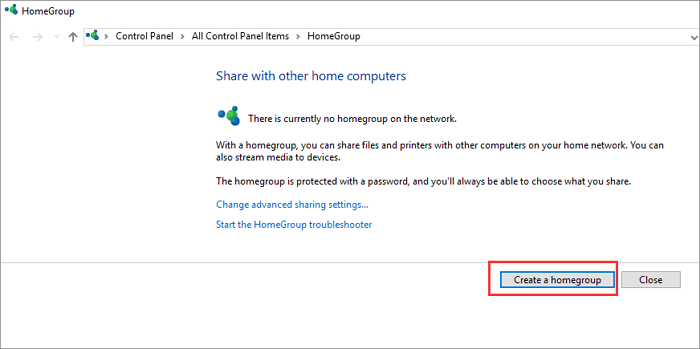
Step 1. On the Windows computer, type and search for a homegroup in the Search box. Click to open it.
Step 2. Choose "Create a homegroup" > "Next", and follow the instructions.
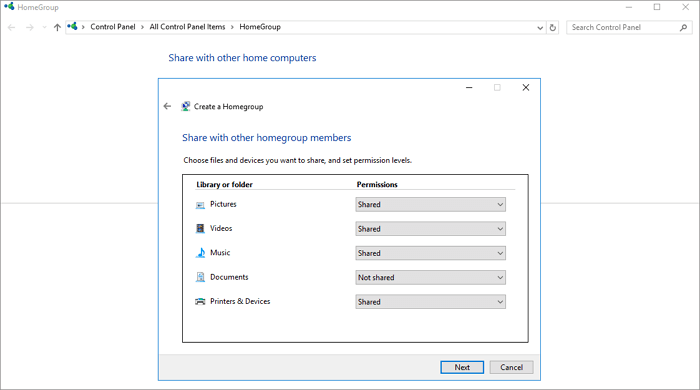
Step 3. Select the files and folders you want to share, switch the Permissions buttons to "Shared", and click "Next".
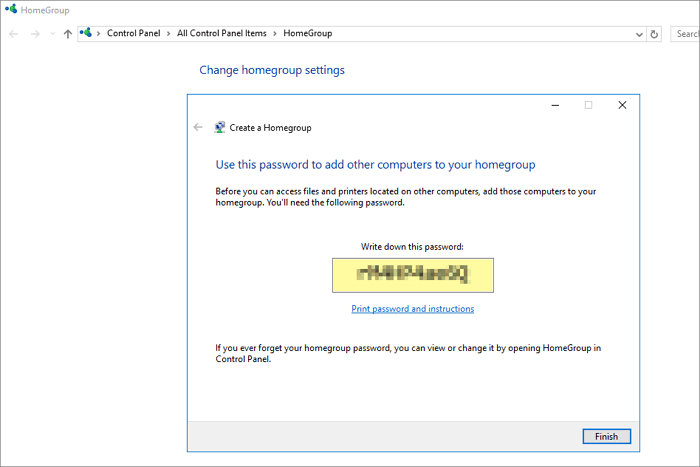
Note: Remember the password shown on-screen.
Step 4. To access the HomeGroup settings on a Windows 10 computer, go to the Control Panel, click on "All Control Panel Items," and then select "HomeGroup" from the list. This will open the HomeGroup window, allowing you to view and manage the shared files and devices on your network.
Step 5. Join the existing Homegroup and enter the password you got earlier and click "Finish".
Step 6. Access the shared files on the new PC.
On Windows 10, if you've updated to a version after April 2018 Update (version 1803), you can use the Share option to share files between Windows 7 and Windows 10.
Step 1. To share files or folders in Windows 7, open File Explorer, select the folder or files you want to share, and follow the on-screen instructions to share them with others.
Step 2. Click the "Share" tab at the top panel, and click the "Share" button.

Step 3. To select a contact, nearby sharing device, or one of the Microsoft Store apps, simply choose one from the list.
Step 4. To transfer files from Windows 7 to Windows 10, follow these steps: Connect the external hard drive or USB drive to the Windows 7 computer. Open the Windows Explorer and navigate to the files you want to transfer.
Tool 3 - Map and Use Network Shared Drive on Both Two Computers for File Sharing
To share files between Windows 7 and Windows 10, both computers must be connected to the same network or LAN. This allows for file sharing via the network shared drive, enabling users to access and transfer files between the two operating systems.
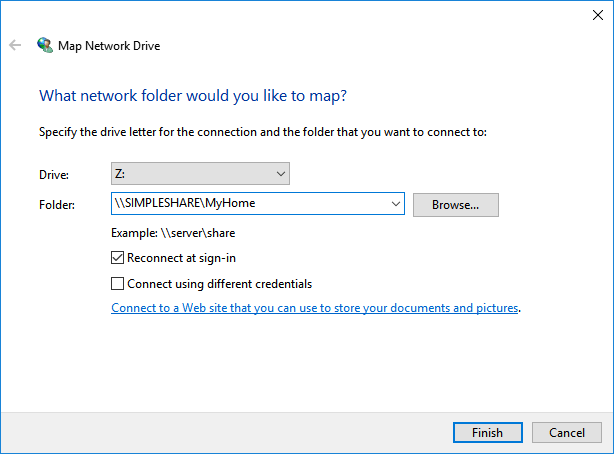
Step 1. Map a network drive on the source computer.
- 1. Right-click on This PC/Computer and select "Map network drive".
- 2. In the Drive box, select the drive letter you wish to use.
Note: The drive should be big enough to hold all the files and folders you want to share.
- 3. In the Folder box, type the IP address of the drive to be mapped, such as \\server\share.
- To access a local network device, you can type the IP address followed by a backslash. For example, if the IP address is 192.168.6.xxx, you can type \\192.168.6.xxx.
- 4. Click "Finish".
Step 2. Save files and folders to the mapped drive.
Step 3. On the target PC, open File Explorer and type the IP address of the mapped network drive, e.g., 192.168.6.xxx.
Step 4. To access the shared files, hit Enter and copy the files to your local PC. You can save them for future use.
Method 3. Use OneDrive Link to Share Files Between Windows 7 and Windows 10/11
Applies to: File backup, File sharing on all Windows PCs
Cloud drive services offer convenience for file backup and sharing across all Windows and Mac computers, with popular options including OneDrive, Dropbox, Google Drive, and iCloud.
To share files between Windows 7 and Windows 10/11 using OneDrive, you can first ensure that OneDrive is installed and configured on both computers. Then, on the Windows 7 computer, you can right-click on the file you want to share, select "Share a file" and choose the recipient's email address from your contacts.
Step 1. Go to Open the OneDrive on the source PC with Windows 7 or Windows 10/11.
Step 2. Right-click the file or folder that you want to share and select "Share a OneDrive link".
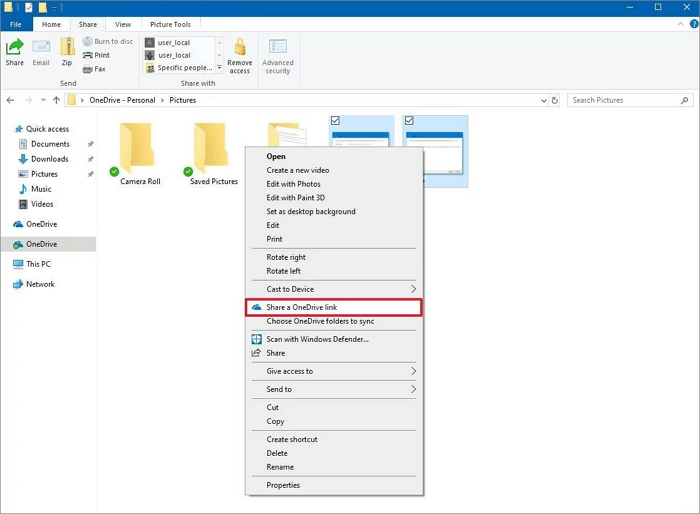
Step 3. Paste the link to share it on any email, social media post, or any other type of messaging system.
Step 4. Once you've received the sent link on the target PC, you can access the shared files.
Method 4. Use Email to Share Files between Windows 7 and Windows 10/11 Computers
Applies to: Everyone who has an email account in all Windows OS.
Email is another practical way for file sharing, as it's a common practice in daily life, with almost everyone having an email account.
Two email accounts are required, one from Outlook, Windows Email/Mail, Gmail, Mozilla Thunderbird, or Hotmail, and another from any other email service provider.
Here are the steps to share files between your two PCs:
Step 1. Sign in with your email accounts on two PCs.
Step 2. You need to go to the source computer and navigate to the Index section, where you can input the email addresses.
You can send an email from your source PC to your target PC by using the command "sendmail" with the recipient's email address. For example, if your email address on the source PC is "john@sourcepc" and the target PC's email address is "jane@targetpc", you can send an email by running the command "sendmail jane@targetpc" on your source PC.
Step 3. To share files on your current PC, click the Attachment icon and select the files you want to share.
Step 4. Click "Send" to start sending files to the target PC.
Step 5. On the target PC, go to the Inbox, check for any received email attachments, and download them.
Bonus Tips. Share Files Between Windows 7 and 10/11 without Network
You can share confidential files offline between Windows 7 and 10 without a network connection, making it possible to transfer sensitive information between the two operating systems in a secure and isolated environment.
Here are the three methods to share files between Windows 7 and Windows 10 offline:
- #1. Manually Copy Files via External Storage Device
- #2. Use Qiling PCTransfer with Its Data Backup & Restore Feature
Method 1. Manually Copy Files via External Storage Device
Note: Be cautious when copying and pasting files to avoid unexpected file loss due to improper operation.
Step 1. You will need to prepare a large enough empty external hard drive or USB drive to store the data.
Step 2. Connect the external storage drive to the source PC, copy and save files and folders to the drive.

Step 3. Unplug the external device, connect it to the target PC, and save shared files to a local drive on the target PC.
Method 2. Transfer Files via Image with Qiling PC Transfer Tool
The "Backup and Restore" Transfer feature in Qiling Disk Master enables you to create compressed backup files and folders, which can then be transferred to the target PC at one time.
Step 1. Create a backup file to transfer
- The source PC needs to have Qiling Disk Master launched, then go to the "Backup & Restore" page and click "Start" to proceed.
- Choose a name for the backup file and select the external USB drive as the backup location.

- Upload files to the website, then click the "Proceed" button to initiate the process, which will run until it's finished.
When the creation process is complete, click "OK" to confirm. Safely eject the USB drive and connect it to the target PC. Then, move to recover the backup of files to the new PC using the USB drive.
Step 2. Restore and transfer backup files to PC without network
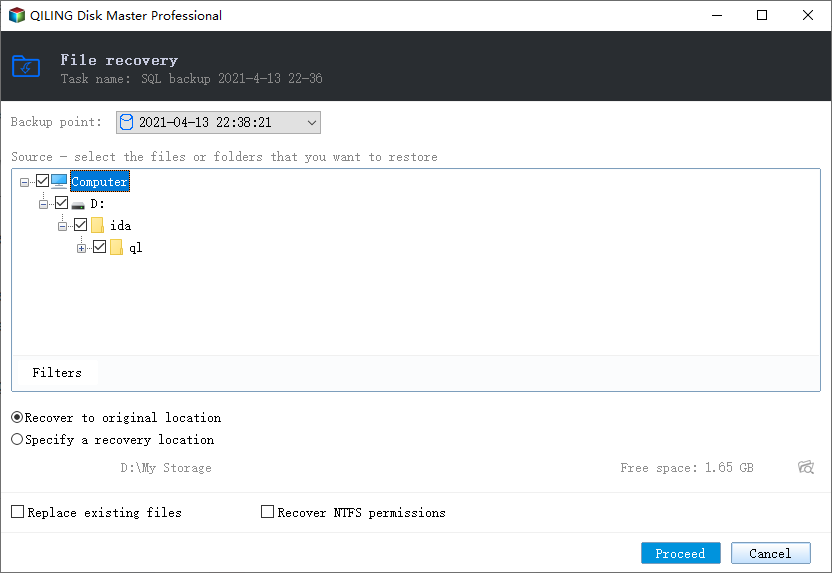
- Connect the external USB drive to the target PC, launch PCTrans, click "Backup & Restore" > "Recovery" to continue the process.

- To recover your data, click "Browse for recovery" and select the image file from your USB drive. Then, choose the correct backup file and click "OK" to proceed.

- Choose specific files and click "Restore".
Easy, Quick, and Safe Fixes for File Sharing
This page shows six methods to transfer files between Windows 7 and Windows 10/11.
The easiest solution is using Qiling Disk Master in Method 1, which is suitable for all users. Alternatively, you can consider manual guidelines, email, cloud drive, or network sharing as practical options. Your input is valuable to us, and we look forward to hearing your thoughts.
Related Articles
- How to Transfer the Installed Programs, Data to a New Hard Drive
- How to Transfer Games to New Computer without Reinstallation [Steam/Epic/Origin/Uplay]
- Fast File Transfer Software for PC Free Download
- How to Copy MS Office from Laptop to Pen Drive/USB (Windows 11 Available)
- Solved: Kingston SSD Toolbox Not Detecting SSD in Windows 10
How to deal with the problem of Kingston SSD Toolbox not detecting SSD? The best backup software – Qiling Disk Master Standard can give you a hand. - How to Factory Restore Lenovo ThinkCentre? (4 Ways Included)
You may want to factory restore Lenovo ThinkCentre for different reasons. This article will show you 4 ways to restore Lenovo ThinkCentre to factory settings in Windows.