How to Locate or Find Large Files in Windows Server 2022/2019/2016
Many Windows Server users now prioritize quality over quantity, opting for fast solid-state drives (SSDs) over slower mechanical hard drives. However, SSDs are limited in storage capacity, typically capping out at 256GB, whereas mechanical hard drives can store much more data. As a result, it's easy to fill up the storage on SSD-equipped systems, particularly in Windows Server 2022/2019/2016.
The Windows Server is similar to the usual Windows system, but with added security features and server management capabilities. To maintain its performance, it's essential to regularly clean up and free up space by identifying and removing large files that are taking up storage space. In this article, we'll explore the easiest ways to find large files in Windows Server 2022/2019/2016.
How Do I Find Large Files In Windows Server?
To find the largest file on your Windows Server with minimal effort, there are three straightforward methods to consider. These include using the built-in Windows Server tools, such as the "System Information" or "Disk Cleanup" tools, to scan and identify large files. Another approach is to utilize third-party software, like disk space analyzers, which can provide detailed information about file sizes and locations.
- To find large files in Windows Server using Qiling Disk Master Technician, follow these steps: 1) Open Qiling Disk Master Technician and select the disk you want to scan. 2) Click on the "Scan" button to start the scanning process.
- Find Large Files in Windows Server Using PowerShell
- Locate Large Files in Server Drives Using CMD
The three methods to locate large-size files on a Windows Server include using the Command Prompt, PowerShell, or the built-in Disk Cleanup tool. These methods allow users to easily identify and manage large files, but may be challenging for general users due to the technical requirements and complexity of the commands involved.
Hence, the most user-To quickly find the largest file in your Windows Server, use the Qiling Disk Master Technician, a powerful tool that efficiently manages data, files, and programs. This tool allows you to perform various operations without extra effort. Alternatively, you can also use the built-in Windows tools, such as the "Properties" window to view file sizes, or the "Search" function to find large files. Additionally, you can use the Command Prompt to run the "dir" command with the "/s" option to search for the largest file on your server. Another option is to use a third-party tool like WinDirStat or Disk Space Analyzer to visualize and identify the largest files on your server.
1. Find Large Files In Windows Server Using Qiling Disk Master Technician (1 Click)
Finding the largest file on your Windows Server is now a breeze, thanks to QilingQiling Disk Master Technician. With just one click, you can easily locate the file you're looking for. This software is designed for professionals but is user-friendly enough for anyone to use, making it a great tool to boost productivity.
It is a very cost-For professional IT workers, a efficient option to manage multiple PCs at once is available, offering free tech support in case of urgent needs. This option provides features such as direct transfer of programs without software installation, flexible transfer solutions between local disks, and more.
To find the largest file on your Windows Server computer, download and install the Qiling Disk Master Technician software from their official website. Once installed, open the software and select the "Large File Cleanup" feature, which will automatically scan and list the largest files on your system. From there, you can choose which files to keep and which to delete, making it easy to manage your computer's storage with just a single click.
Step 1. Run Qiling Disk Master on your PC, then choose "Large File Cleanup" and click the "Start" button to proceed.
Step 2. Select the disk you want to scan, click "Scan."
Step 3. When the scan is finished, files over 20M will be listed. Select the desired files and choose the destination drive to move them. You can either click the triangle icon to select the destination or click "Browse" to choose the desired location.
Step 4. Click the "Move" button, check the files on the pop-up window, and click the "Move" button again.
To clean up junk files in Windows 10, you can use the built-in Disk Cleanup tool, which can be accessed by searching for "Disk Cleanup" in the Start menu. This tool will scan your computer and remove temporary files, system files, and other items that are no longer needed. Alternatively, you can use the Storage Sense feature, which automatically deletes temporary files and other items that you don't need.
How often do you delete your temporary Internet files and cookies (and why)? Delete these junk files in order to speed up your PC.
2. Find Large Files In Windows Servers Using PowerShell
If you're a geeky person or don't want to install a third-party app on your system, then you can also use PowerShell to find the largest files in your system. Generally, it is quite a difficult task to find the largest file in your Windows Server, but with the help of PowerShell script, you can easily find the largest file in your system without any issues. Here is the step-by-step guide that you can follow to perform the action.
Step 1: To open the Windows PowerShell ISE, press the Windows key, type "Windows PowerShell ISE" in the search bar, open the PowerShell, and create a new script by clicking the New File icon or using the shortcut key Ctrl + N. (note: this is a rewritten version of the original text in one paragraph)
Step 2: ```powershell
Get-ChildItem $folder -recurse -ErrorAction SilentlyContinue |Sort-Object length -descending| Select-Object -first 27 @{Name="MegaBytes";Expression={"{0:F2}" -f ($_.length/1MB)}} , Fullname
Please note that you need to replace "ENTER YOUR DRIVE OR FOLDER PATH HERE" with the actual path to the drive or folder you want to access.
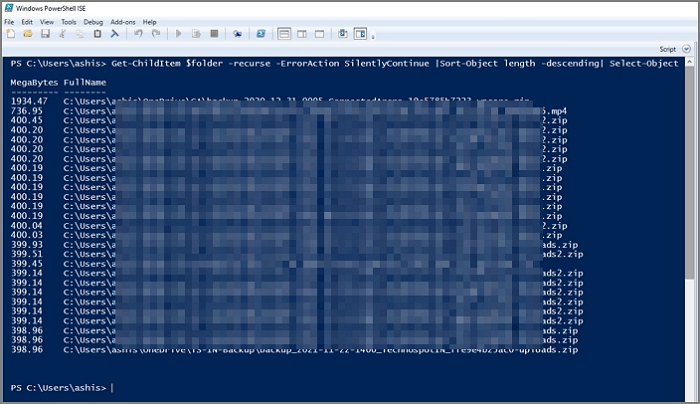
Step 3: Please confirm the drive name you want to use, then run the script by pressing F5 or clicking the green play button. The script will take a few minutes to run and provide your results.
3. Locate Large Files In Server Drives Using CMD
The Command Prompt is a powerful tool when used correctly, allowing your computer to run commands that yield desired results. To utilize it, follow these simple steps:
Step 1: To open the Run utility, press the Windows + R key, type "cmd" in the input search field, and click OK.
Step 2: To run a command in the command prompt, open the command prompt, type the command `your_command_here`, and hit the enter key to run it. Replace `your_command_here` with the actual command you want to execute.
f`forfiles /S /M * /C "cmd /c if @fsize GEQ 1073741824 echo @path > largefiles.txt"`
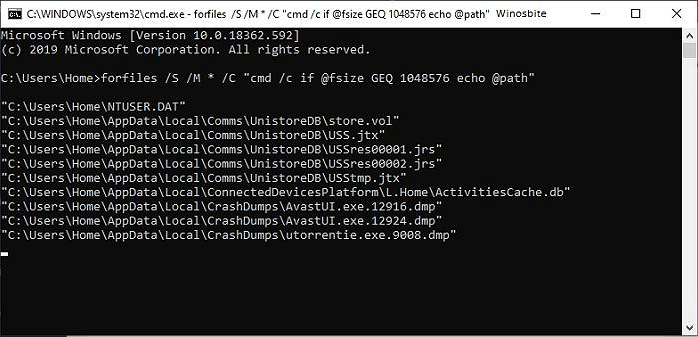
Step 3: This code will execute a command to find all files larger than 1 GB in size. Once complete, the command will identify the files that meet this criterion.
Conclusion
To find the largest file on your Windows Server 2022/2019/2016, you can use one of three methods: PowerShell, Command Prompt, or Qiling Disk Master Technician. Each method is effective, but if you want the simplest approach, using Qiling Disk Master Technician is the way to go, as it allows you to locate the largest file with just a single click.
Qiling Disk Master Technician is a feature-rich software that simplifies disk management and saves time. It offers various features such as file transfer, app migration, data backup and restore, system cleanup, and product key management, making it perfect for utilizing disk space efficiently. Additionally, it allows data recovery from a broken or dead PC, making it a highly recommended tool.
Related Articles
- [2 Solutions] How to Transfer Autocad to New Computer
- Stop Using Qiling Disk Master Crack, Activate with Official License Code [Latest]
- How to Recover Photos from Laptop with Broken Screen? [Full Guide]
- How to Transfer Microsoft Teams to Another Computer [Full Guide]
- (Solved) Outlook Not Showing Old Emails | 6 Ways
You will get all the possible reasons for Outlook 2016 or Windows 10 not showing old emails and 6 effective methods to fix it. To keep your emails safe, please back them up. - Top 2 Ways to Take an Outlook Personal Folders Backup
This article describes two ways to help users to take Outlook personal folders backup. You can choose the most suitable one according to your needs.