How Do I Back Up PC Automatically in Windows 11 [Get 3 Ways]
Want to automate your PC backup process without the hassle? We've got you covered! With our three brilliant methods, you can back up your Windows 11 PC automatically, without having to manually save your files one by one. This way, you can access your data at any time, without worrying about losing valuable information. Our guide will show you how to set up automatic backups, and we even have a tool that will make the process seamless. Keep reading to have your backup needs covered!
| Workable Solutions | Step-by-step Troubleshooting |
|---|---|
| 1. Use Qiling Backup | Click the "Select backup contents" button to...Full steps |
| 2. Use Windows Backup and Restore | First of all, go to the backup settings from the...Full steps |
| 3. Back Up With File History | In Windows 11, go to Settings > System >...Full steps |
How Do I Back Up PC Automatically in Windows 11? 3 Ways
To back up your PC automatically on Windows 11, you have three convenient options. These methods allow you to easily safeguard your important files and data. Let's take a look at all three of them.
1. Qiling Backup - Third-Party Auto Backup Software
The Windows backup and recovery tool is an efficient download that can back up your PC automatically, including Windows 11. With multiple features, it makes it easy to back up your data, and it comes in different versions to cater to various user needs. Additionally, a free trial is available for those who want to test it out.
2. Windows Backup and Restore
This option is a built-in access the backup feature in Windows, go to the Start menu and navigate to the Backup settings. This is a suitable option as well.
3. Windows File Backup
You can also use the built-in backup option that comes with Windows. To access it, go to the Start menu and navigate to Backup options. This is a convenient option that requires some steps, but it's a great alternative if you're willing to put in the effort.
We'll guide you through three methods to use the Qiling Backup tool, which offers exciting and useful features, especially for automatic backups. If you prefer the backup to be fully automatic, we recommend downloading the Qiling Backup tool. Alternatively, you can use other methods, but they may not be as efficient. Let's explore these options in more detail.
How to Back Up PC Automatically in Windows 11 with Qiling Backup
The Qiling Backup tool is a comprehensive solution that offers a wide range of features, making it a one-stop-shop for various tasks. It provides a convenient and efficient way to perform multiple tasks using a single tool, streamlining workflows and saving time.
- Schedule backup,
- Backup files immediately
- Backup OS
- Back up to external hard drive,
- Network shared drive
- SQL/Exchange Backup and Restore - -
- System/File/Disk/Outlook Email Backup and restore
- Disk/Partition Backup and restore
- Backup to a network drive
- Backup to Cloud(google drive, dropbox, )
- Full/Incremental/differential backup
- Disk clone, migrate OS to SSD/HDD
- Smart Backup
- Centrally management (by Qiling Backup Center)
- Image-Reserve Strategy
- Universal Restore
Visit their website and go to their Backup & restore option, where you can see all the versions of the tool and download the one that suits your needs, enabling you to back up your PC automatically in Windows 11 without hassle.
Step 1. To start a backup, click the File backup button in the "Backup and recovery" page.

Step 2. The process involves selecting the files to be backed up by expanding the directory on the left-hand side, which lists local and network files.

Step 3. Select the location where you wish to store the backup.

Step 4. In the Backup Options section, clicking on Options allows you to encrypt the backup with a password. This provides a range of customizable features that you can tailor to meet your specific needs.

To specify the backup schedule, you can choose from various options such as daily, weekly, monthly, or custom intervals. Additionally, you can select the time of day or specific events like system shutdown or login to initiate the backup process.

Step 5. Backups can be stored on a local disk, in Qiling's cloud service, or on a network attached storage device (NAS).

Step 6. Qiling Backup enables customers to securely back up their data either to a third-party cloud drive or to the company's own cloud storage solution.
To back up your data to a third-party cloud drive, select Local Drive, scroll down to add Cloud Device, enter your account information, and follow the prompts.
Step 7. To start a backup, select the "Proceed" option. Once the backup process is complete, it will be displayed as a card on the left-hand panel. To view the details of the backup job, right-click on it.

How to Back Up Windows 11 Automatically via Windows Backup and Restore
To back up your day using this method, you will need to follow these steps: Take a photo of your schedule or calendar to capture your tasks and appointments; Write down any important phone calls or messages you received; Record any notable conversations or meetings you had; Take a photo of any documents or papers you signed or received; Write down any purchases or transactions you made; Record any notable events or experiences you had; Write down any goals or tasks you want to accomplish tomorrow; Take a photo of your planner or journal to review your progress.
To access the backup settings, go to the Start menu and type "backup" in the search box, which will direct you to the backup settings. From there, you can view your available options.
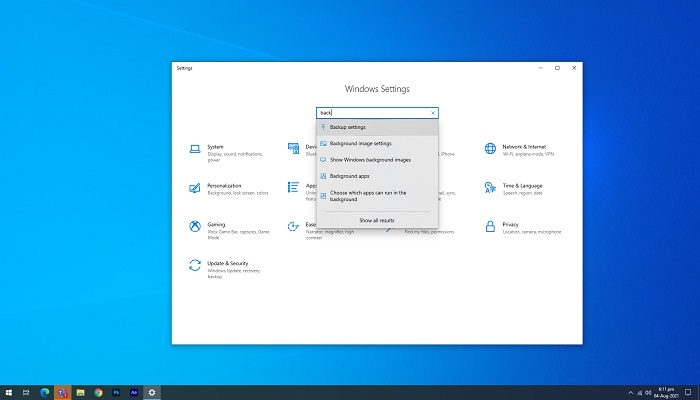
To access the backup options, go to the designated backup section, where you'll find various backup options. The "back and restore" option is specifically located under the "looking for an older backup" title.
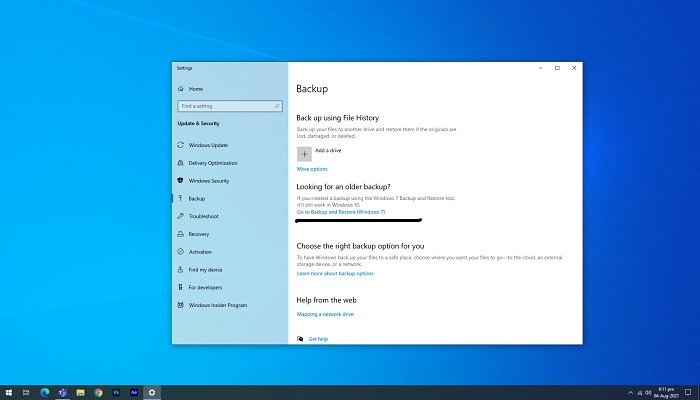
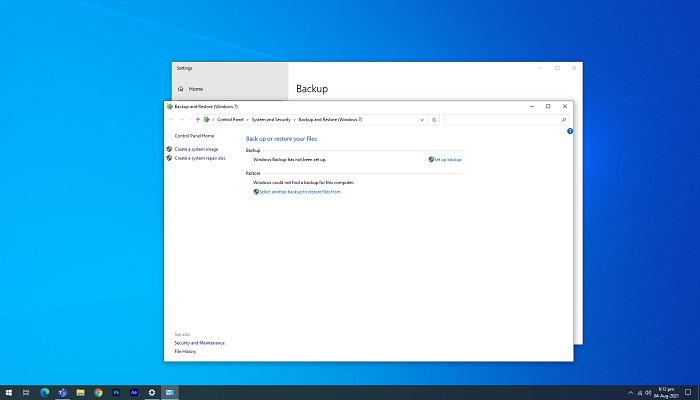
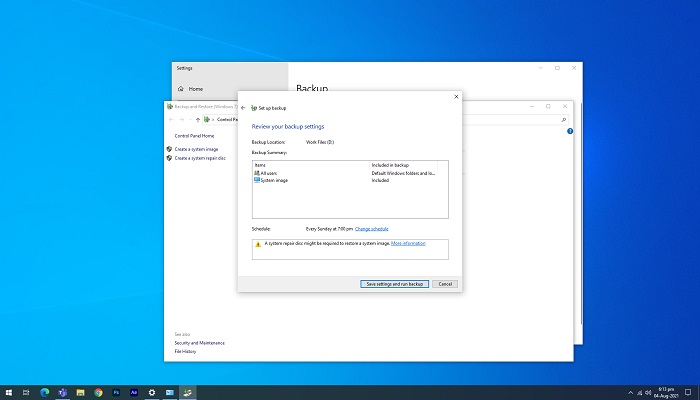
To initiate the backup and restore process, click on the "backup and restore" option, which will then prompt you to select a location to save your backup.
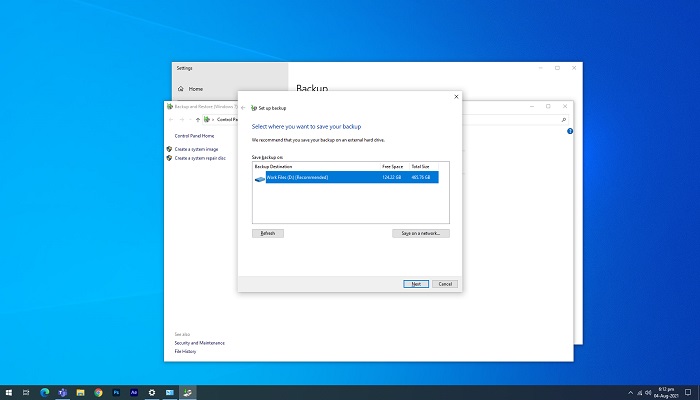
Save your backup to a location of your choice, such as an external hard drive or cloud storage. Select the desired location and press next to proceed.
A dialogue will ask you what you want to back up. Select "let me choose" if you want to choose yourself, or select "windows recommendation" if you want to give Windows the choice to select important files to back up.

To use the backup and restore option in Windows, first go to the Control Panel and click on System and Security. Then, click on Backup and Restore (Windows 7) or Backup and Restore (Windows 8) and select Set up backup. Choose the drive where you want to save your backups, select the files and folders you want to include, and set a schedule for automatic backups. Finally, save the settings and run the backup, which will start to back up your data.
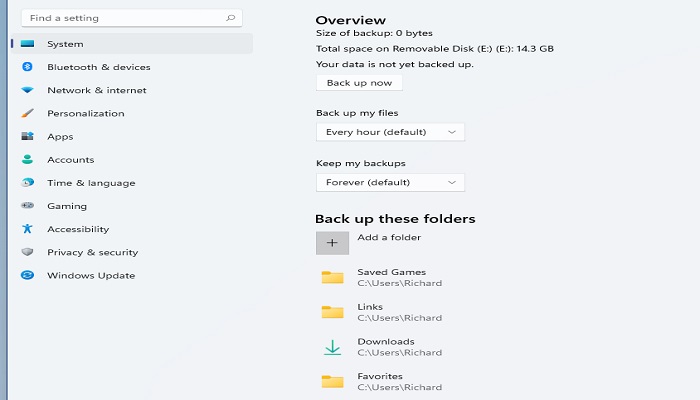
Auto Back Up PC in Windows 11 With File History
To access the Backup using file history option in Windows 11, go to Settings > System > Storage > Advanced Backup options, where you will find this feature.
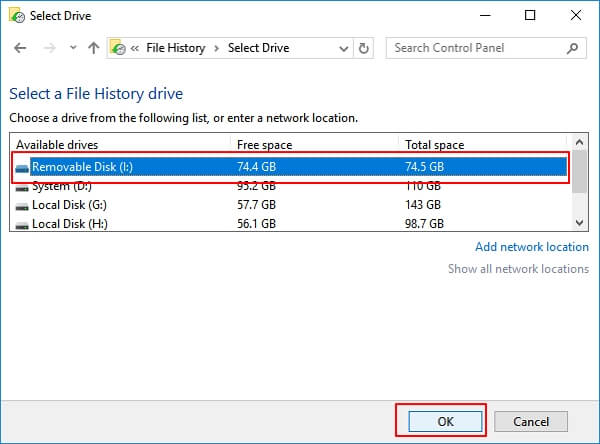
After selecting a drive, Windows will automatically back up data every hour in the user folder (C:\Users\username).
To add an external drive to Windows, click on the "Add a drive" option, which will direct you to choose the external drive that you have connected to your computer.
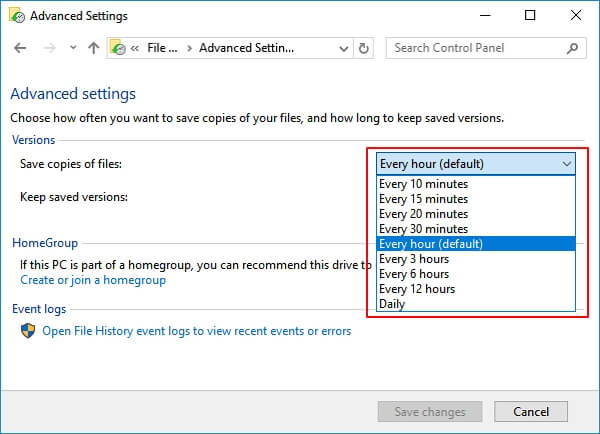
To tailor your backup needs, click on more options, which permit you to customize when and how files are backed up, utilizing the backup using file history feature.
Ta da, you are all done.
Conclusion: Back Up PC and Protect Data Automatically in Windows 11 Is Important, Let's Start
Backing up your data is crucial to avoid losing it due to errors or viruses. Our guide helps you set up automatic backups, ensuring your data is always safe. To do this, we recommend using the Qiling tool, but you can choose the method that suits you best. By taking this step, you'll have your data backed up and secure, giving you peace of mind.
Related Articles
- How Windows 11 Prevent You from Malware Attack with New Security Features
- How to Back Up Raspberry Pi SD Card on Windows, Linux and Mac
- Create System Image on USB Drive in Windows 10/8/7
- How to Back Up Photos to Google Drive
- Windows Server 2012 R2 Restore OS and Files from Backup
How to make your Windows Server 2012 R2 restore from backup? You could use the built-in software, Qiling Disk Master or Qiling Backup. Click for more details and operation steps. - How to Perform System Restore in Windows Server 2016 | 2 Ways
How to do system restore in Windows Server 2016? Without restore point option like in Windows Client, you need to create a backup including system state using Windows Server Backup, or try easier alternatives.