How to Delete Old Backup Files in Windows 10
Keeping backups of important data is helpful, but outdated or unneeded backup files can take up space on your device. To manage this, users may need to adjust their automatic backup schedule and periodically clean up older backups to free up space.
1. Delete Windows File History Files
Files on a Windows computer are automatically backed up using File History, which allows users to schedule backups of important folders. However, as more versions of the backups are created, the external drive may run out of space, requiring data to be deleted to continue backing up new files.
Step 1. To start, go to Windows 10 Settings > Update & Security > Backup, locate the File History interface, and click "More options".
Step 2. In the Backup options, you can adjust the frequency of backups under "Back up my files" and set how often backups are saved before being deleted under "Keep my backups".
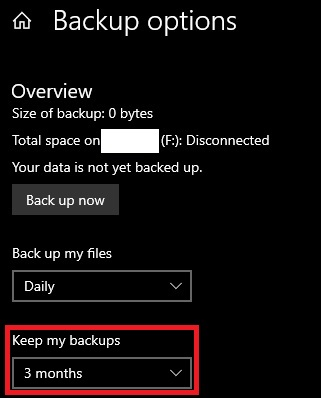
To optimize backup storage, set the system to automatically delete backups after a certain period, such as every month, or when the storage is running low, to prevent accumulation of old backups and free up disk space.
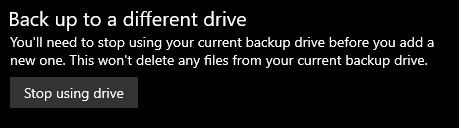
Step 3. To stop using Google Drive backups, go to the Google Drive settings, click on "Backup" and then click on "Stop using drive" at the bottom of the page. This will prevent the feature from creating new backups.
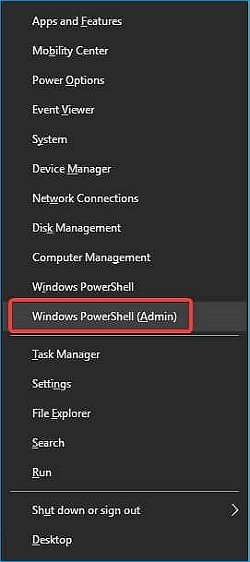
Step 4. To manually remove saved backup files kept by File History, start by returning to the Windows desktop. Then, right-click the Windows Start menu and select the Windows PowerShell (Admin) option.
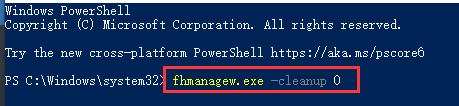
Step 5. To remove all but the most recent file backups, type "fhmanagew.exe -cleanup 0" in the PowerShell window, then hit enter. You can replace 0 with another number to leave a longer period of backups saved. If successful, a confirmation pop-up will appear.
2. Delete Windows System Restore Points
To free up space on your computer by deleting System Restore points, go to the Start menu, type "system restore" in the search bar, and select the "Create a restore point" option. Then, click on the "Configure" button and select the "Delete" option. You can also use the System Properties window to delete all restore points. To do this, go to the Start menu, type "system properties" in the search bar, and select the "System Protection" tab.
Delete All System Restore Points
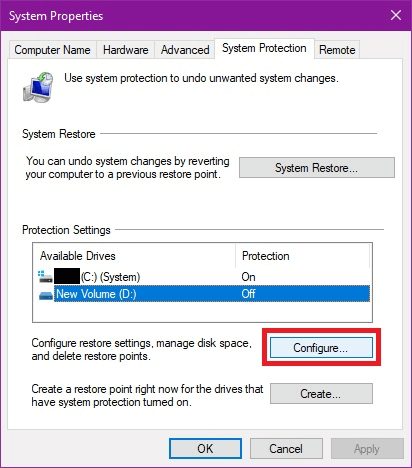
Step 1. To create a restore point, open the Start Menu and search for "Create a restore point." Select it to open the System Properties menu.

Step 2. Select the drive you want to manage, then click Configure.
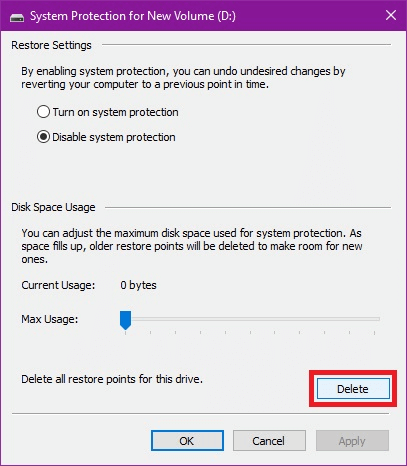
Step 3. Click the "Delete" button and confirm to delete all system restore points for the selected drive.
3. Delete the Windows.old Folder After Upgrading to Windows 10
The Windows.old folder is created when upgrading to Windows 10, storing the previous Windows version in case of a revert. It can be deleted if disk space is needed and all important files are checked, but this is irreversible.
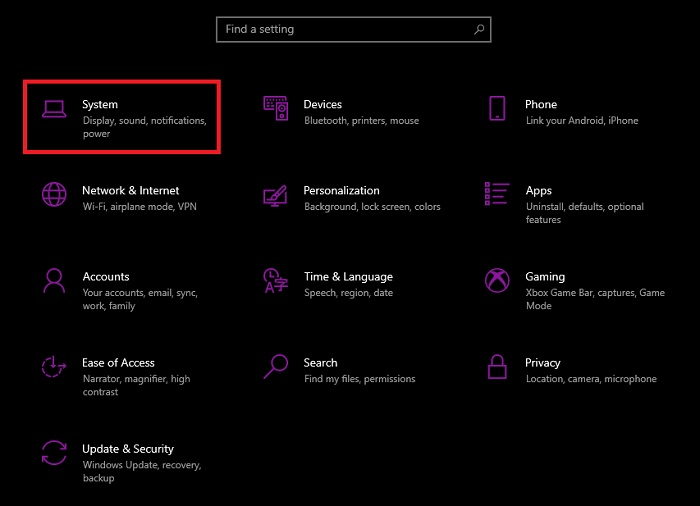
Step 1. To access the System settings, open the Start Menu, type "Settings", and click it in the results, then choose "System".
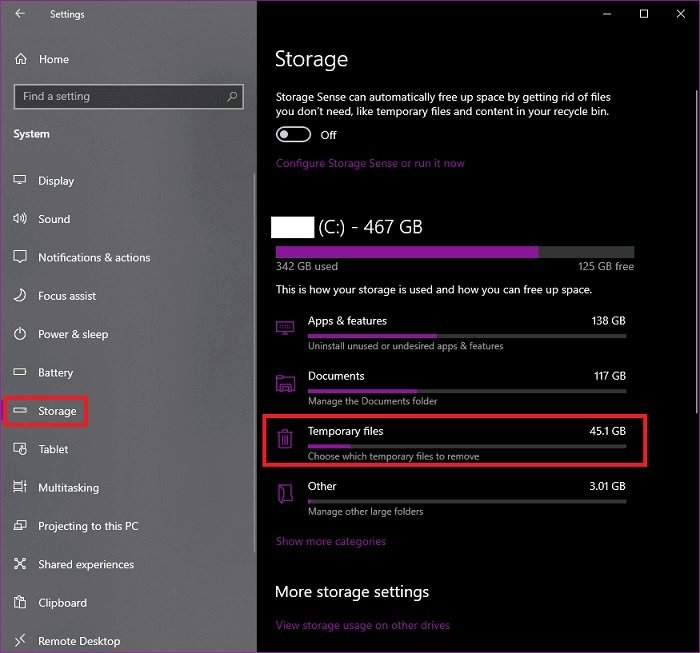
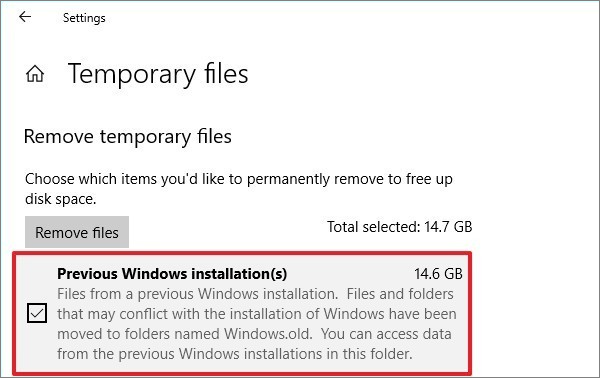
Step 2. Go to Storage and select Temporary Files on the drive information.
Step 3. To remove a previous Windows installation, select the check box for "Previous Windows installation(s)" and then click "Remove files".
4. Delete Backup Files Created by Third-Party Backup Software
Some users may find the built-in backup tools on Windows and Mac inadequate, leading them to opt for third-party backup software for more comprehensive file protection.
Third-Party backup software often allows users to select their preferred data storage location, which can be set up to automatically backup files permanently. However, this can quickly consume space if not regularly checked, so it's essential to set up the automatic backup schedule correctly. Some third-party software may not have an automatic deletion system, requiring users to manually delete old and unneeded backups.
When setting up a backup schedule with third-party software, you can usually customize the location where backup files are stored. To delete unwanted backup files, simply go to the designated location and remove the files you no longer need.
Bonus Tip: How to Back Up Files with Qiling Backup
When compared with the built-Qiling Backup offers more features and better performance than built-in tools like Windows File History, especially when backing up large amounts of data. With Qiling Backup, you can choose to back up individual files or whole folders, and select between differential and incremental backup plans to suit your needs. This article will guide you through setting up an automatic backup system with Qiling Backup.
To back up your files with Qiling Backup, follow these steps:
Step 1. Click the File backup button in the "Backup and recovery" page to start backup.

Step 2. To backup files, select the files to be backed up by expanding the directory on the left-hand side, which lists local and network files.

Step 3. Follow the on-screen instructions to select the desired location for storing the backup.

Step 4. To encrypt the backup with a password, click on "Options" in the "Backup Options" section. This allows for customization of the backup operation to suit individual needs.

To specify the backup schedule, go to the Backup Scheme section and select the desired frequency for your backups, such as daily, weekly, or monthly. You can also choose to start the backup at a specific event, like a daily shutdown or a weekly reboot.

Step 5. Backups can be stored on a local disk, in Qiling's cloud service, or on a network attached storage device (NAS), providing flexibility in choosing a storage location.

Step 6. Qiling Backup allows customers to back up data to a third-party cloud drive or the company's own cloud storage.
To back up your data to a third-party cloud drive, select Local Drive, scroll down to add Cloud Device, and enter your account information.
Step 7. To start a backup, select Proceed. Once the backup is complete, it will appear as a card on the left-hand panel. For more detailed information about the backup job, right-click on it.

Conclusion
You'll need to store your backup data somewhere, and if left unchecked, your device may run out of space unexpectedly. This applies not only to third-party backup tools but also to Windows' own system backup, such as the Windows.old folder. Before deleting any backup files, confirm that you won't need them in the future. To free up space, consider deleting unneeded backups using the methods listed in this article.
If you're using third-party backup software like Qiling Backup, you can set it to automatically delete older backup images after a certain time period or number of images, or manually delete them if needed.
Related Articles
- Comprehensive Tips: Keep Your Data Backup Safe
- XCopy vs Robocopy: Which Is Better Windows File Copy & Windows File Backup Utility?
- ISO Is Corrupted| How to Fix a Corrupted ISO Files in Windows 11/10
- Tips for Clean Install Windows 10 without Losing Data
- Lenovo Onekey Recovery Driver Initialization Failed after Windows Update
Lenovo OneKey Recovery driver initialization failed please reinstall application and still fails after reinstalling, this mainly occurred after users upgrading Windows from 7 to 8 or 10. To reuse OKR, reinstall Win7 or just use Qiling Disk Master. - How to Create Lenovo Onekey Recovery on New Hard Drive
You can easily recover your system as long as you create Lenovo onekey recovery on new hard drive, even when the original is damaged.