How to Transfer Files from PC to Laptop in 9 Ways
This page provides 9 ways to transfer files from PC to laptop or vice versa. The easiest method is to use PC transfer software, which can complete the process in just 3 steps. Alternatively, you can try 8 other solutions to effectively move files to your new computer. These methods are applicable to all Windows PCs and laptops running Windows 11/10/8.1/8/7/Vista and XP.
How Can I Transfer Files Between Laptop and PC Wirelessly
Question 1: To connect a laptop to a desktop PC, you can use a USB cable, an Ethernet cable, or wirelessly via Wi-Fi or Bluetooth. The fastest file transfer tool is typically a USB 3.0 or Thunderbolt 3 cable, which can transfer data at speeds of up to 10 Gbps. You can also use cloud storage services like Google Drive, Dropbox, or OneDrive to transfer files wirelessly.
Question 2: Yes, you can connect your laptop to your PC via Wi-Fi and share files between the two devices. This can be done using a feature called "Connect to Wi-Fi" or "Wi-Fi Direct" on Windows, or "Wi-Fi Sharing" on macOS.
Question 3: You're looking for a way to simplify file sharing between your PC and laptop. There are several software options that can make this process easier.
Many people have questions about transferring files between a computer and a laptop. If you're one of them, this page aims to provide solutions to your queries.
To share files between your PC and laptop, you can use Windows built-in tools. One option is the Windows Explorer, which allows you to easily share files between devices. Another tool is the File Explorer, which provides a more detailed view of your files and allows you to share them with others.
To transfer files from your PC to your laptop, you have two options. First, you can use a transfer cable to directly connect your PC and laptop, allowing you to transfer files between the two devices. Alternatively, you can use an external storage device such as a USB drive or external hard drive to transfer files from your PC to your laptop.
To transfer data from your laptop to your PC, you can use either the cloud or email method. The cloud method involves uploading your files to a cloud storage service like Google Drive, Dropbox, or OneDrive, and then downloading them to your PC. This way, you can access your files from any device with an internet connection.
Part 1. Transfer Files from PC to Laptop Using Software - [Free & Fast]
Pros: The app is user-friendly, accessible to all skill levels, and prioritizes security, ensuring a seamless and trustworthy experience for everyone.
Cons: To access advanced features, a small payment is required, which costs a few dollars. This fee allows users to utilize additional tools such as rescuing data, finding product keys, and more.
Difficulty: ☆
There are numerous file transfer software and tools available online, but to save time, we'll focus on one standout option that efficiently handles file transfers.
Transfer Files from PC to Laptop via Free PC Transfer Software
If you need to transfer files from your desktop to your laptop just once, using WiFi, a professional PC transfer software like Qiling Disk Master Free can be helpful.
You can easily transfer folders, files, and programs with their settings from one PC to another in Windows 11/10/8/7, either by connecting over the internet or by creating an image file with just a few clicks.
Here are the steps to transfer files from one PC to another PC via network in a short paragraph:
Step 1. To transfer files, applications, and user account from your PC to your laptop, install and open Qiling Disk Master on both devices. Select the "File sync" option to directly transfer the desired content.

To connect the PC to the laptop, enter the laptop's account password or verification code, then go to the "PC to PC" main screen and toggle the button behind "Connection Verification" to turn it on.

Step 3. To transfer files, select "Files" and choose the files to transfer. By default, PCTrans will save the transferred files to the same location on the target computer, but you can customize the storage path by clicking the "Edit" icon.

Step 4. Now, click "Proceed" to start transferring files from PC to laptop at a fast speed.
For offline file transfer between PCs, Qiling Disk Master can be used. To do this, follow the steps shown in the video provided for assistance.
If you need to transfer programs and apps into a new drive in one PC, you can refer to the article "Transfer installed programs, apps to a new hard drive" for guidance.
[One-for-All Guide] Transfer Files from PC to PC in 2022
Part 2. Sharing Files between PC and Laptop with Windows Built-in Tools [4 Ways]
Pros: Free
Cons: Complex for new or inexperienced computer users
Difficulty: ☆☆☆☆☆
Microsoft added file sharing features to all Windows systems, allowing users to transfer files via network shared drives, links, home groups, and nearby sharing.
Let's check the detailed steps for sharing files between PCs and laptops with Windows built-in sharing tools.
# 1. Share Files between PC to Laptop via Network Link
Step 1. Map a network drive on the source computer:
1. Right-click on This PC/Computer and select "Map network drive".
2. In the Drive box, select the drive letter you wish to use.
Note: The drive should be sufficiently large to accommodate the files and folders you intend to share.
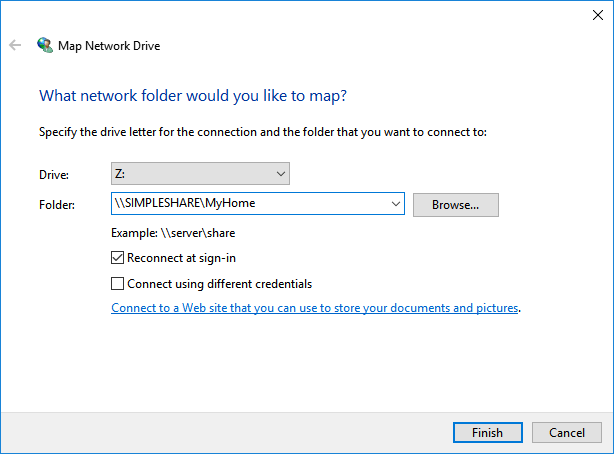
3. In the Folder box, type \\server\share, where you can type the IP address of the drive to be mapped. Click "Finish" to cotinue.
To access a shared folder on a local network, you can type the IP address of the computer hosting the shared folder, followed by a backslash, in the address bar of the File Explorer. For example, if the IP address is 192.168.6.xxx, you can type \\192.168.6.xxx.
Step 2. Save files and folders to the mapped drive.
Step 3. To access the mapped network drive on the target PC, open File Explorer, type the IP address of the mapped network drive (e.g. 192.168.6.xxx), and press Enter to connect to the drive.
Step 4. Once you hit enter, access the shared files, copy them, and save them to your local PC.
# 2. Create Network Shared Link and Sharing Files between Two PCs
Step 1. To enable file sharing on the source PC, open the Network & Sharing Center, click on "Change advanced sharing settings" on the left side, and then select the file sharing option that suits your needs, such as "Turn on network discovery" and "Turn on file and printer sharing".
1. To open the Network and Sharing Center on a Windows computer, right-click the Windows icon, select Search, and type in "Network and Sharing Center." Once the search results appear, click on the "Network and Sharing Center" option to open it.
2. To change the advanced sharing settings, click on "Change advanced sharing settings" at the bottom of the window. Then, check the boxes for the types of sharing you want to allow, such as "Network discovery" and "File and printer sharing".
- Turn on network discovery
- Turn on file and printer sharing
- To allow anyone with network access to read and write files in the public folders, turn on sharing. This will enable users to access and modify files in these shared locations, promoting collaboration and information exchange within the network.
- Turn off password protected sharing

Step 2. To create a shared link for the files you want to share, follow these steps:
1. To share files on the source computer, open File Explorer, navigate to the desired location, select the files you want to share, and right-click on them to access the sharing options.
2. To share a file on Windows, go to File Explorer, click on the Share tab, select "Share", and choose "Specific people..." from the dropdown menu.
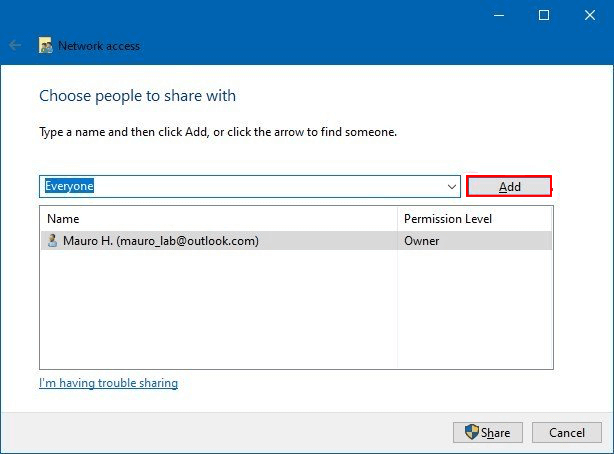
3. To share the content with everyone, click the expand button and select "Everyone" as the share mode, then click "Add" to confirm.
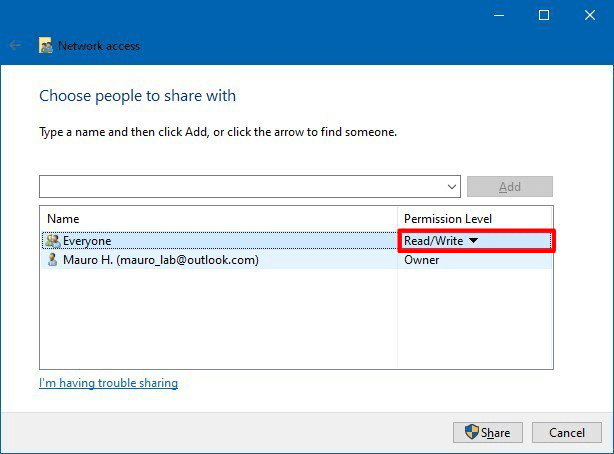
4. To share a Google Drive file with everyone, select 'Everyone' under the 'Permission level' dropdown, then choose 'Read/Write' as the access privilege. After that, click the 'Share' button to confirm the changes.
5. Right-click the shared folder path and select "Copy Link" from the context menu.
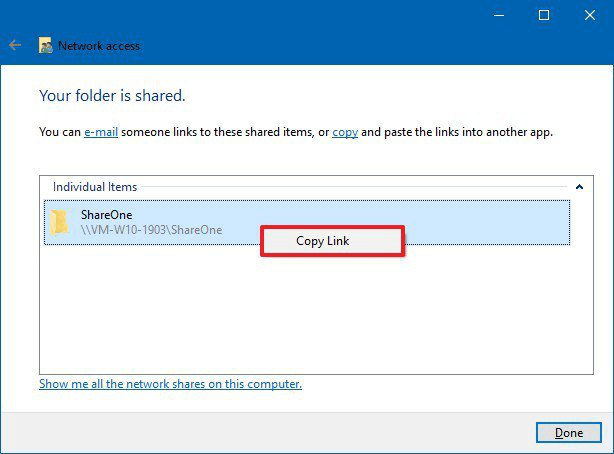
6. Send the shared link to the target PC via Email or other ways.
Step 3. To share and copy files to a target PC via the network drive, you can follow these steps: First, ensure both computers are connected to the same network and have a shared drive set up. Then, on the source PC, navigate to the folder containing the files you want to share, select the files, and right-click to copy them.
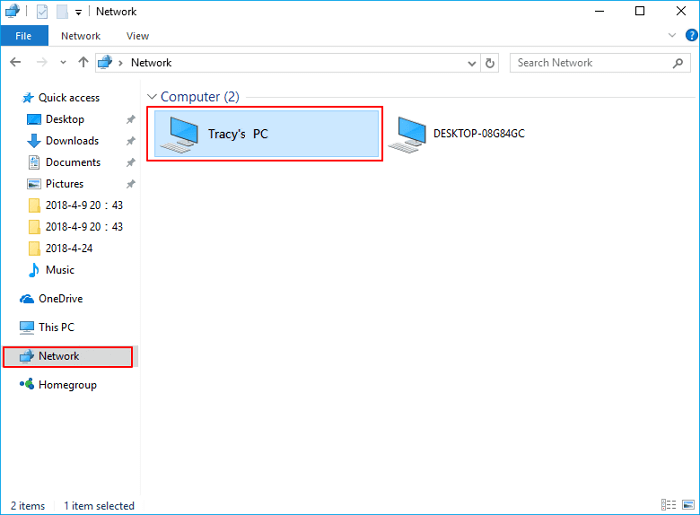
1. Open File Explorer on the target computer and click "Network".
2. To access shared files on another computer, find the source computer name, double-click it to open, and view, copy and save the shared files to a local drive on your target PC.
# 3. Transfer Files to New PC via Home Group
This feature is only available for Windows 11/10 users before 1803 version and Windows 8/7, etc users.
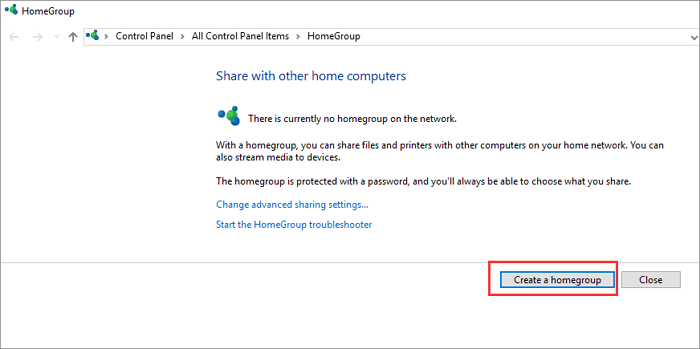
Step 1. On the source computer, type and search for a homegroup in the Search box. Click to open it.
Step 2. Choose "Create a homegroup" > "Next", and follow the instructions.
Step 3. Select files and folders that you want to share, switch the Permissions buttons to "Shared", and click "Next".
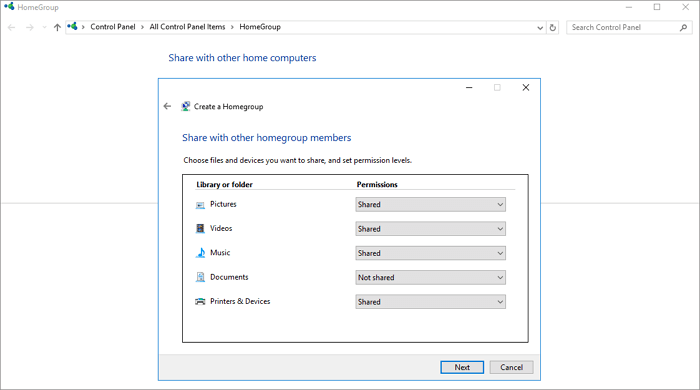
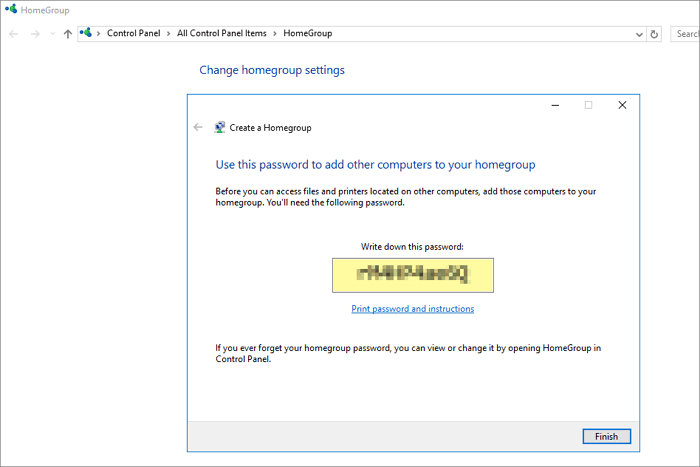
Note: Remember the password shown on-screen.
Step 4. To access the HomeGroup on a target computer, go to the Control Panel, click on "All Control Panel Items", and then select "HomeGroup".
Step 5. Join the existing Homegroup and enter the password you got earlier and click "Finish".
Step 6. To access the shared files on the new PC, you can use the File Explorer to navigate to the shared drive, and then copy the files to a local drive for safekeeping. This way, you can ensure that the shared files are saved to a secure location and are not lost if the network connection is interrupted.
# 4. File Sharing between Windows 11/10 PC and Laptop via Nearby Sharing
Note: This method is only available for Windows 11/10 1803 and newer versions of Windows users.
Step 1. Enable nearby sharing on both computers: Go to Settings > System > Shared experiences > Nearby sharing, and turn it on.
Step 2. Under "Nearby sharing," select "Everyone nearby".
With Nearby Share, your PC will be able to share and receive content with all nearby devices, including those you don't own.
Save files I receive to — Your PC will save the received files to the target path on your drive.
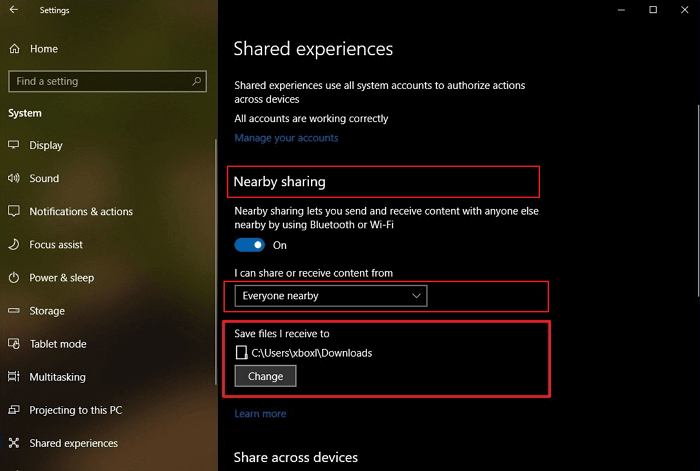
By default, transfers will be stored in the Downloads folder, but you can easily change this to a different folder or drive by clicking the "Change" button under the "Save files I receive to" option in the "Nearby sharing" section.
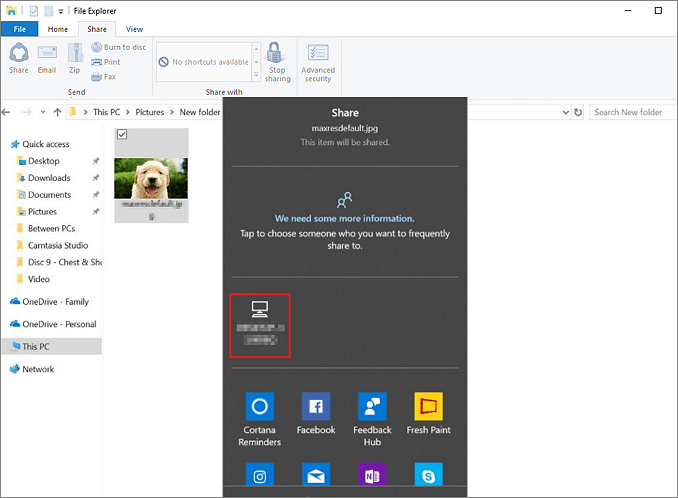
Step 3. Start file sharing between the two laptops.
Open "File Explorer". Right-To share a file, click on the file you want to share, then click on the "Share" option, and finally select the device from the list.
Part 3. Transfer Files from PC to Laptop via Transfer Cable or External Storage Device
Pros: Simple & easy, applicable by all users
Cons: You can buy a new external hard drive or a transfer cable for a few dollars or even a hundred bucks, depending on the model and quality.
Difficulty: ☆☆
Users can manually transfer files between computers using a USB transfer cable or an external hard drive, providing a non-cloud alternative.
# 1. Transfer Files between PC and Laptop via USB 3.0 Transfer Cable
To transfer files from one PC to another using a USB transfer cable, you'll need to use software to facilitate the process. This software typically allows you to select the files you want to transfer and copy them to the other PC. The specific software used may vary depending on the operating system and the type of files being transferred.
- For Windows 8.1/8/7/ users, you can use Windows Easy Transfer with a USB transfer cable to transfer your files and settings to a new Windows 10 PC.
- For Windows 10 users, a third-party transfer cable with embedded software can be used to complete the transfer process.
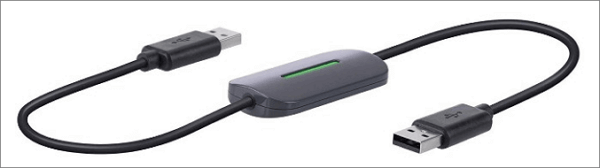
Here are the steps:
Step 1. To connect the PC and laptop, start both devices and ensure they are turned on. Then, insert one end of the Transfer USB cable into the PC and the other end into the laptop.
Step 2. Run the transfer software, such as Windows Easy Transfer, on both computers to facilitate the transfer process.
Step 3. To transfer files from the source computer to the target computer, select the transfer method on the transfer software and choose the files you'd like to move.
Confirm the operation and wait for the process to complete.
# 2. Use External Hard Drive to Copy and Transfer Files
To transfer files from your old computer to a new laptop, start by preparing an empty external hard drive. Next, follow the steps outlined to copy and move files from your old computer to the new laptop.
Step 1. Connect your external hard drive to the source computer.
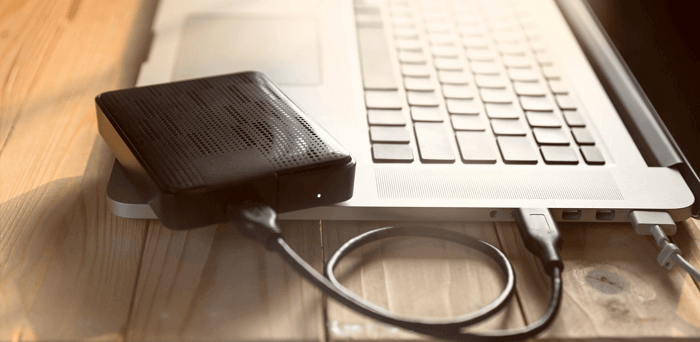
Step 2. Select the files you'd like to transfer and copy them to the external hard drive.
Step 3. Unplug the external hard drive, connect it to the target laptop, and copy files from the external drive to the new laptop's drive.
Part 4. Transfer Data from Laptop to PC via Cloud and Email
Pros: Available and easy
Cons: Payment required, cost a few bucks
Difficulty: ☆
# 1. File Transfer between PC and Laptop with cloud storage
Cloud services like OneDrive, Dropbox, and Google Drive support file sharing between devices. To share files, install the cloud service app on the target device, sign in with your cloud account, and redownload the files.
To set up OneDrive, go to the OneDrive website and sign in with your Microsoft account. You can also set up OneDrive on your computer by clicking on the OneDrive icon in your system tray or taskbar, or by searching for OneDrive in your start menu.
Step 1. Upload files from the source computer to OneDrive.
To upload a file to OneDrive, open OneDrive, sign in with your account, and click "Add" or "upload" to add the file to your cloud account.
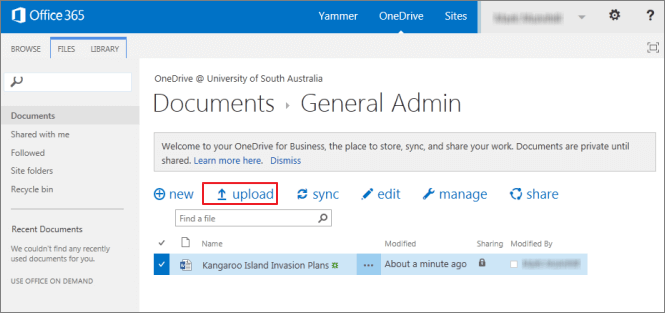
Step 2. Download wanted files to the target PC.
On the other laptop, open the OneDrive app, sign in with your account, right-click on the uploaded files, and select "Download" to retrieve the files.
Wait patiently till the downloading process finishes.
# 2. Transfer Files to New PC via Email
Email service applications such as Outlook, Windows Mail, Gmail, Mozilla Thunderbird, and Hotmail allow users to easily share files by attaching them to emails, enabling seamless file transfer between two computers.
Step 1. To access your email accounts on the source computer, open your email application, such as Gmail or Outlook, and sign in with your email account credentials, including your email address and password.
Step 2. To transfer files from one PC to another using the Index, input the email addresses - From: your email address on the source PC, To: email address on the target PC.
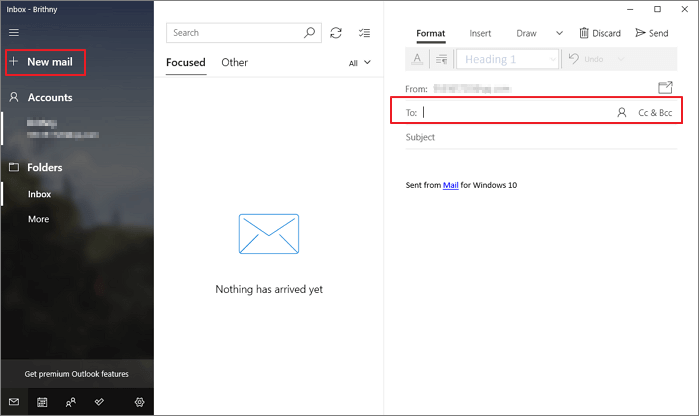
Step 3. To share files from your current PC with another PC, click the Attachment icon, select the files you want to share, and then click "Send" to initiate the file transfer.
Step 4. On the target PC, open any email application, sign in, go to the inbox, check and download any received attachment files.
Conclusion
This page includes 9 ways to assist you in transferring files from PC to laptop or vice versa.
- For a simple and efficient solution, consider using software like Qiling Disk Master, which can help you transfer data with ease.
- Using a network shared drive or link is a better option for a free method.
- Using an external hard drive to manually copy and move files to the new computer is a suitable option.
- For Cloud and Email users, transferring files from PC to laptop can be done in two ways. You can use cloud services such as Google Drive, Dropbox, or OneDrive to upload files from your PC and then access them on your laptop.
If you have questions about file transfer, migrating installed programs, or moving games to another drive, you can find more information by searching the Qiling website or visiting the PC-Transfer page.
Related Articles
- How to Locate or Find Large Files in Windows Server 2022/2019/2016
- Can I Transfer My Netflix Downloads to Another Device?
- How to Send Files to Dropbox? Follow This Guide!
- How to Transfer Youtube Data to Another Account [Channels, Subscription, Playlist]
- Quick Fixes for Windows 10 Backup Failed Error
You will learn how to fix Windows 10 backup failed easily, either directly fixing it or using other powerful backup software. - How to Make Windows 10 Manage Backups Automatically?
Find the backup disk is full? Learn how to make Windows 10 manage backups automatically from this page.