What Is HP Cloud Recovery And How To Use It?
| Workable Solutions | Step-by-step Troubleshooting |
|---|---|
| 1. What Is HP Cloud Recovery | Visit http://support.hp.cloud-recovery.s3...Full steps |
| 2. HP Cloud Recovery Tool Guide | Make sure that computer is connected...Full steps |
| 3. To Recover System | Insert the USB boot device and turn...Full steps |
| 4. Alternative Tool | Launch Qiling Backup, click...Full steps |
What Is HP Cloud Recovery?
Over time, PCs may experience issues such as slowing down or even stopping altogether. However, in some cases, these problems can be resolved with the right fix, and in others, a simple reinstall of the operating system may be the solution.
If you're an HP user, using the HP Cloud Recovery Tool can help resolve issues on your computer. This professional tool allows you to download HP Recovery software from the cloud, which you can then save to a USB drive and use to recover your system.
HP Cloud Recovery Tool is available for consumer PCs produced in 2016 or later, running Windows 10 or Windows 7 x64 architecture.
The HP Cloud Recovery Tool cannot be installed on an external hard drive, and its functionality is compromised when downloaded to one. Some HP PCs may not support the tool, so it's essential to check compatibility before proceeding.
1. Visit http://support.hp.cloud-recovery.s3-website-us-west-1.amazonaws.com/, and you can search if your system has been supported by the HP Cloud Recovery Tool by inputting the product ID. You can easily locate the product ID on the back cover of the computer.
2. To check the HP support page, visit https://ftp.ext.hp.com/pub/caps-softpaq/CloudRecovery/crsupportedplatform.html and look at the table for the supported platforms.
How to Install HP Cloud Recovery Tool on A Compatible Device
Now that you've seen what HP Cloud Recovery Tool is and its uses, you may wonder how to download and install it on your computer. Before installation, prepare by having a few things ready, such as.
- The recovery process for a corrupted USB drive typically takes around one to four hours, although the time may vary depending on the specific USB drive and network being used.
- To ensure that your computer has a stable internet connection, it's recommended to use an Ethernet connection instead of relying on Wi-Fi. This is because Ethernet provides a more stable and faster connection, which is ideal for tasks that require a strong internet connection, such as video conferencing, online gaming, or large file transfers. If an Ethernet connection is not available, make sure that your Wi-Fi connection is strong and stable, with a good signal strength and a reliable router.
- Use an AC power connection to the computer for the process.
- Do not disconnect your computer from the internet connection and AC power during the process.
To download the HP Cloud Recovery Tool for Windows 10, simply visit the Microsoft store at https://www.microsoft.com/en-us/p/hp-cloud-recovery-tool/9mtks9pr7r3n and download the recovery tool for free.

To download and install the HP Cloud Recovery Tool for Windows 10 and Windows 7, visit https://support.hp.com/lv-en/product/hp-officejet-pro-6830-e-all-in-one-printerserie/5390307/document/c06162205.
How to Use HP Cloud Recovery Tool
Now comes the imperative part, i.e., how to run the HP Cloud Recovery Tool. But before you use this tool, you are required to do some preparative work which includes the following:
1. Make sure to take a backup of all your important and personal files before proceeding with any changes or updates. This will ensure that you have a copy of your data in case something goes wrong.
2. Ensure that you have a black USB drive with a minimum storage capacity of 32 GB.
3. Ensure that your HP computer has at least 20 GB of free disk space on the Windows partition.
To back up important files on an HP computer, you have two main options: backing up folders online to OneDrive and file history, or using the Qiling Backup tool, which offers a quick and effective one-click backup feature with high data security. After taking the backup, you can run the HP Cloud Recovery Tool on your computer. Just follow the steps mentioned below to run the tool.
Step 1: Ensure your computer is connected to the internet and insert a blank USB drive into the computer.
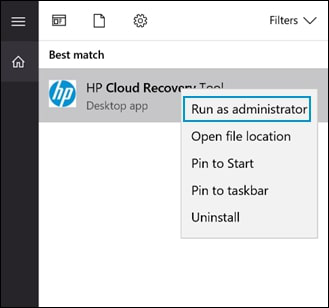
Step 2: HP Cloud Recovery Tool can be run as administrator in Windows by searching for "Cloud Recovery" and right-clicking on the HP Cloud Recovery Tool, then selecting "Run as administrator".
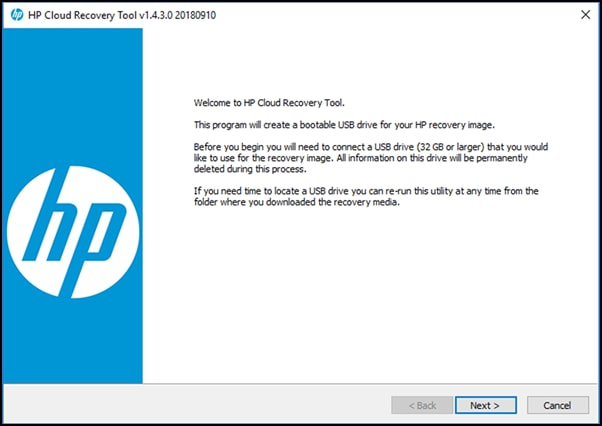
Step 3: On the HP Cloud Recovery Tool welcome page, read the message and click "Next".
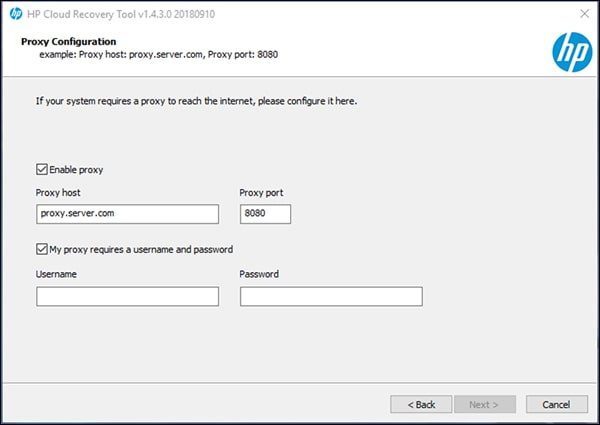
Step 4: Now, you will see a Proxy Configuration window. Here:
- If you're downloading the recovery tool on a secure network, it will automatically detect and populate the proxy information. Simply click "Next" afterwards.
- If you're downloading the software on an unsecured network, it's recommended to skip to the next option. This is because downloading software on an unsecured network can expose your device to potential security risks, such as malware or unauthorized access.
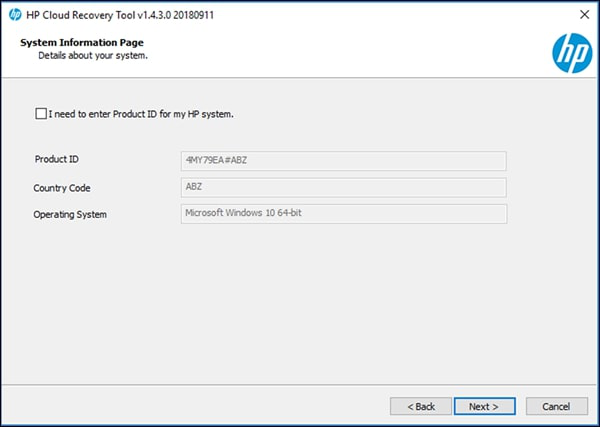
Step 5: Now, enter system information and click on the "Next" option.
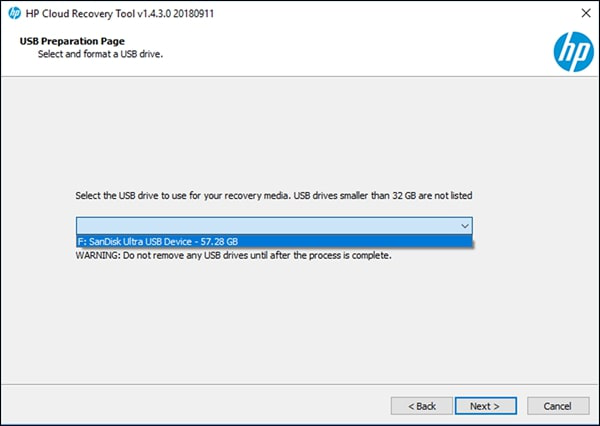
Step 6: Choose your USB drive from the drop-down menu and tap on the "Next" option.
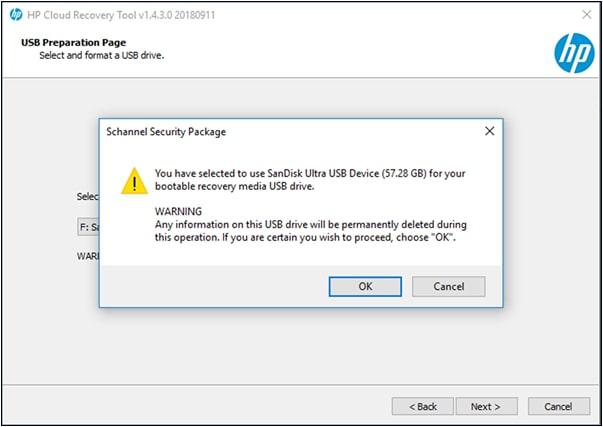
Step 7: A popup will appear, stating that all data on the USB drive will be deleted permanently during the process. Click on "Ok" or "Cancel" to proceed or cancel the operation.
Step 8: Click on the "Next" option to continue the process.
Step 9: Wait for the HP Cloud Recovery Tool to complete the process and display the "Recovery Image" on the USB drive, which will show a progress bar indicating the chosen USB drive as a recovery boot device, and you can cancel the process at any time if needed.
Step 10: A message will appear indicating that the flash drive is ready. Click on the "Accept" option to proceed.
Step 11: Once the process completes, tap on the "Finish" option.

Before initiating the recovery process using the recovery boot device after running the HP Cloud Recovery Tool, ensure that you have taken a backup of your files, disconnected all connected cables and devices, and removed any media from the internal drive or added internal hardware. Once you have completed these precautions, you can proceed with the recovery process.
Step 1: Insert the USB boot device and turn off the PC.
Step 2: Turn on the PC and press the "Esc" key repeatedly every second until the "Startup Menu" appears.
Step 3: Now, to open "Boot Device Options," press the F9 key.
Step 4: To select the USB drive, use the up or down arrow keys to navigate to the correct drive, then press the "Enter" key to confirm your selection.
Step 5: When the prompt shows, run Recovery Manager from the hard drive or media, choose the "Run program from media" option, and click on the "Next" option.
Step 6: After selecting the language, click on the "Ok" option.
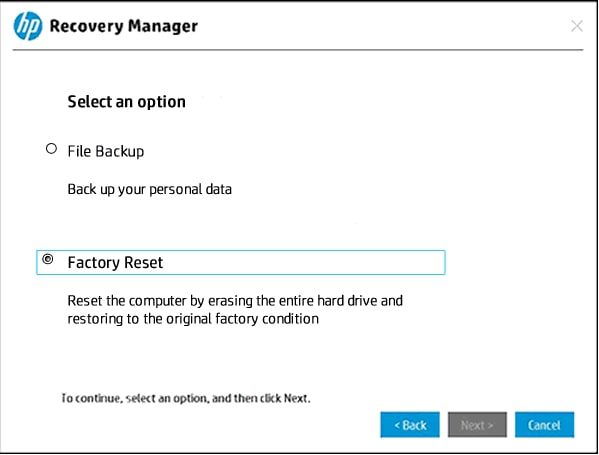
Step 7: To initiate the factory reset process, select the "Factory Reset" option and tap on the "Next" option.
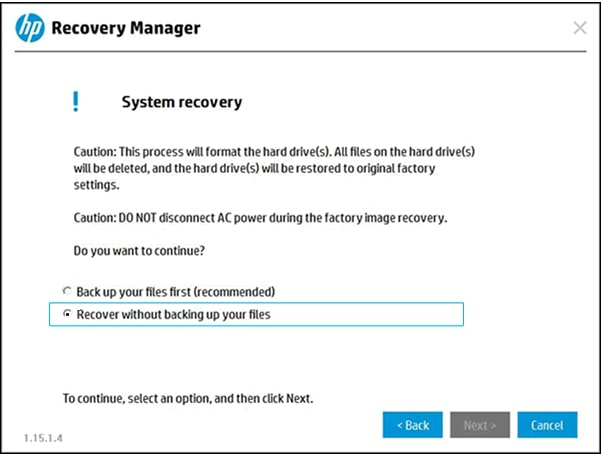
Step 8: Click on the "Next" option on the Welcome screen, then choose the "Recover without backing up your files" option, and click the "Next" button.
Step 9: Wait till the recovery manager completes the process.
Note: You can skip the prompt about the supplemental recovery USB drive when asked by HP support, as it is not required for the recovery process. You can proceed with the recovery process without the supplemental recovery USB drive.
Step 10: When the recovery preparation is finished, click on the "Continue" option.
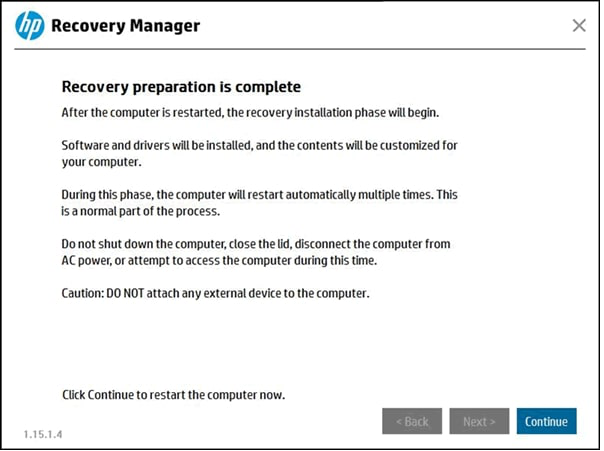
Note: Don't remove the USB drive or switch off the computer during the process.
Step 11: Once the recovery process is completed, click on the "Finish" option to restart the system.
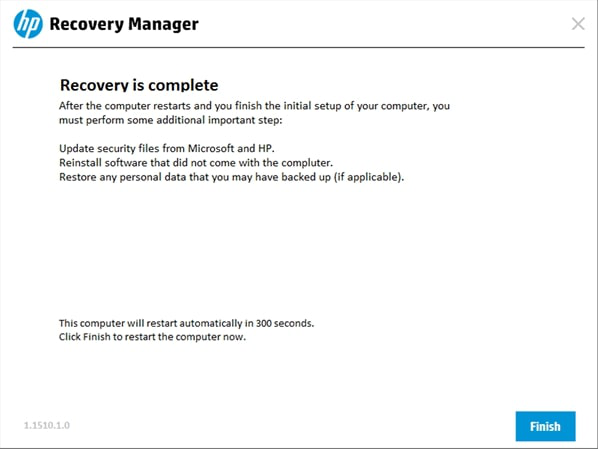
Step 12: Remove the USB drive once the PC initial setup initiates.
HP Cloud Recovery Tool Alternative - Qiling Backup
The HP Cloud Recovery Tool is specifically designed for HP computer users. If you're not an HP user, you can use the Qiling Backup tool to securely back up and restore your files in just a few clicks. This alternative solution provides a convenient and efficient way to manage your system's data.
You can use Qiling Backup software to create a system backup image, which can be used to revert a crashed system to a working point without losing data. The software allows you to create a backup image of your system, which can be used to restore your system to a previous working state in case of a crash. This way, you can easily recover your system and data without any loss.
Step 1. Launch Qiling Backup on your computer, and click System Backup on the home screen.

Step 2. To start the system image backup process, Windows will automatically select your operating system information and all system-related files and partitions, eliminating the need for manual selection. Next, you'll need to choose a location to save the system image backup by clicking on the illustrated area.

Step 3. The backup location can be another local drive on your computer, an external hard drive, network, cloud, or NAS. We recommend using an external physical drive or cloud to preserve system backup files.

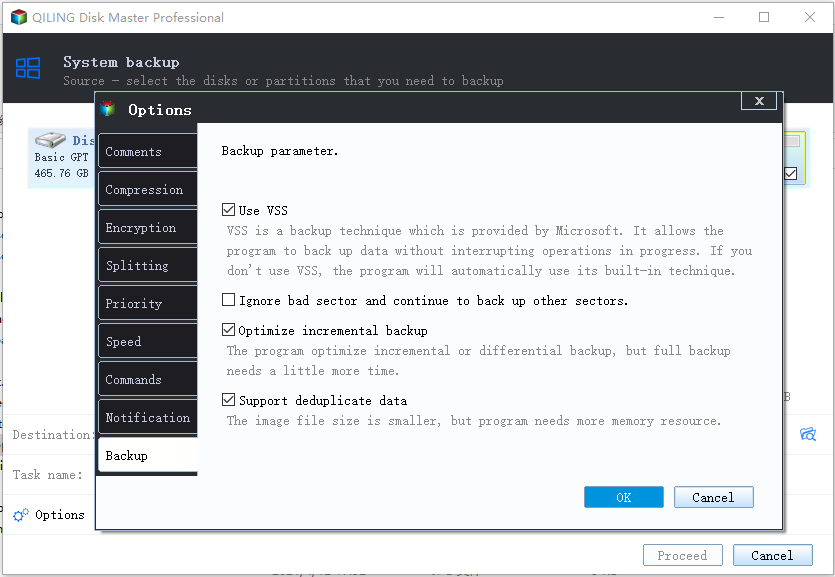
Step 4. To customize the backup settings, go to the Options button, where you can set an automatic backup schedule to run daily, weekly, monthly, or upon an event. You can also choose to make differential and incremental backups. Once you're done, click Proceed to start the backup process. The completed task will be displayed on the left side in a card style.
And to restore the system image, continue with the steps:
*Try to boot the computer with the Qiling Backup emergency disk to accomplish system recovery on a non-bootable machine..
Step 1. Click Browse for Recover to luanch Qiling Backup.

Step 2. To restore a system backup, go to the backup location and select the fvd file created by Qiling Backup.

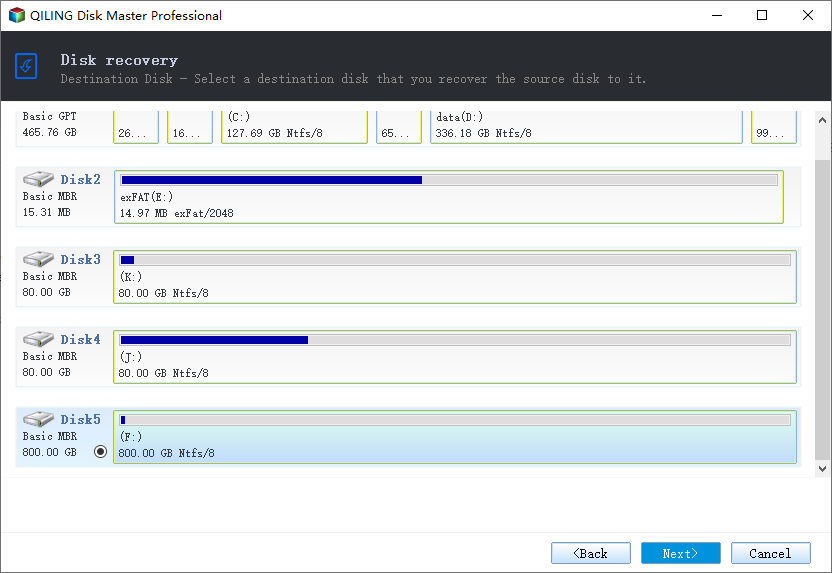
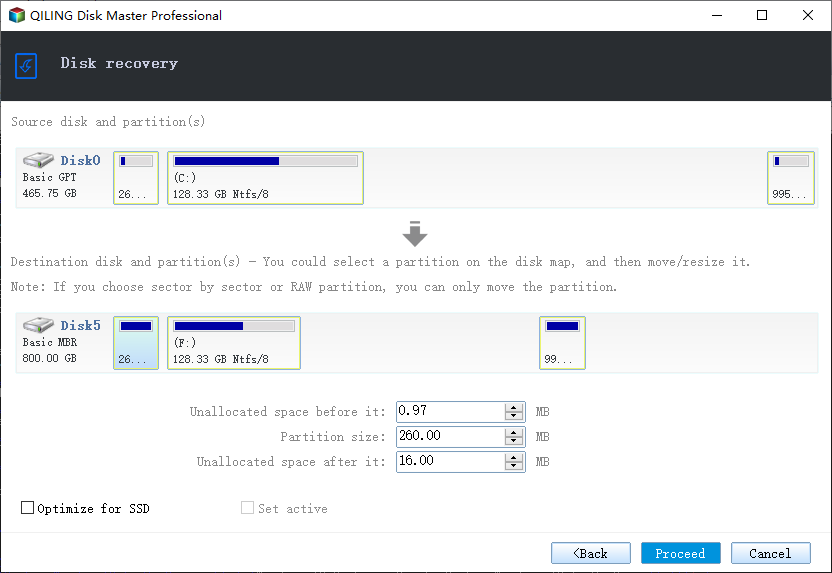
Step 3. Select a recovery disk that matches the partition style of the source disk to ensure a successful recovery process. The partition style on the source and recovery disks should be identical.
Step 4. To start the system backup recovery process, select the "Proceed" option. This will initiate the recovery process based on the disk layout you've customized to suit your specific needs.
The HP Cloud Recovery Tool can be used to resolve issues in HP computers, but it won't work on other devices. However, you can use Qiling Backup to address backup and recovery issues, which is a viable alternative.
Related Articles
- Google Drive Video Still Processing Takes Forever [Issue Fixed]
- Windows 7 Backup and Restore Blank Screen? Here Are Fixes!
- The Best 11 Xbox Games All the Time (2022 Updates)
- For Backup Beginners: Windows 11 Backup vs Windows 10 Backup vs Qiling Backup
- Windows 7 Startup Issues Troubleshooting (7 Effective Ways)
How to do Windows 7 startup issues troubleshooting? Here are some ways prepared for you. You can try them one by one until your computer boot successfully. - How to Fix Windows 7 via Startup Repair or CHKDSK from Command Prompt?
This article helps to disable Windows 7 Startup Repair and fix Windows 7 Startup Repair loop via CHKDSK or Bootrec command prompt.