Full Guide: How to Move Blizzard Games to Another Drive or PC in Windows 11/10
This guide helps you move Blizzard games like Warzone, Diablo 3, and World of Warcraft to a new drive or PC. If your C drive is full of Blizzard games or you're trying to transfer them to a new computer in Windows 10 or 11, follow these steps to migrate your Blizzard games with battle.net on your own.
| Workable Solutions | Step-by-step Troubleshooting |
|---|---|
| 1. Move Blizzard Games to Another Drive |
Solution 1. Move Blizzard Games to Another Drive Without Re-installation...Full steps |
| 2. Move Blizzard Games to a New PC |
Step 1. Run Qiling Disk Master on both PCs: On the source PC, select "PC to PC...Full steps |
Why Do You Need to Move Blizzard Games to A New Drive or PC
Here are the 3 major factors that could explain why many Battle.net users want to move their games to another drive or computer:
Reason 1. To free up space, you can try deleting any unnecessary files, uninstalling unused games, or transferring games to an external drive or cloud storage. Additionally, you can also consider upgrading to a larger storage drive or purchasing an external drive specifically designed for game storage.
If your C drive is full and running out of space, it's likely because Blizzard's default setting drops game files there, taking up space with installation files and desktop files.
Reason 2. To optimize the gaming experience by switching games to SSD.
To transfer installed programs to an SSD, you can use the built-in Windows feature called "System Image Backup" to create a backup of your current system, then restore it to the SSD. Alternatively, you can use third-party software like Qiling Backup to clone your current system to the SSD. Additionally, you can also reinstall the operating system on the SSD and then reinstall the programs you want to transfer.

Reason 3. To migrate Blizzard games from an old PC to a new gaming computer, you can follow these steps:
You can use the Battle.net client to transfer your games and settings to the new computer. To do this, follow these steps: 1. Uninstall the Battle.
To move Blizzard games from the C drive to another SSD or external disk, or switch all games with Battle.net to a new computer, follow these steps: you can use the Battle.net client to move games to a new location, or use a tool like Steam Mover or GameWatcher to help with the process. If you're switching to a new computer, you can also use the Battle.net client to download and install games on the new machine, then use the "Save to Cloud" feature to transfer saves and settings. Additionally, you can use a tool like DDU (Display Driver Uninstaller) to remove any remaining game files and drivers on the old machine.
How to Move Blizzard Games to Another Drive in 3 Ways
Moving Battle.net games to another drive is a straightforward process that can be achieved through three solutions. To get started, you can follow the steps outlined for each solution, allowing you to easily transfer games like Call of Duty, World of Warcraft, Hearthstone, and Heroes of the Storm to a new drive.
Solution 1. Move Blizzard Games to Another Drive Without Re-installation (Automatically)
Among the three methods, Qiling Disk Master is the most useful and convenient one, allowing for easy and free PC transfer of data, applications, and user account settings between PCs in just one click.
Blizzard's APP Migration feature allows you to change the game installation location and copy installed software without startup issues, saving time by not needing to reinstall games on Battle.net.
Qiling Disk Master
- Transfer to a new PC: Steam, Origin, LOL, Blizzard.
- Transfer to a new drive: DIABLO, WORLD OF WARCRAFT,
OVERWATCH, HEARTHSTONE, etc. - 3 steps to migrate games apps to a new pc or a new drive.
To migrate Blizzard games to another drive, download the application migration program, and follow the instructions to move the games to the new drive. This can be done on either a hard disk drive (HDD) or a solid-state drive (SSD) to improve game performance and free up space on the original drive.
Step 1. Connect the destination drive to your computer
To transfer games from their original location, you should connect the drive to your computer where Qiling Disk Master is installed, then run the games transfer software, select the "Backup and recovery" page, and finally click on "File sync".

Step 2. Choose the games you want to change the location
On the list view, select the original drive where your game programs are installed, locate the games and tick the checkboxes.

Click the triangle icon to choose the target drive, then select the file path. After selecting everything, click "Proceed".

Step 3. Transfer the games to the destination drive
The software will move the selected games from their original location to your chosen location, and the process will be completed once it's finished.
What Else Can Qiling Disk Master Do for You:
- Transferring files, applications, and user accounts from one PC to another can be done directly by connecting the two devices. This allows for a seamless transfer of data, making it ideal for situations like transferring files from a laptop to another laptop using a WiFi connection.
- To transfer files, programs, and account information from one PC to another, you can create images of your files, programs, and account, and then automatically export them from the source PC to the target PC when an internet connection is not available.
Solution 2. Move Battle.net Games to Another Drive by Reinstalling
If you don't want to use a third-party program, you can try manually moving Blizzard games to another drive by re-downloading and changing the installation location, but this may not ensure the game will run properly.
If you don't mind the time-To avoid consuming too much space, it's recommended to install Blizzard games like HearthStone, Warzone, Duty of Call, etc., on a drive with enough space for the first time. If you need to move them, follow these steps:
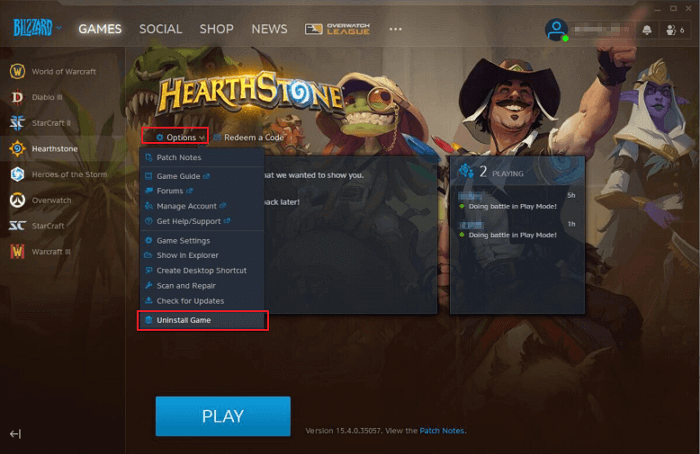
Step 1. Uninstall Games with the Blizzard Battle.net Desktop App.
To uninstall a game from the Blizzard Battle.net desktop app, open the app, select the game you want to remove, go to the "Options" menu, and choose "Uninstall Game".
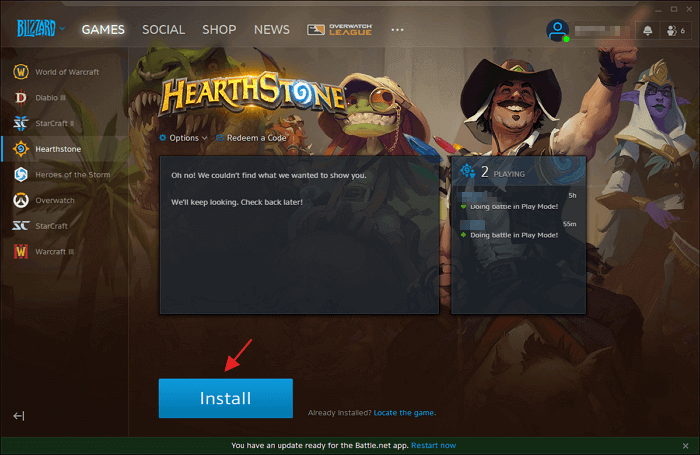
Step 2. Open the Blizzard Battle.net Desktop Application and go to the correct tab for the game you'd like to install, then hit the "Install" button.
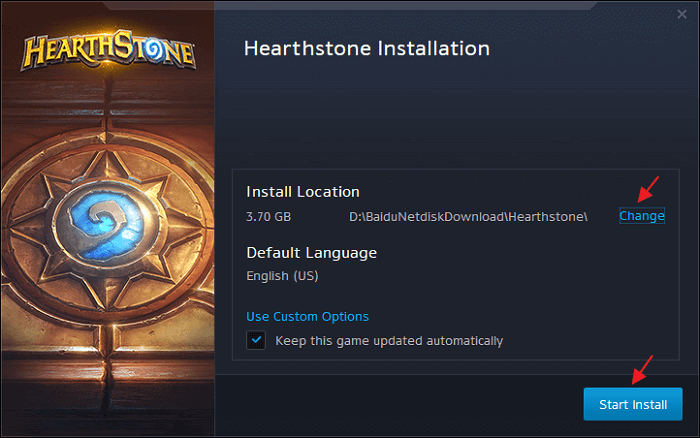
Step 3. To install games, browse to the correct drive and folder you'd like to use for the installation, then click "Start Install". Repeat these steps for each game.
This method only changes the location of the game, not the Blizzard Battle.net Desktop App. Moving the Blizzard Battle.net Desktop Application to a different drive from your Operating System files can cause problems with your games.
Solution 3. Move Blizzard Games to Another Drive via Changing Installation Setting/Game Folder Location
Besides the two methods of moving Blizzard games to SSD, there's another way to help you move Call of Duty (including Warzone or Modern Warfare) to another drive. You can change the installation game folder, which is a viable option for Call of Duty games.
Step 1. Copy the original game folder to another drive, and then run the Battle.net client.
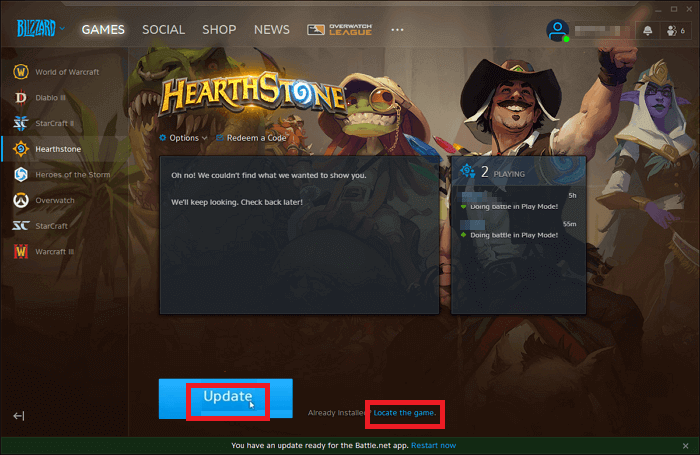
Step 2. To locate the game, click on the "Locate the game" button at the bottom of the interface, then select the new folder where the game should be installed.
Step 3. After changing the folder location, head back to the interface. The "Install" button will now read "Update". Clicking this button will finalize the location change.
How to Move Blizzard Games to a New PC in Windows 11/10 With Simple Clicks
Qiling Disk Master allows you to transfer Battle.net and Blizzard games to a new computer using its PC to PC feature, making it easy to re-load the games on the new computer.
Qiling Disk Master allows you to transfer Battle.net games from one computer to another without reinstalling them. This process involves using the software to clone the original game installation, including all associated files and settings, onto the new computer.
Step 1. Run Qiling Disk Master on both PCs
On the source PC, select "PC to PC" on the main screen of Qiling Disk Master and proceed.
Step 2. Connect two computers
1. Connect to a target PC via its IP address or device name and click "Connect".
2. Enter the login password of your target PC and click "OK" to confirm. This step is to ensure that you have the necessary permissions to access the target PC.
If the target PC is not listed, you can manually add it by clicking "Add PC" and entering its IP address or device name.
Step 3. Select apps, programs, and software and transfer to the target computer
1. You can select and choose what you want to transfer from the current computer to the target PC.
2. Once you've selected the desired applications and programs, click "Transfer" to initiate the transfer process.
After backing up your files and reinstalling your operating system, you can log into your account on Battle.net, reload your favorite Blizzard games like Call of Duty, Warcraft, HearthStone, and Diablo 3, and enjoy playing them with your team on your new PC.
Moving Blizzard Games Is a Simple Click
This tutorial provides comprehensive solutions to help you move Battle.net games, such as Warzone, Call of Duty, and Starcraft, to a new location. Qiling Disk Master, a seamless PC data transfer tool, allows you to transfer these games from one drive or PC to another in a few clicks, freeing up space by transferring programs from the C drive to the D drive.
Related Articles
- Your Complete Guide: Windows Server Migration Tools Free Download and How-To Tips
- How to Back Up/Transfer Kodi(XBMC) with Addons and Settings
- Solutions to Transfer Programs to New Computer - Check Full Guide 2022
- 7 Ways to Clean Up C Drive in Windows Server 2022/2019/2016
- How to Back Up Windows 10 to Synology NAS (2 Ways)
Learn how to back up Windows 10 to Synology NAS with backup software or Windows built-in tools to protect files and system data. - How to Back Up Computer Windows 7 Before Upgrading to Windows 10 (2 Ways)
Learn how to back up Windows 7 before upgrading to Windows 10 so you can protect files, settings, and system data during the upgrade.