Your Complete Guide: Windows Server Migration Tools Free Download and How-To Tips
Transferring workloads from one server to another is a common task for many organizations. There are various methods and tools available for file transfer, but finding the best one can be challenging. However, if you're looking for a reliable solution, you're in the right place. In this post, we'll recommend the best Windows Server Migration tool, provide an overview of its working process, and highlight its outstanding features. Let's dive in for more details.
What Tool Is Used to Migrate Windows Server Data?
When it comes to migrating Windows Server data, two popular tools are widely used:
- Windows Server Data Migration Software - Qiling Disk Master Technician
- Windows Server Migration Tool
If you're looking for the best way to migrate Windows Server data, I recommend using server migration software, especially for Windows Server beginners.
#1. Windows Server Data Migration Software Free Download with How-To Tip
If you're looking for reliable and fast free software for Windows Server data migration, then you're in luck! There are several options available that can help you transfer your data quickly and efficiently.Qiling Disk Master Technician The best professional PC transfer solution is a highly recommended tool that helps businesses move to new PCs with high effectiveness, and it's completely free to download.
Qiling Disk Master Technician
Your smart Windows Server file transfer software.
- Unlimited file transfer between Servers.
- Transfer programs, apps without reinstallation.
- Transfer account, settings to new Server computer.
- Data rescue, find product key for installed programs.
The simple interface and easy-This tool stands out among other data migration tools by offering advanced features that make it a game-changer for data migration. Its functionality allows for seamless data transfer, ensuring minimal disruption to business operations. What sets it apart is its ability to handle complex data transformations, real-time data validation, and automated error handling, making it an indispensable asset for organizations looking to streamline their data migration processes.
- To set up your new PC, you can automatically transfer files, programs, and settings you choose from your old PC. This process allows you to seamlessly transition to your new device, saving you time and effort.
- Users can quickly and straightforwardly transfer programs without installing software
- One- To transfer a local or domain account to a brand-new PC with similar settings, you can use the "Click Transfer" facility. This feature allows you to transfer the user account, settings, and files from an old PC to a new one, ensuring a seamless transition and minimal setup time.
- Data backup and restore
- Data rescue
- Transfer files over Network or Image files.
- 24x7 hours free technical support assistance
- Transfer Microsoft Account
To migrate Windows server data via the Qiling Disk Master Technician tool, follow these steps:
Step 1. Launch Qiling Disk Master on your source and target computers, and connect both PCs via the internet.
1. At the "Backup and recovery" section, click "File sync" to proceed.

2. Select your target computer via its device name, enter its account password or verification code, choose the transfer direction, and click "Connect" to proceed.
You can check the verification code on the right top of the "PC to PC" main screen on the target computer.

Step 2. You can select the categories Applications, Files, and Accounts to transfer via the internet.
To transfer data selectively, click on the "Edit" option under each category and select the specific items you want to transfer.

Step 3. To transfer your apps, files, and accounts from one computer to another via the internet, click "Proceed" to initiate the process.
#2. Windows Server Migration Tool Download with How-To Tip
Transferring workloads from one server to another is often done using Windows Server Migration Tools on Windows Server computers. For transferring files, various methods can be used, with Windows Server Migration Tools being a common one, typically involving a set of PowerShell cmdlets. While this method can be complex for beginners, it can be completed by following a series of steps.
The operation of Windows Server Migration Tools is complex, so we've broken it down into 4 parts for clarity and convenience.
Part 1. Install Windows Server Migration Tools on the destination and source Server.
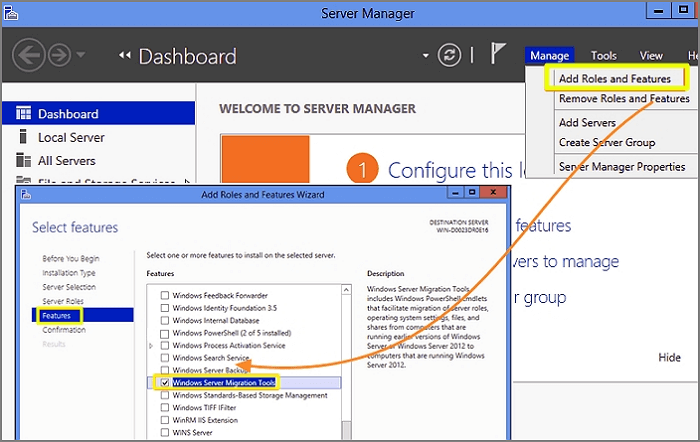
Step 1: To start the Server Manager in Windows, click the Start button in the lower-left corner, type "Server Manager" in the search box, and then open it.
Step 2: To add roles and features, click on the "Add Roles and Features" option under the "Manage" tab, then press "Next". Select the destination and press "Next" again. Under the "Features" tab, select "Windows Server Migration Tools" and press "Next".
Step 3: Confirm the installation selections and click Install to install the tool on the targeted computer, then follow the same process to install it on the source system.
Part 2. Create a deployment folder on the destination computer
Step 1: To access the Command Prompt (Admin), PowerShell, or Windows Terminal, press the Windows key + X, and then select the desired application from the menu.
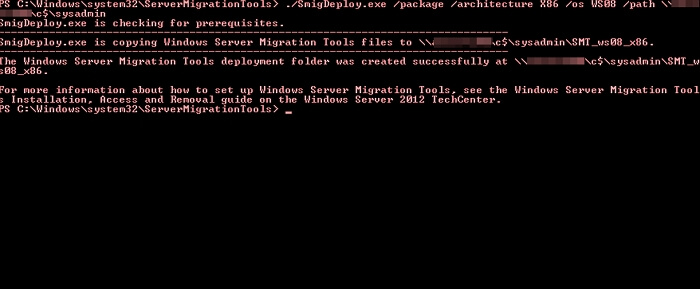
Step 2: To deploy the .NET Framework, change to the directory where the smigdeploy.exe tool is stored and type the given command, then press Enter.
cd %Windir%\System32\ServerMigrationTools\
Step 3: The command is: `git clone
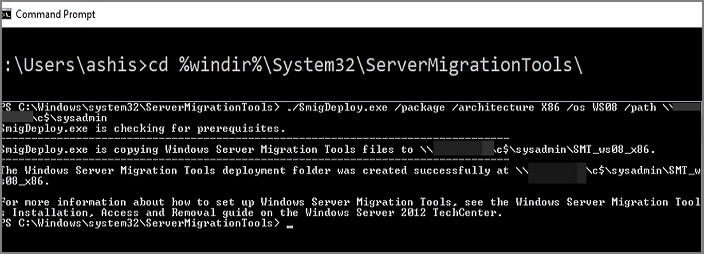
SmigDeploy.exe /package /architecture X64 /os WS08 /path
Part 3. Register Windows Server Migration Tools on the Source computer
Step 1: Copy the deployment folder generated by the destination system to a local drive on the source system, ensuring the operating system architecture of the deployment folder matches the source computer's architecture.
Step 2: To open a Command Prompt window on the source computer, press the Windows logo key + X and select Command Prompt from the menu.
Step 3: Change the directory to the deployment folder in the command prompt.
Step 4: To register Windows Server Migration Tools cmdlets, navigate to the installation directory and run the command ".\Smigdeploy.exe" followed by pressing Enter.
Now that you've completed all the necessary arrangements, it's time to learn how to utilize server migration tools. These tools are designed to facilitate the process of transferring servers, applications, and data from one environment to another, minimizing downtime and ensuring a smooth transition. With the right server migration tools, you can automate many of the tasks involved in the migration process, making it faster, more efficient, and less prone to errors.
Part 4. Use Windows Server Migration Tools step by step
To export local users from the source server, follow these exact steps.
Step 1: To migrate servers, click on Server Manager and then Tools on the source server, followed by Windows Server Migration Tools to open it.
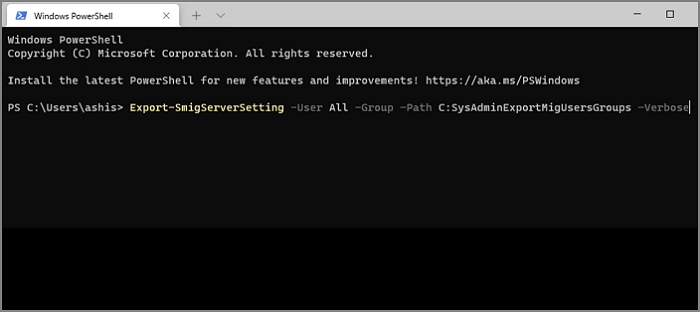
Step 2: Now run this command:
Export-SmigServerSetting -User All -Group –Path C:SysAdminExportMigUsersGroups –Verbose.
If you want to import the local users to the targeted server then you should follow these steps
Step 1: Open Windows Server Migration Tools from Server Manager>Tools>Windows Server>Migration Tools.
Step 2: Now type the following command and press Enter.
Import-SmigServerSetting–UserEnabled–Group-PathC:SysAdminExportMigUsersGroups -Verbose
The process of performing the task is complex for non-technical individuals, but by following the given steps, you can complete it quickly.
Which Windows Server Migration Tools Suit You Better?
The process of server data migration can be complex and confusing for non-technical users, but utilizing a Windows Server data migration tool can simplify the process. For a reliable and user-friendly solution, we recommend using the Qiling Disk Master Technician, which offers a range of unique features and an intuitive interface.
Related Articles
- Fast File Transfer Software for PC Free Download
- 2 Easy Ways to Transfer Dropbox to Google Drive
- You Must Know How to Move Files from OneDrive to Local Drive
- Copying Files from One Server to Another Server in Windows Robocopy
- 3 Ways to Transfer Files from Server to Server
If you need to transfer files from one server to another, you have two options: transferring the files directly between the servers, or waiting for a server merge. If you choose to transfer the files directly, please read on for further instructions. - 3 Ways to Transfer Files from Windows 7 to Windows 11
Are you planning to upgrade your computer from Windows 7 to Windows 11? Here are three easy ways to transfer your files from Windows 7 to Windows 11.