3 Ways to Transfer Files from Windows 7 to Windows 11
Can Windows 7 Files Be Transferred to Windows 11
You can transfer your files from Windows 7 to Windows 11, and it's a straightforward process. With a massive amount of data stored on your system, upgrading to a new operating system can be a concern, especially when it comes to transferring files without losing any data. Fortunately, there are several ways to shift all your files to Windows 11 smoothly, and this guide will provide you with solutions to do so successfully on your own.
Quick Ways:
To transfer files from Windows 7 to Windows 11, you can use Qiling Disk Master. This method allows you to transfer files from an old hard drive to a new one, and it supports file transfer between different Windows versions, including from Windows 7 to Windows 11. You can connect the old hard drive to the new Windows 11 computer, launch Qiling Disk Master, and follow the on-screen instructions to transfer files from the old drive to the new one.
To transfer files between Windows 7 and Windows 11, you can use a USB drive or external hard drive. First, ensure the USB drive or external hard drive is compatible with both operating systems. Next, copy the files you want to transfer from the Windows 7 computer to the USB drive or external hard drive.
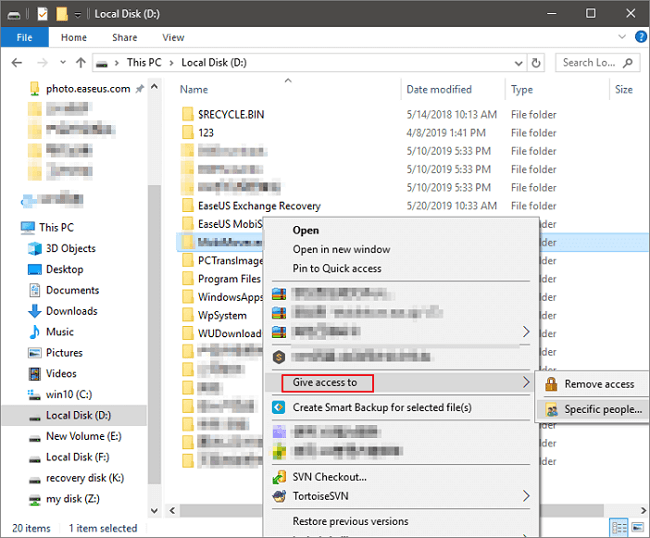
To share files from Windows 7 to Windows 11 using OneDrive, first, ensure that the OneDrive app is installed on both computers. On the Windows 7 computer, select the files you want to share and right-click on them. Select "Share a OneDrive link" to share the files.
3 Best Ways to Transfer Windows 7 Files to Windows 11
Upgrading to Windows 11 from Windows 7 is easy and can be done in a few steps. The best ways to transfer files from Windows 7 to Windows 11 include using the built-in Windows 11 File Transfer tool, or using a third-party file transfer software, such as Qiling Disk Master or AnyTrans, to transfer files, settings, and even programs. Additionally, users can also use cloud storage services like OneDrive or Google Drive to transfer files, or manually transfer files using a USB drive.
1. Use PC To PC Transfer Software - Qiling Disk Master
2. Use USB/External Hard Drive
3. Use OneDrive
The next question that arises is which method amongst these is best. Our top pick is Qiling Disk Master, as it's efficient and fast in file transferring, saving your time and effort.
Method 1. Transfer Files to Windows 11 from Windows 7 Using Qiling Disk Master Free
Qiling Disk Master Free is a tool that helps transfer programs and files from one operating system to another, making it ideal for upgrading the OS, such as from Windows 7 to Windows 11, without reinstalling. It transfers files, applications, programs, and accounts between computers, making it a convenient and fast way to migrate data. Additionally, it can recover programs and files from a dead computer.
The essential features of Qiling Disk Master are as follows:
- Move everything securely It allows you to transfer apps, files, programs, settings, and even user profiles from one computer to another in a secure way.
- Fast and automatically- This software provides a straightforward way to set up your new computer, ensuring that all necessary programs and applications are pre-installed and ready for use when you first start using your PC.
- Auto Transfer- With Qiling Disk Master, you can easily transfer programs, files, and settings from one PC to another, making it a convenient tool for upgrading or replacing computers.
- No Need to Reinstall Programs- It enables direct data transfer between devices without the need for apps, enhancing productivity.
- Recover Data and Accounts from A Dead Computer- With Qiling Disk Master, you can recover your data even if your hardware or software fails, ensuring the security and integrity of your digital assets.
Download the free data transfer software:
Three Transfer Modes Available
You can choose the most suitable transfer mode available to transfer and move to a new PC quickly.
- Transfer via Network Connection
By connecting computers on the same Local Area Network (LAN), you can transfer files, programs, and even account settings between them.
- Transfer Locally
1. You can also choose migrating applications among local disks of the same computer.
- Transfer via Image File
Another way of transferring files is to create images of your files, programs, and accounts and move them from the source PC to the new PC.
Qiling Disk Master is a simple yet effective solution for quickly and conveniently moving files and programs, making it a highly recommended option for file transfers.
How to Transfer File in "PC to PC" Mode
Step 1. Launch Qiling Disk Master on both old and new computers. Then, click the "File sync" button on the main screen to proceed with the process.

Step 2. Connect the two PCs on the same LAN by entering the target PC's password or verification code, then select the correct transmission direction and click "Connect" to proceed.
The verification code is located on the top right of the main screen for "PC to PC" on the target computer, and the turn on button is behind the Connection Verification.

Step 3. To move files, go to the "Files" section, select the individual files you need to move, and then proceed with the file transfer process.

Step 4. To migrate data, click the "Proceed" button to initiate the transfer, then wait for it to complete, with the duration depending on the size of the files.
Sharing files between two laptops can be done with or without WiFi using various methods. On Windows 11/10, you can use the built-in feature called "Quick Share" to share files with nearby devices, or use the "Nearby Share" feature to share files with devices that have Bluetooth and WiFi enabled.
To transfer files between two laptops in Windows 11/10/8/7, you can use methods such as using a USB drive, cloud storage services, email, Bluetooth, Wi-Fi Direct, Remote Desktop, and third-party file transfer software like Shareit, Xender, or Pushbullet. You can also use the built-in features of Windows, such as Nearby Share and the File Explorer's "Share" option, to quickly and easily transfer files between devices.
Method 2. Transfer Files Between Windows 7 and Windows 11 via USB/External Hard Drive
To transfer files from a Windows 7 PC to a Windows 11 PC, you can use an external storage device such as an external hard drive, USB drive, or SD card to quickly move all your files and programs.
External hard drives are portable, convenient, and can be encrypted for security, allowing for fast and cost-effective transfer of large files without additional software or internet access.
Here are the steps to copy your files on a Windows 7 PC to an external storage device in one paragraph:
To copy files from a Windows 7 operating system to an external hard drive, follow these steps: Simply navigate to the desired files on your computer, select them, and then click and drag them to the external hard drive. Alternatively, you can right-click on the files and select "Copy," then navigate to the external hard drive and right-click to select "Paste." This will duplicate the files and keep the originals intact.
- First, connect your external hard drive/USB drive to your Windows 7 PC. Then, click on the Start button and select Computer.
- To select the Start Button, click on it, which is typically located at the bottom left corner of the screen. This will open the Start menu.
- To locate the files or folders where your files are stored that you wish to copy, you can start by checking your computer's file system. This typically involves navigating through your computer's directories or folders to find the specific files or folders you're looking for.
- To copy a file without opening it, select the file you want to copy without opening the file. If you want to copy multiple files, hold down the CTRL button while selecting additional files. When selecting folders, it will select all files within those folders.
- To copy files to the memory, select the files you want to copy, and then go to Organize > Copy from the top of the window. This will highlight the selected files and make them ready for copying.
- To access an external drive, click on the corresponding letter of the drive to go to the external drive location.
- When the drive is highlighted, select Organize > Paste to copy the files you selected earlier to the drive.
Before Removing the Storage Device, Verify Your Files Are Correct
Once you've copied your files to an external hard drive or USB storage device, double-check that they're in the right location by browsing the external drive or USB drive.
To safely remove an external storage device, select "Eject" before physically removing the hard drive from your PC. This ensures no files are lost or corrupted.
Once you have copied your files onto the hard drive, you can easily transfer them onto your new Windows 11 PC.
Method 3. Share Files from Windows 7 to Windows 11 Using OneDrive
Transferring files from a Windows 7 PC to a Windows 11 PC can be done easily using OneDrive, allowing for a quick setup of the new computer and transferring many files at once.
Here are the steps to transfer your files from Windows 7 to Windows 11 PC using OneDrive.
Step 1: Installing and Setting Up OneDrive on your Windows 7
To get started, you'll need to install and set up OneDrive on your Windows 7 computer. This process involves installing the OneDrive software, which can be downloaded from the Microsoft website, and then setting it up on your computer. Once installed, you can access your OneDrive account and start syncing your files to the cloud.
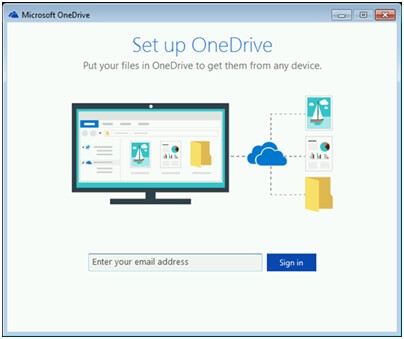
- To start syncing your OneDrive files, install the Windows version of the OneDrive sync app. If you have Microsoft 365 or Microsoft 2016, you already have it installed. Just search for OneDrive in the Start menu to confirm.

- Next, begin with OneDrive Setup.
- Sign up for a Microsoft account, which is free, to access OneDrive, Microsoft Office for the web, Skype, and more. You can sign in with your current email address or phone number, or create a new Outlook.com email address.
- To finish the OneDrive setup, follow all the steps that appear on your screen.
- To access OneDrive settings, click on the OneDrive cloud icon in the notification area on the taskbar, right-click on it, and then select Settings.
- In the Back Up Your Folders dialog box, select all the folders containing files you want to transfer to your new PC.
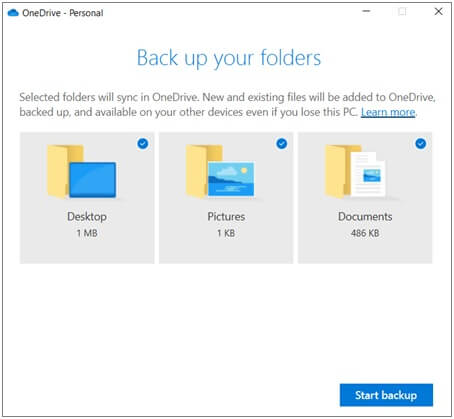
- Now select Start Backup (if you have an older version of OneDrive, select Start Protection).
- To transfer files outside of your Documents, Pictures, and Desktop folders, use Windows Explorer. Open Windows Explorer by pressing the Windows key + E, search for the desired folders, and drag them to OneDrive in the left pane.
- You can check the status of the files uploading to OneDrive by hovering your mouse on the OneDrive cloud icon at the extreme right of the taskbar.
Step 2: Setup Your New Computer
To complete the Windows setup on your new PC, follow the on-screen steps and ensure your computer has access to the Internet throughout the process. When prompted to sign in, use the same Microsoft account you used for setting up OneDrive on your Windows 7 computer.
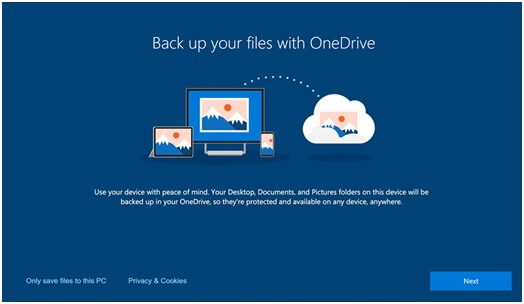
During the Windows setup process, continue clicking "Next" through the steps, including the "Back up your files with OneDrive" screen, and once the setup is complete, you can access your files in File Explorer. Your files from the Desktop, Documents, and Pictures folders on your Windows 7 PC will automatically be available in the same locations on your Windows 11 PC.
Turn on PC folder Backup
If you can't see your files in File Explorer on your Windows 11 PC, you might need to turn on PC folder backup.
To ensure OneDrive is running and syncing your files, you can check if the OneDrive icon is present in the system tray or taskbar, and if it's syncing files by looking for a progress bar or checking the OneDrive app for updates. You can also check the OneDrive settings to see if the syncing is enabled and set to sync all files or specific folders.
- Start by selecting the OneDrive cloud icon in the taskbar.
- Select Help & Settings > Settings.
![]()
- In the settings, choose Backup > Manage backup.
- When the Back Up Your Folders dialog box appears, select all the folders you want to back up.
- Click Start Backup.
- You can close the dialogue box while your files sync to OneDrive, and you can also see the upload progress by selecting View Upload Progress.
Transferring Windows 7 Files to Windows 11 Is Easy with the Correct Tool
Using reliable software, you can transfer Windows 7 files to Windows 11 on your own, with tools like Qiling Disk Master helping to migrate files smoothly and efficiently, or alternatively using an external hard drive or OneDrive.
Related Articles
- 2 Easy Ways to Transfer Dropbox to Google Drive
- 6 Ways to Transfer Large Files from PC to PC (Guaranteed)
- How to Turn on Bluetooth on Windows 11 and Transfer files
- How to Transfer Files from PC to PC Using/Without USB Cable | Check Your Full Guide
- 4 Ways | How to Reinstall Windows Without Losing Games
You can reinstall Windows on your computer without losing your games by following one of the four methods outlined in this article. Whether you need to reinstall Windows for a fresh start or due to a system issue, these methods allow you to keep your games intact. Choose the one that best suits your needs. - Safe Disk Tutorials
Data or Drive Backup Tutorials