How to Move Installed Programs to Another Drive in Windows 11
| Workable Solutions | Step-by-step Troubleshooting |
|---|---|
| Manually Ways |
1. Transfer Programs from C Drive to D Drive using Windows Settings...Full steps 2. Transfer Programs from C Drive to D Drive using Command Prompt...Full steps |
| Qiling Disk Master | Step 1. Launch Qiling Disk Master, choose "App Migration", and click "Start" on the main screen...Full steps |
The low disk space warning on Windows 11 is likely due to the disk space being occupied by system files, user data, and other programs, rather than a single internal disk being used for storage. The system uses multiple disks for different purposes, such as the C: drive for the operating system, the D: drive for user data, and other drives for program files, documents, and pictures.
You can resolve the issue of low performance or space messages on Windows 11 by moving some programs to another drive, which will free up space and improve your PC's performance.
It's recommended to leave 15-20% of free space on your C drive, especially since it stores most of your Windows 11 updates and system settings, to ensure sufficient space for future updates and system settings.
To free up space on your C drive in Windows 11, you can transfer some programs from your C drive to another empty space on your other disk drives, such as a D drive, without uninstalling any programs. This will allow you to run your Windows 11 smoothly.
Moving installed programs to another drive in Windows 11 is a relatively straightforward process. You can either use manual steps or software to quickly transfer programs from the C drive to the D drive or any other drive, making it easy to free up space on your primary drive.
To move installed programs from one drive to another on your Windows 11 computer, follow these steps: First, open the Settings app by pressing the Windows key + I on your keyboard. Then, click on the "System" tab on the left side of the window.
How to Transfer Programs from C Drive to D Drive Manually
If you are a tech-Here are three ways to move installed programs from one drive to another:
1. Transfer Programs from C Drive to D Drive using Windows Settings
To move programs to another drive, use the Apps & Features or Apps & Games settings in Windows. This method relocates partially installed applications from the C drive to the D drive, but doesn't fully transfer all installed programs. If this meets your needs, follow the steps to proceed.
Transfer with Apps & Features
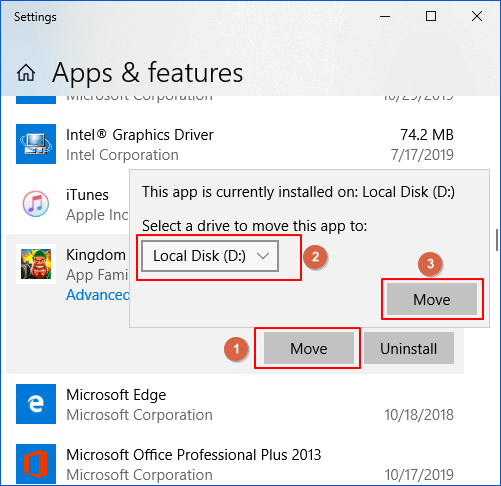
- Right-To access the Apps & Features page, click on the Windows icon and select Apps & Features, or go to Settings > Apps > Apps & Features.
- Select the application you want to transfer, click on the Move button, and choose the drive where you want to transfer the program, such as the D: drive.
- Now, just wait for the move to complete.
Transfer with Apps & Games
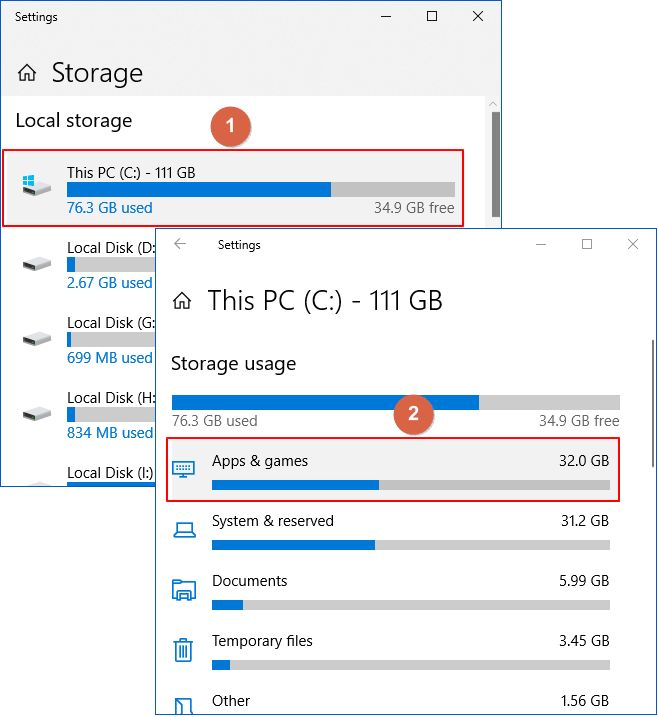
- Open the search bar and type Storage to open it.
- To view the storage usage of your C drive, click on "This PC" (C:) to open it, and then click on "Apps & Games" to see the storage usage of your installed applications and games.
- To move a program to a different drive, go to Settings, then Apps & Features, select the desired program, and click on the Move button. Choose the destination drive, such as D:, to relocate the program.
- Let's wait for a few minutes to complete the transfer and restart your PC once.
2. Transfer Programs from C Drive to D Drive using Command Prompt
Can you handle Windows commands? If yes, you can use the Registry command to move installed programs from C drive to D drive. However, if things don't work as per your plan, small changes in Registry settings can crash your whole system. So, only follow these steps if you are super confident:
- Create a new folder named "Program Files" on the C: drive.
- To move the Program Files folder to a new location, press the Windows key + R to open the Run dialog box. Then, type `cmd` in the Run search box and press Enter.
- Enter the following command line—
Robocopy" C:\ Program Files" " D:\ Program Files" / mir
Robocopy" C:\ Program Files" "D:\ Program Files" / mir
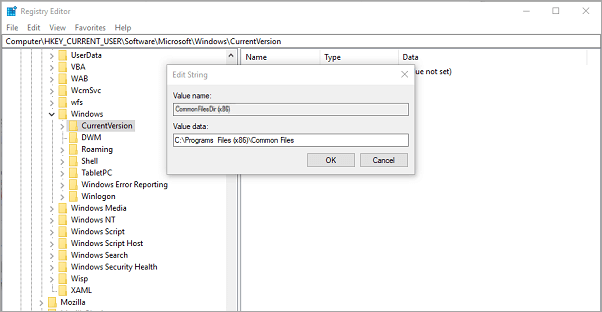
- To find the folder path using prompt in Windows 10/11, open the search box, type "cmd" and press Enter to open Command Prompt. Then, type "cd" followed by a space, and drag and drop the folder you want to find the path for into the Command Prompt window.
The rewritten registry path is "HKEY_LOCAL_MACHINE \ SOFTWARE \ Microsoft \ Windows \ CurrentVersion". This path is used to access the common registry keys that are shared between 32-bit and 64-bit applications on a 64-bit Windows system.
How to Move Installed Program to Another Drive Using Software
If the Move option is greyed out next to the program or you aren't comfortable with the command line, a software is the best option to transfer programs between drives.
Plus, when you have an easy-Fortunately, a transfer tool like Qiling Disk Master is available, eliminating the need for manual hassle. This software can be easily downloaded on Windows 11, and with just three steps, you can successfully migrate your program to another drive.
Here are the easy steps to transfer installed programs from the C: drive to the D: drive using Qiling Disk Master:
Step 1. Launch Qiling Disk Master, choose "Backup and recovery", and click "File sync" on the main screen.

Step 2. Qiling Disk Master will automatically scan and display all the supported programs.
- To change the location of programs, first, find the programs you want to relocate. Select them by clicking on them while holding the Ctrl key (or Command key on a Mac) to choose multiple programs at once.
- To migrate programs, click the triangle icon to select the destination where the programs will be moved.

Step 3. Click "Proceed" to start changing the program installation location.
Note: Just restart your computer after the transfer process is complete to save all the changes.
Bottom Line
Transferring programs between drives is a straightforward process. You can use Windows Settings, Registry Settings, or simply copy and paste files to move them. Alternatively, you can use the free and powerful Qiling Disk Master software to streamline the process and avoid manual hassle.
If your C drive is overburdened, you can use Qiling Disk Master to reduce its burden and improve your Windows 11 performance.
Related Articles
- Top 5 Free File Transfer Software & Best Free PC to PC File Transfer Software
- [microsoft edge vs internet explorer 11] Internet Explorer End of Life! Is Microsoft Edge the Future?
- 3 Ways to Share/Transfer Files Between Two PCs in Windows 11/10
- How to Transfer Files Between Two Different Operating Systems
- Can I Insert My Old Hard Drive Into My New Computer and Have It Working Without Reinstalling Windows?
Do you want to use the old hard drive in a new PC without reinstalling Windows? This guide from Qiling gives you some suggestions to - Can I Reset Windows Without Losing APPs?
Can I reset Windows without losing apps? You are on the right page if you want to know the answer. This short article will tell you whether you can reset Windows without losing apps and how to reset Windows without losing apps.