For Beginner's: Put a Windows 11 PC to Sleep
What Is Windows Sleep Mode
Windows Sleep Mode is a power-saving state where all laptop or PC actions are stopped, and open applications or documents are temporarily stored in RAM, allowing for a quick resume when power is restored, using significantly less power than a fully powered-on system.
In standby mode, non-essential systems receive limited power, while RAM gets constant power for data preservation. The system can be woken up by pressing the power button, typing on the keyboard, or clicking the mouse.
To put a Windows 11 PC to sleep, you can use the Start menu shortcut, the Power button, or the Action Center. You can also use the Power button on your keyboard or the Start menu to access the Power options and select Sleep. Additionally, you can use the Command Prompt or PowerShell to run the command "shutdown /h" to put your PC to sleep.
How to Put Windows 11 to Sleep Mode
Here are the ways to enter sleep mode in one paragraph:
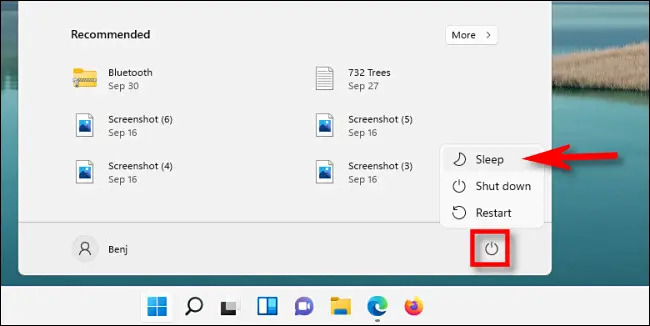
Method 1: Use Start Menu
To put Windows 11 to Sleep Mode, click on the Start Menu, then click on the Power icon in the lower right corner, and select the Sleep option from the menu. This will automatically put your PC to sleep.
Method 2: Use the Power User Menu
To put your Windows 11 computer to sleep, right-click on the Start button, select Shut Down or Sign Out, and then click on Sleep. This will instantly complete the process.
If you're having trouble right-clicking on the Start button, you can try clicking on Windows+X instead to open the menu. This will give you access to the same options as right-clicking on the Start button.
Method 3: Set the Sleep Mode Time in Settings
To make your PC fall asleep automatically after a certain time, open the settings by pressing Windows + I, then select System, and go to Power and battery.
In the Screen and Sleep section, click on the dropdown menu beside the battery power put your device to sleep after option and select an alternative, such as when plugged in, you can put my device to sleep after.
To put your PC into sleep mode, you first need to select an appropriate period, such as 15 minutes or 20 minutes, after which it will automatically turn off if it remains idle.
Method 4: Use Shortcut Key (Ctrl + Alt + Delete)
The sign-To put your Windows 11 to sleep mode, you can either use the screen option or a shortcut. The screen option involves going to the lower right corner of the screen, clicking on the power icon, and selecting the Sleep option from the menu. Alternatively, you can use the shortcut by pressing Ctrl + Alt + Delete on your Windows 11 screen, and then selecting the Sleep option. This will instantly put your PC to sleep.
Method 5: Create Shortcut and Shortcut Keys for Sleep Mode
Step 1: Creating a new shortcut to make your desktop Sleep
To create a new shortcut on Windows 11, click on an empty spot on the desktop and select New Shortcut Windows. This will open a shortcut wizard, prompting you to choose what item you'd like to create a shortcut for.
The wizard will prompt you to enter the location of the item you wish to create a shortcut for. You'll then type: C:\Windows\System32\rundll32.exe powrprof.dll,SetSuspendState.
The process involves creating a shortcut on the desktop, naming it, and then clicking on finish to proceed. This will create a functional desktop icon that, when double-clicked, will put the PC to sleep mode.
Step 2: Selection of Proper icon for the shortcut of Sleep mode
For this, you need to right-To change the icon of a shortcut, click on the shortcut and then select the Properties option. From there, you can find the Change icon option.
Tip: You may receive a warning that the icon does not contain any icons, but you have to click on OK to proceed. However, this is not a problem and you can safely ignore it.
To access the icons, click on the icon button, which will redirect you to a list of many different icons. You can then pick any one that suits your preference.
To confirm the perfect icon, click on OK, and then proceed with the next step.
Step 3: To pin the new icon of a shortcut to Windows 11 sleep mode to the taskbar, you can create a shortcut to the sleep mode, then right-click on it and select "Pin to taskbar". Alternatively, you can also use the "Power" option in the Start menu to create a shortcut to the sleep mode, then right-click on it and select "Pin to taskbar".
To pin the sleep mode shortcut to the taskbar, right-click on the shortcut icon, select "Show more options," and then choose "Pin to Taskbar."
Step 4: Checking if the new shortcut for sleep mode is working
The PC may enter hibernation when clicking on a shortcut, but this is distinct from sleep mode.
How to Manage when Windows 11 Goes to Sleep Mode
Windows 11 has a feature that shuts down certain hardware after a period of inactivity or when running in low-power mode, helping to conserve battery power. However, if you'd like to adjust the default sleep mode settings, you can make changes to suit your preferences.
To wake up a computer from sleep mode, you can simply press the power button on the device. This will immediately shut down the computer and then restart it, effectively waking it up from its sleep mode.
- You can press any standard key on the keyboard.
- You can press the shortcut for SLEEP on the keyboard.
- You can move the mouse.
- You can press the power button quickly on your PC.
Tip: If you're using Bluetooth devices, you might not be able to wake up the system.
It is recommended to use a specified data backup software and follow specific steps to back up data on PCs in case sleep mode causes data loss, utilizing Qiling Backup for fails, systems, disks, or partitions backup.
Step 1. To initiate a backup, click the File backup button.

Step 2. On the left, both local and network files will be shown, allowing you to browse and select the desired backup files from the directory.

Step 3. Follow the on-screen instructions to select a location to store the backup, such as an external hard drive or a cloud storage service like Google Drive or Dropbox.

Step 4. To encrypt the backup with a password, click "Options" in the "Backup Options" section, allowing you to customize the backup process according to your needs.

To specify the backup schedule, click Backup Scheme and choose the desired backup frequency, such as daily, weekly, or monthly, and the start time of the backup. This allows for automatic and regular backups of the data.

Step 5. The backup may be stored on a local disk, Qiling's online service, or NAS.

Step 6. Qiling Backup allows customers to back up data to both a third-party cloud drive and Qiling's own cloud drive.
To back up data to a cloud drive, select Local Drive, scroll down to add Cloud Device, and then add and log in to your account provided by a third party.
Step 7. Click Proceed to begin the backup process. The backup job will be presented as a card on the list view of the panel after it has been finished. Click the backup job to handle it further.

PC Won't Go to Sleep Mode in Windows 11
If your PC is not going to Sleep Mode in Windows 11, don't worry - we have some fixes to help you resolve the issue.
Fix 1: Check Sleep Settings
Step 1: Open Run by pressing Windows key +R.
Step 2: You have to write powercfg.cpl and click on OK.
Step 3: From the left menu, click on Choose when to turn off the display.
Step 4: Here, you can check the power settings. If you think they are incorrect, you can change them.
Fix 2: Disable Screensaver
Step 1: To change the screen saver on your Windows 11 computer, type "Change screen saver" in the search bar. This will open the Display settings page, where you can select a screen saver from the list of available options and configure its settings as desired.
Step 2: From the dropdown menu, select the None option.
Fix 3: Using Windows Troubleshooter
Step 1: To get started, open the Windows key + I to access the Settings menu.
Step 2: Now, you need to click on Update and security.
Step 3: You need to click on Troubleshoot from the left menu.
Step 4: You need to scroll down and click on the Power option.
Step 5: To resolve the issue, click on the Start button, then click on Settings. From the expanded menu, click on Update & Security.
Step 6: After the troubleshooter has completed its operation, you can verify if the sleep option has started working.
Fix 4: Go for A clean Boot.
If Windows 12 is unable to sleep due to third-party software, you may need to try a clean boot mode on your PC. This will allow you to see which Windows services and programs are running, and prevent any third-party software from starting when you boot up your PC.
Fix 5: Scanning PC for any Malware or Virus
If you're unsure if a virus is affecting your PC, it may cause system issues and prevent it from running properly. To troubleshoot, install a reputable antivirus software or scan your PC with the one you have, then check if the problem persists.
Sleep Mode, Hibernate, and Standby in Windows 11
If you're looking to save power on your device, you should know about Hibernate, Standby, and Sleep modes. Hibernate and Standby are two power-saving modes that exist alongside Sleep mode, each with its own unique characteristics. Hibernate mode is a deeper power-saving mode that shuts down your device's hardware, but still retains its system state, allowing it to quickly resume from where it left off.
Hibernate is similar to Sleep mode, but instead of running apps in RAM or saving open docs, it saves them on the hard disk. This shuts down the PC entirely, with everything resuming as soon as it's turned back on.
Standby mode helps conserve the PC's power when it's left idle, indicated by a flashing amber light. When work resumes, the light turns green.
Sleep Mode vs. Hibernate Vs. Standby
| Serial no. | Basis | Sleep Mode | Hibernate | Standby |
| 1 | Energy Use | 12 Watts | 0 Watts | 1-6 Watts |
| 2 | Time to Sleep/Wake | 1 minute | 30 sec-3 min | Few seconds |
| 3 | Saving | Saves Less energy | Saves More energy | Saves less energy |
| 4 | Full Operation Time | Takes less time to resume to full operation | Takes time to come to full operation | Resumes quickly to full operation |
Conclusion
We've provided a step-by-step guide on how to put a Windows 11 PC to sleep, offering multiple methods to choose from. We've also addressed common issues related to sleep mode and clarified the differences between Sleep mode, Hibernate, and standby, making this a comprehensive beginner's guide to help you competently apply these solutions.
Related Articles
- Fix Windows 11 Won't Shut Down with 10 Easy Solutions
- Know All: Qiling Backup Security Zone
- Does Windows File History Backup Everything? Know More About File History
- How Windows 11 Prevent You from Malware Attack with New Security Features
- How to Back Up Windows 7 in Different Ways - Full Steps with Pictures
If you want to back up your data on Windows 7, you can follow this guide to learn how to back up your system to a USB or external drive. Alternatively, you can use a third-party tool that offers a better solution for backing up your data. - How to Back Up Your Files in Windows 11 and Downgrade Back to Windows 10
If you're planning to downgrade from Windows 11 to Windows 10, you'll want to back up your files first. Fortunately, backing up your files in Windows 11 is a straightforward process. You can use the built-in File History feature to automatically back up your files to an external drive or network location.