Does Windows File History Backup Everything? Know More About File History
Windows has a default backup program called File History, which was introduced in Windows 8 and became the main backup tool in Windows 10. It allows users to automatically back up their files to an external drive connected to their PC.
File History makes it easy to back up Windows content, but there are several questions surrounding the program, including whether it backs up everything on Windows. If not, what's the next best solution?
Windows File History is a feature that allows you to automatically back up your files to an external drive. It creates a copy of your files at regular intervals, so you can recover them if something goes wrong. You can set it up to back up files from any drive, including your desktop, documents, and pictures folders.
***What are Windows 10 recovery tools available to use? Click the article to know more.
How to Turn On File History on your PC?
To create a backup of your vital data on Windows 10 using the File History, connect an external drive to your computer, then select the Settings from the Start menu and follow the steps to set up File History.
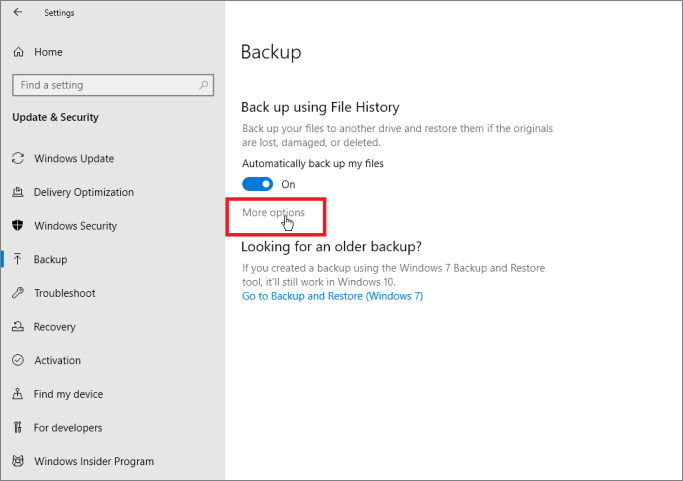
Step 1. To back up your Windows device, go to Settings > Update & Security > Backup, and then select Backup Using File History.
Step 2. To set up Windows 10 backup, you need to tell it where to keep backup copies. In most cases, Windows automatically recognizes the backup location, but if not, you can click on More Options > Backup Options > See Advanced Settings to select an external drive attached to your device and turn on backup.
Step 3. If you've already chosen a backup location, you can turn on the "Automatically Backup My Files" feature, and Windows will start backing up your files to your hard drive.
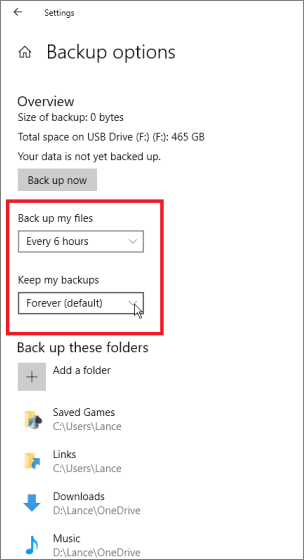
By default, Windows has a backup feature that automatically saves files every hour, but you can adjust this and other settings to suit your needs.
Does Windows File History Backup Everything?
Windows File History will backup all files and folders on your computer, but there are some exceptions. It does not back up system files, operating system files, and certain system folders, as these are typically managed by Windows itself. It also does not backup files that are in use, like open documents or running applications.
Windows File History can only back up certain files like documents, pictures, videos, music, or offline OneDrive files, but not programs, system, settings, or other data.
If you only want to back up basic files on Windows 10, File History is the best option for you. Once File History is active on your computer, you can configure it by selecting the folders or files you want to back up and choosing the destination for the backup.
File History, by default, backs up folders such as Desktop, Downloads, and Media. If you want to exclude some of these folders from the backup, you can scroll down to the Backup option window and click on the "Remove" button next to the folder you want to exclude. This will prevent that folder from being backed up.
You can also configure how long you want to keep back up data and where you wish to store backup files on your hard drive.
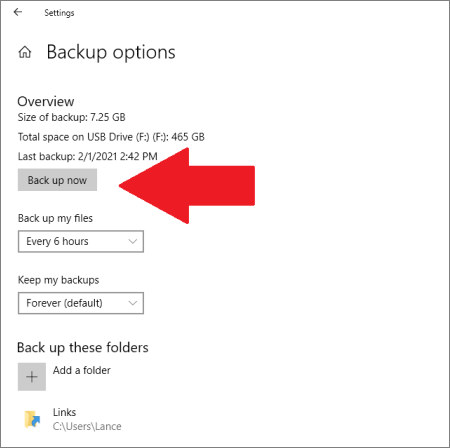
After setting up File History, click the Backup Now button to start backing up your selected files to your chosen location, which will typically take a few minutes to complete.
How to Restore File History Backup?
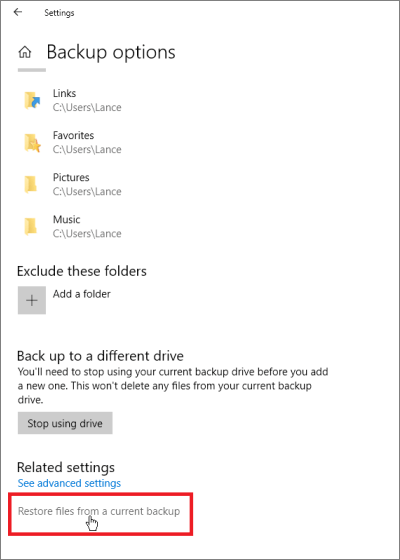
File History can help you restore deleted or corrupted files by allowing you to flip through different file versions, compare them, and restore the right one.
Here you can restore File History backup as follows:
Step 1. To restore items from File Explorer, click on the File Explorer and select the folder containing the items you want to restore.
Step 2. To access your browsing history, click on the Home tab on the top of your folder and then click on the History button.
Step 3. Select the item you want to restore.
Step 4. You can browse through various versions of the item you're looking to recover, allowing you to select the one that best suits your needs.
Step 5. Once you find the right version, click on the Restore button to restore it.
Step 6. If there's a file name conflict, a window will pop up offering options to replace the file in the destination folder, skip the file, or compare info for both files. You can select the desired option based on your preference.
Step 7. Now, exit the File History window and go to the location where your file was restored.
Free Up File History Drive Space
File History constantly backs up and protects files, but this can lead to full disk space and the accumulation of older file versions, which the software does not automatically delete.
To free up disk space when your storage is full, you can delete File History back up data by going to Settings > Update & Security > Backup, clicking on the "Manage backup" button, and selecting the "Free up space" option. Alternatively, you can also use the Control Panel to delete the backup data. Additionally, if you have a separate drive for backups, you can also delete the backup files directly from that drive.
1. Change Backup Settings
- Go to the File History > Advanced Settings.
- Click on the drop-down menu and choose 'Until the space is needed' and save the changes.
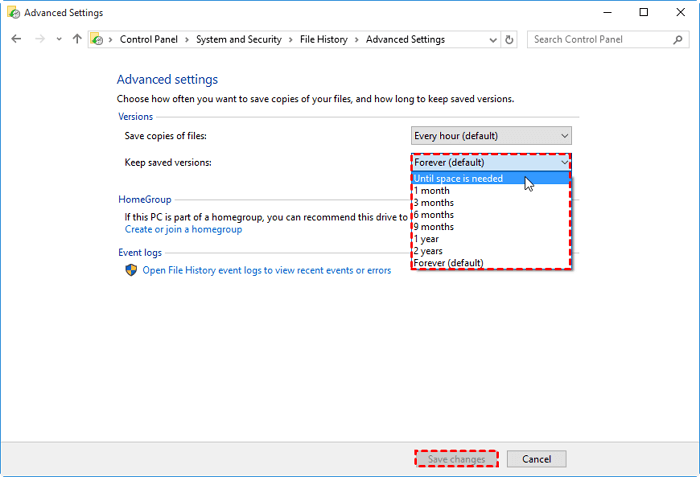
After this, the data will only be saved until your disk has enough space.
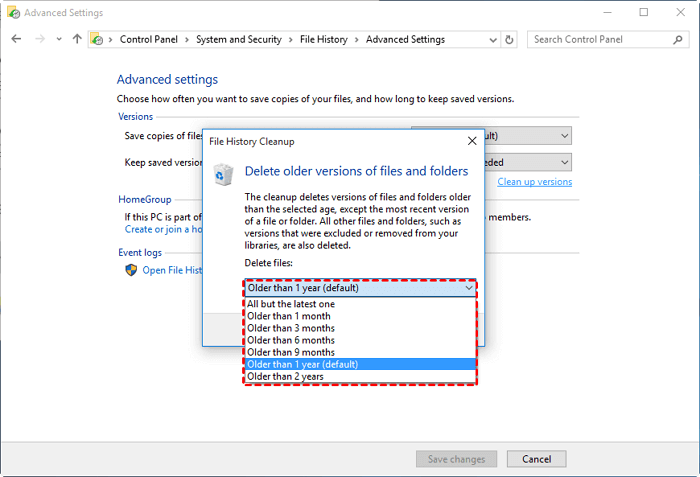
2. Delete Older File Versions
- To clean up versions in File History, go to File History > Advanced Settings > Clean up versions.
- To delete files, select the time under "Delete files" and click on the "Cleanup" option.
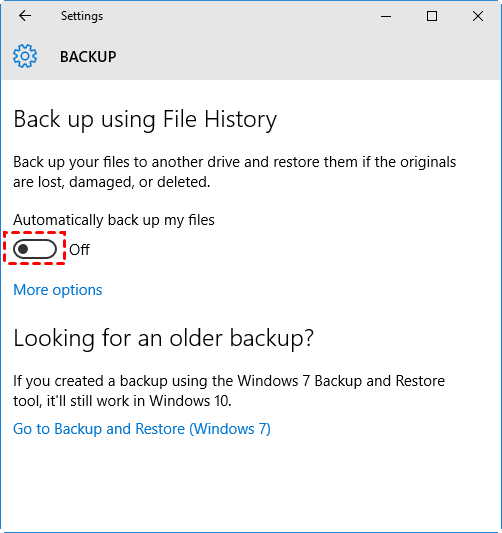
3. Completely Delete All Backups
- To disable automatic file backups, go to Settings, then Update & Security, followed by Backup. Toggle the switch under Automatically back up my files to the off position.
- Open the backup drive and delete the FileBackup folder.
You now know how to set up File History, backup, restore, and delete files on it. While File History is a default Windows backup software, it's worth noting that it doesn't back up everything, so you may still need to use other backup methods to ensure your important files are fully protected.
To find a suitable replacement for File History on Windows 10, you can consider using an external hard drive or a cloud storage service like OneDrive or Google Drive to back up your files. This will not only provide a more robust backup solution but also free up space on your local drive.
Back up More Content without Running Out of Drive Space
Qiling Backup is the best third-party backup solution in this situation, as it can overcome the limitations of File History, such as.
- This feature allows for automatic deletion of old backup versions, eliminating the need for manual removal of unwanted backups.
- This service allows you to back up your files to cloud storage, offering 1TB of cloud storage with higher-tier plans.
- It can facilitate backup programs, system settings, and many other files, making it easier to manage and maintain your computer's data.
- I can schedule backups to run at specific intervals, such as daily, weekly, or monthly, and run data backups as often as you want.
- You'll have four interactive backup modes to choose from: Full, Incremental, Differential, and Scheduled backup. These options allow you to tailor your backup strategy to suit your needs.
- Generates real-To stay informed at every stage of the backup process, consider implementing a time back up system with regular reports. This will keep you up-to-date on the status of your backups, providing peace of mind and allowing you to quickly identify and address any issues that may arise.
Qiling Backup offers a more comprehensive solution than File History, with a simple and straightforward approach to backing up and restoring data. If you're interested in trying it out, you can download it and follow these steps to see how it works.
Step 1. To start backup, click the File backup button.

Step 2. On the top tree view, you'll see a list of local and network files, which can be expanded to select the files to be backed up.

Step 3. Follow the instructions on the screen to select the desired location for storing the backup.

Step 4. To encrypt the backup with a password, click on "Options" in the "Backup Options" section. This allows you to customize various features to suit your needs and tailor the backup operation to meet your specific requirements.

To specify the backup schedule and choose whether or not to start the backup at a certain event, go to Backup Scheme and select the desired schedule from the dropdown menu. You can choose from options such as daily, weekly, monthly, or custom schedules.

Step 5. Backups can be stored on a local disk, in Qiling's cloud service, or on a network attached storage device (NAS) for secure and convenient data preservation.

Step 6. Qiling Backup allows customers to back up data to a third-party cloud drive or the company's own cloud storage.
To back up your data to a third-party cloud drive, select Local Drive, scroll down to add Cloud Device, and enter your account information.
Step 7. To initiate a backup, select the Proceed option. Once the backup process is complete, it will be displayed as a card on the left-hand panel. For more detailed control over the backup job, right-click on it.

Sum Up
File History is a useful tool for backing up basic files on Windows 10, but it may not be sufficient for larger backup volumes or backing up apps.
Qiling Backup is considered the best free alternative for Windows File History because it offers more features and flexibility, making it a more comprehensive backup solution for users.
- It can back up everything on Windows
- It won't consume space on your drive
- And, offers many additional features
If File History is no longer sufficient for you to back up your data, download the Qiling Backup now.
Related Articles
- Guideline: Backup Specific Folders to OneDrive on Windows 10/11
- 3-Minute Guide on Backup vs. Sync
- How to Upgrade Acer Aspire Laptop to SSD
- Is Vimm's Lair A Safe Site to Download Games?
- How to Back Up OneDrive to NAS like Synology or QNAP in Windows
How can you back up OneDrive to NAS when the built-in tools of Synology or QNAP only supports NAS to cloud backup or synchronization? In this post, I'll share a powerful backup tool to do the job with flexible options. - How to Back Up Outlook Emails before Deleting Account (2 Ways)
This tutorial will show you how to back up Outlook emails before deleting account to have peace of mind knowing that you are in control of your data.