How to Transfer Photos from Google Photos to Gallery? Follow the Guide!
| Workable Solutions | Step-by-step Troubleshooting |
|---|---|
| To transfer photos from Google Photos to the mobile phone's gallery, you can follow these steps: |
1) Transferring on iPhone...Full steps 2) Transferring on Android...Full steps |
| #2. Transfer Photos from Google Drive to Gallery on Computer | Step 1: Open Google Drive on your computer; Step 2: Head to "Recent", "My Drive", or any Folder...Full steps |
| Extra Tip: Share Photos between 2 PCs/Drives | Step 1. Open Qiling Disk Master on both of your computers. Choose "PC to PC" to go to the next step...Full steps |
1. Open Google Photos on your device. 2. Tap the three horizontal lines on the top left corner.
Google Photos has over 1 billion users, a number it reached nearly three years ago, and has likely added more since then. The app has a significant following on both Android and iOS platforms, with a roughly equal number of users on each operating system.
Transferring photos from Google Photos to a device's gallery can be a troublesome process for many users. However, it is solvable and can be done without hassle.
Why You Might Want to Transfer Your Photos
Google Photos is the default gallery app on Android phones, and it's been that way for a while. To transfer photos from Google Photos to a gallery, it's essential to understand one key thing.
One notable feature of this system is its automatic backup capability, which can be customized and adjusted to suit individual preferences.
Here are a few reasons why you might want to transfer your photos:
- To secure them offline
- To access them without the internet
- To copy the contents of your phone to another device, you can use the "Backup & Reset" feature in the Settings app. This will allow you to transfer your data, such as contacts, photos, and apps, to the new device. Alternatively, you can use a cloud service like Google Drive or iCloud to store your data and then access it from the new device. You can also use a USB cable to connect your phone to the computer and transfer the data manually.
- To create some space in Google Drive
With modern phones taking high-quality photos that can easily exceed 1MB in size, it's not uncommon for users to accumulate a large collection of photos on their Google Drive. As a result, adding hundreds or even thousands of photos to the platform can quickly consume a significant amount of online storage space. To mitigate this issue, many users now opt to remove or transfer their photos from Google Photos to free up some space.
#1. Transfer Photos from Google Photos to Gallery on Mobile phone
Transferring photos from Google Photos to an Android gallery is a simple process. Since Google Photos also stores photos saved in Drive, including those received or sent on WhatsApp and taken with the camera, you can easily move them to your device's gallery.
To transfer photos from Google Photos on an iPhone, you can use the Google Photos app to export photos to iCloud, then use the Photos app on your iPhone to transfer the photos to your computer. Alternatively, you can use the Google Takeout service to download your Google Photos library in a compressed archive, which can then be transferred to your computer.
1) Transferring Photos from Google Photos on an iPhone
Step 1: Open Google Drive on your iOS device, i.e., iPad or iPhone.
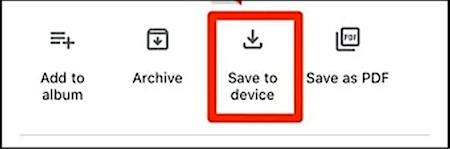
Step 2: 1. Go to the section where photos are stored, such as "My Drive" or "Recent". 2. Select the image(s) you want to download or save to the gallery by holding and picking them. 3.
Step 3: Click on the top-left drop-down menu.
Step 4: Pick "Save to device".
Step 5: The Photos app will continue to save images in your iPhone's gallery or Camera roll.
2) Transferring Photos from Google Photos on an Android
Transferring photos from an Android device to a computer is also a convenient process. You can use a USB cable to connect your Android phone to your computer, and then transfer the photos to your computer using the built-in file transfer feature or a third-party app like Google Photos. Alternatively, you can also use a cloud service like Google Drive or Dropbox to upload your photos to the cloud and then access them from your computer.
Step 1: Open Google Drive.
Step 2: To save recently uploaded pictures, go to "Recent" or explore folders and files by clicking "My Drive".
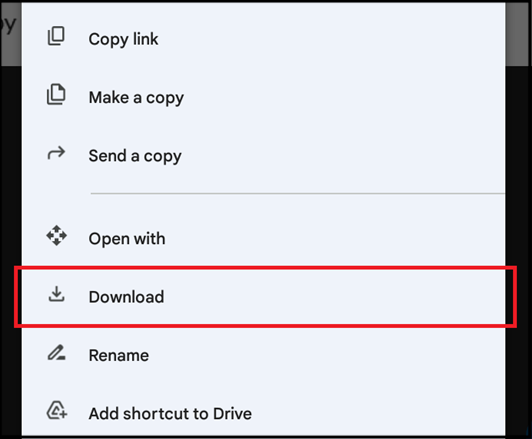
Step 3: To save a photo, select and hold on to one photo, then pick multiple. Alternatively, choose the one image that you wish to save to the gallery and open it.
Step 4: Head to the drop-down menu and select "Download".
Step 5: If you select multiple files, you can also choose to download them by selecting "Download" from the drop-down menu, which will save the files to your gallery.
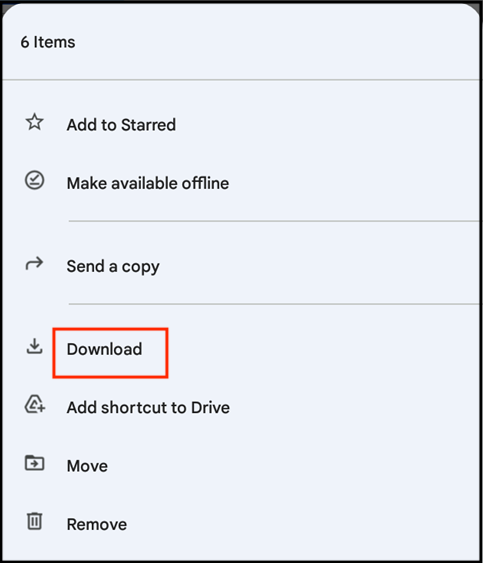
To download multiple files on Android and iPhone, you can simply select the desired number of images you want to download. Alternatively, you can move all your photos into a specific folder on Google Drive or Photos. This makes it easy to manage and access your photos in one place.
Once you're done, you can use the same process to download the entire folder to your computer, saving time and downloading multiple photos at once.
#2. Move Photos from Google Drive to Gallery on Computer
When learning how to transfer photos from Google Photos to the gallery, you can also download pictures on your computer, and then transfer them to your phone once they're stored. This can be a helpful alternative to directly transferring photos from Google Photos.
Here's how you can do it:
Step 1: Open Google Drive on your computer.
Step 2: To view your saved photos, navigate to the "Recent", "My Drive", or any other folder where your photos are stored.
Step 3: Select the files you wish to download. Click "Download".
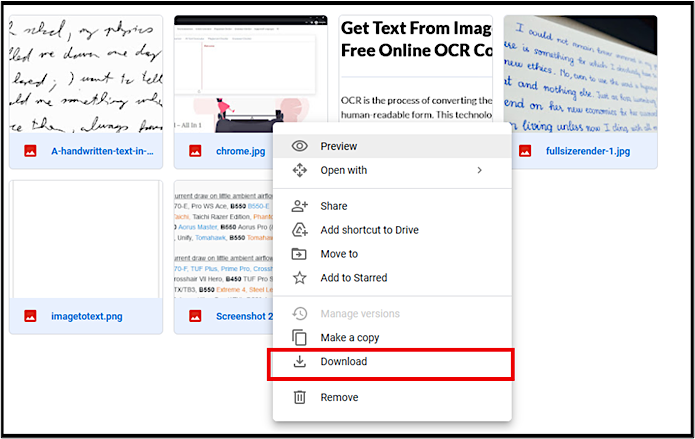
Google will download your files in the shape of a ZIP folder. So, now that the files are on your computer, it's imperative to place them in one folder, typically the primary download folder, which can be accessed by heading to "This PC > Download".
Step 4: Now that your phone is connected to your PC, you can transfer files from your phone to your PC, or vice versa. You can also use your phone as a camera to take photos of things on your desk, or use your PC to charge your phone. The possibilities are endless!
Step 5: On your phone, pick "Transfer Files" when prompted.
Step 6: Head to your phone's storage.
Step 7: I'll copy the folder with the pictures and paste it into your phone.
Copying and pasting photos to your phone from a computer is a convenient and quicker option. This method allows you to preview your pictures and select only the ones you want to save, making the process more efficient.
Extra Tip: Want to Share Photos between 2 PCs/Drives?
You might be thinking, "What if I could avoid all this hassle?" Fortunately, there's a solution. Understanding how to transfer photos from Google Photos to the gallery can be a bit overwhelming, but don't worry, Qiling Disk Master can make it easier.
Step 1. Open Qiling Disk Master on both of your computers. Choose "File sync" to proceed.

Step 2. To connect two PCs via the network, enter the password or verification code of the target PC, and ensure you've selected the correct transfer direction. Then, click "Connect" to proceed.
The verification code is located in the top right corner of the main screen on the target computer, specifically in the "PC to PC" section.

Step 3. Select the specific files you want to transfer, and you can also customize the storage path for transferred data by clicking the Edit icon.

Step 4. Click "Proceed" to begin transferring files from PC to PC, and wait for the transfer to complete based on the file size.
The tool's common use include:
- Move installed programs to another drive windows 11.
- Send files and photos from one PC to another.
- Transfer from cloud to PC.
This third-Party data transfer software can help you easily share photos between devices by creating backups that can be used on multiple computers, making it convenient to share photos across devices without any added hassle.
Final Thoughts
To transfer photos from Google Drive to your iPhone or Android phone's gallery, you can use various methods, such as downloading the photos and then transferring them to your device, using a cloud storage app that allows direct transfer, or using a third-party app like Google Photos. Choose the method that works best for you, and consider using a backup tool like Qiling Disk Master to create copies of your files and avoid potential issues in the future.
Related Articles
- How to Transfer Files from iCloud to PC [Full Guide]
- How to Transfer Opera with Bookmarks to a New PC
- Zinstall Review and Zinstall Free Alternative You Must Know in 2022
- Windows Profile Migration Tool Free Download with How-to Guide 2022
- How to Extract Files from a Broken Laptop [Full Guide]
If your laptop won't turn on and you have important data on the hard drive, don't worry - you can still extract files from a broken laptop. Although the PC can't boot, the hard disk can still be accessed, and professional recovery software can help recover any lost files. - [Detailed Guide] How to Factory Reset HP Laptop
To sell your HP laptop or replace broken parts, it's essential to reset the device to its factory settings to protect your personal data from unauthorized access. There are two ways to achieve this on your laptop, and we'll guide you through the process.